Minuteman E26 ECO / H26 ECO Operator Manual
User Manual
E26ECO Walk-Behind Scrubber
Traction Drive Disc Deck

This manual is furnished with each new MINUTEMAN E26ECO. This provides the necessary operating and preventive maintenance instructions. Operators must read and understand this manual before operating or servicing this machine.
This machine was designed to give you excellent performance and efficiency. For best results and minimal cost, please follow the general guidelines below:
- Operate the machine with reasonable care.
- Follow the manufacturer’s suggested maintenance instructions as provided in this booklet.
- Use original Minuteman supplied parts.
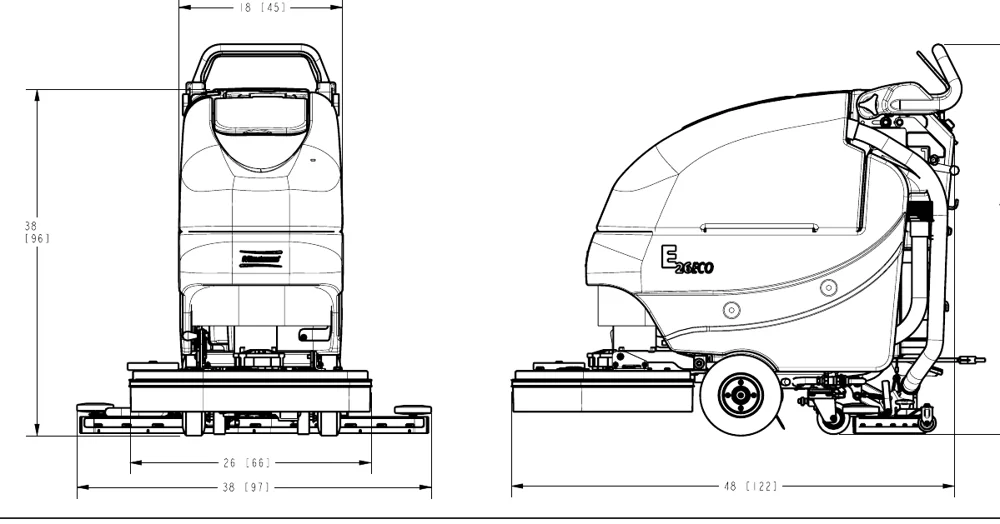
Technical Specifications
| Model | E26ECO |
|---|---|
| Model No. | E26ECOQP, E26ECOQPG |
| Current (Max) | 40 amps |
|---|---|
| Battery Capacity (Lead Acid) | 140Ah @ 20 hr |
| Battery Capacity (Gel) | 95Ah @ 20 hr |
| Sound Level | 69 dBA |
| Cleaning path width | 26 in (65 cm) |
| Squeegee width | 38 in (95 cm) |
| Productivity | 30,500 ft2/hr (2830 m2/hr) |
| Working Speed | 2.7 mph (4.3 km per hr) |
| Transport Speed | 2.7 mph (4.3 km per hr) |
| Rated voltage | 24 volts |
| Vacuum flow | 65 cfm (110 m3/hr) |
| Vacuum waterlift | 45 inches (112mbar) |
| Vacuum power | .60 HP (450 W) |
| Brush type | Disc |
| Brush motor(s) power | 3/4 HP (550W) |
| Number of brushes | 2 |
| Brush RPM | 180 RPM |
| Solution capacity | 12 Gal (45 liters) |
| Recovery capacity | 13 Gal (49 liters) |
| Working Grade | 2% |
| Weight with batteries | 370lbs (168 kg) |
| Weight without batteries | 235 lbs (107 kg) |
| Dimensions (LxWxH) | 48 x 26.0 x 38.0 (112.8 x 47.8 x 107.4 cm) |
| Drive Motor Power | 1/5 HP (150W) |
Table Of Contents
| Topic | Page |
|---|---|
| Safety Instructions | 6 |
| Unpacking Instructions | 7 |
| Inspection | 7 |
| Electrical | 7 |
| Batteries | 7 |
| Operator Responsibility | 7 |
| Machine Overview | 8 |
| Controls | 10 |
| Bail Handle | 11 |
| Handle Adjustment Knobs | 11 |
| Key Switch | 11 |
| Direction Switch | 11 |
| Squeegee Lift Lever | 11 |
| Battery / Fault Gauge | 11 |
| Speed Control | 11 |
| Charge Status Indicator | 11 |
| Optional Hour Meter | 12 |
| Vacuum Hose Routing | 13 |
| Circuit Breakers | 13 |
| Battery Compartment | 14 |
| Diagnostic Code Guide | 15 |
| Machine Overview | 15 |
| Handle Adjustment | 16 |
| Angle Adjustment | 16 |
| Horizontal Adjustment | 17 |
| Solution Tank Drain Hose | 18 |
| Solution Level Indicator | 18 |
| Solution Fill Filter | 19 |
| Recovery Tank Drain Hose | 19 |
| Screened Float | 20 |
| Screened Float Removal | 21 |
| Topic | Page |
|---|---|
| In-Line Solution Filter Assembly | 22 |
| Rear Squeegee | 23 |
| Cleaning the Squeegee | 23 |
| Changing the Squeegee Blades | 23 |
| Squeegee Blades | 24 |
| Angle Adjustment | 24 |
| Squeegee Blades | 25 |
| Height Adjustment | 25 |
| Brush Deck | 26 |
| Brush Loading / Unloading | 26 |
| Aquastop Solution Control | 27 |
| The E26ECO | 28 |
| Machine Operation | 30 |
| To Turn ON Machine: | 30 |
| To Turn ON Vacuum: | 30 |
| To Turn ON Brush Motor: | 30 |
| To Turn on Cleaning Solution: | 30 |
| Direction Switch: | 30 |
| Speed control: | 30 |
| Driving: | 30 |
| To Charge Batteries: | 31 |
| Hour Meter (Optional): | 31 |
| After Use | 32 |
| Maintenance | 33 |
| Troubleshooting | 36 |
| Warranty | 38 |
Safety Instructions
IMPORTANT SAFETY INSTRUCTIONS
Operators must read and understand this manual before operating or maintaining this machine.
Do not operate this machine in flammable or explosive areas.
This machine is designed solely for scrubbing dirt and dust in an indoor environment. Minuteman does not recommend using this machine in any other capacity.
The following information below may cause a potential hazard to the operator and equipment. Read this manual carefully and be aware when these conditions can exist. Take necessary steps to locate all safety devices on the machine and train the personnel operating the machine. Report any machine damage or faulty operation immediately. Do not use machine if it is not in proper operating condition.
FOR SAFETY DURING OPERATION
Keep hands and feet clear of moving parts while machine is in operation.
Make sure all safety devices are in place and operate properly. All covers, doors and latches must be closed and fastened before use.
During operation, attention should be paid to other persons in the work area and especially if small children are present.
Electric motors and components can cause an explosion when operated near explosive materials or vapor. Do not operate this machine near flammable materials such as solvents, thinners, fuels, grain dust, etc.
Store or park this machine on a level surface only. To prevent unauthorized use, machine should be stored or parked with the key removed.
This machine is designed for level operation only. Do not operate on ramps or inclines greater than 2%.
This machine is not suitable for picking up hazardous dusts.
Use caution when moving this machine into areas that are below freezing temperatures. Any water in the tanks or hoses can cause damage to the machine.
FOR SAFETY WHEN SERVICING or MAINTAINING MACHINE
Stop on level surface.
Disconnect the power to the machine by unplugging the red Battery connector located under the recovery tank near the batteries.
Avoid moving parts. Do not wear loose jackets, shirts, or sleeves when working on machine.
Avoid contact with battery acid. Battery acid can cause burns. When working on or around batteries, wear protective clothing and safety glasses. Remove metal jewelry. Do not lay tools or metal objects on top of batteries.
Charging batteries generates explosive gasses.
Do not charge batteries when open flames or sparks are present. Do not smoke.
Make sure the charger is turned off before disconnecting it from the machine.
Charge the batteries in a well-ventilated area with the battery cover removed completely.
Do not clean machine with a pressure washer.
Authorized personnel must perform repairs and maintenance. Use Minuteman supplied replacement parts.
SAVE THESE INSTRUCTIONS
Unpacking Instructions
Inspection
Carefully unpack and inspect your E26ECO Walk-Behind Scrubber for shipping damage. Follow unpacking instructions on shipping pallet. Each unit has been tested and thoroughly inspected before shipment. Any damage is the responsibility of the delivery carrier who should be notified immediately.
Electrical
This machine is battery operated and designed to operate on 24 volts DC (2) 12-volt batteries.
Batteries
The recommended batteries are rated 140Ah WET (Minuteman P/N 956140) or 95Ah Maintenance Free GEL (Minuteman P/N 956100). We do not recommend mixing AMP hour capacities. Alternate battery sets can be used if they equal physical size and capacity. If alternate battery sets are used please contact Minuteman for on board charger settings.
Operator Responsibility
Read this manual carefully before operating this machine.
The operator is responsible for taking care of the daily maintenance and check ups of the machine to keep it in good working condition. The operator must inform the service mechanic or supervisor when the scheduled maintenance intervals are required as stated in the MAINTENANCE section of this manual.
Before starting familiarize yourself with the machine and its controls (see “Machine Overview, Front”, “Machine Overview, Rear”, “Control Console” diagrams).
Machine Overview
Machine Overview - Front
| Key | Part |
|---|---|
| A | CUP HOLDER |
| B | SOLUTION FILL PORT |
| C | RECOVERY TANK LID |
| D | RECOVERY TANK |
| E | BRUSH DECK |
| F | FRONT WHEEL (see note) |
| G | REAR CASTER |
| H | SOLUTION TANK |
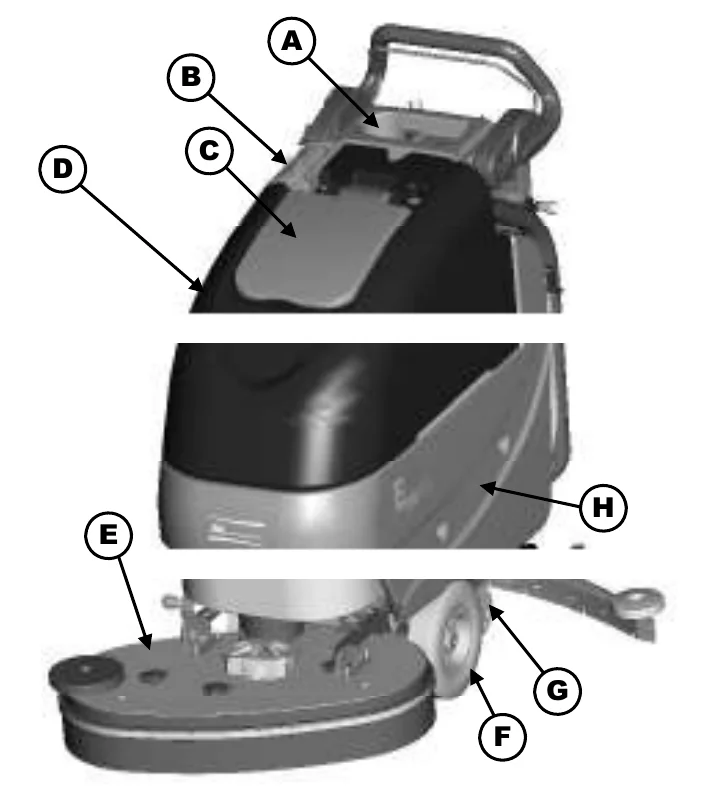
Machine Overview
Machine Overview - Rear
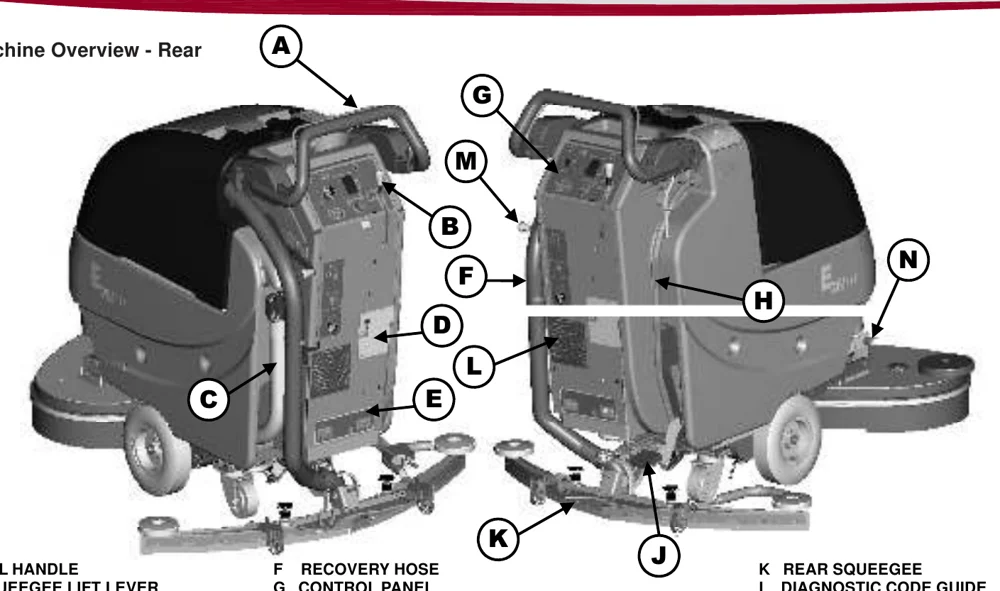
| Key | Item |
|---|---|
| A | BAIL HANDLE |
| B | SQUEEGEE LIFT LEVER |
| C | RECOVERY TANK DRAIN HOSE |
| D | ONBOARD CHARGER CORD |
| E | CIRCUIT BREAKERS |
| F | RECOVERY HOSE |
| G | CONTROL PANEL |
| H | SOLUTION TANK DRAIN HOSE / LEVEL INDICATOR |
| J | BRUSH DECK LIFT PEDAL |
| K | REAR SQUEEGEE |
| L | DIAGNOSTIC CODE GUIDE |
| M | SOLUTION CONTROL LEVER |
| N | DECK TILT HANDLE |
Machine Overview
Controls
| Key | Control |
|---|---|
| A | BAIL HANDLE |
| B | HANDLE ADJUSTMENT KNOB |
| C | KEY SWITCH |
| D | DIRECTION SWITCH |
| E | SQUEEGEE LIFT LEVER |
| F | BATTERY / FAULT GAUGE |
| G | SPEED CONTROL |
| H | CHARGE STATUS INDICATOR |
| J | SOLUTION CONTROL LEVER |
| K | AQUASTOP SOLUTION SETTING |
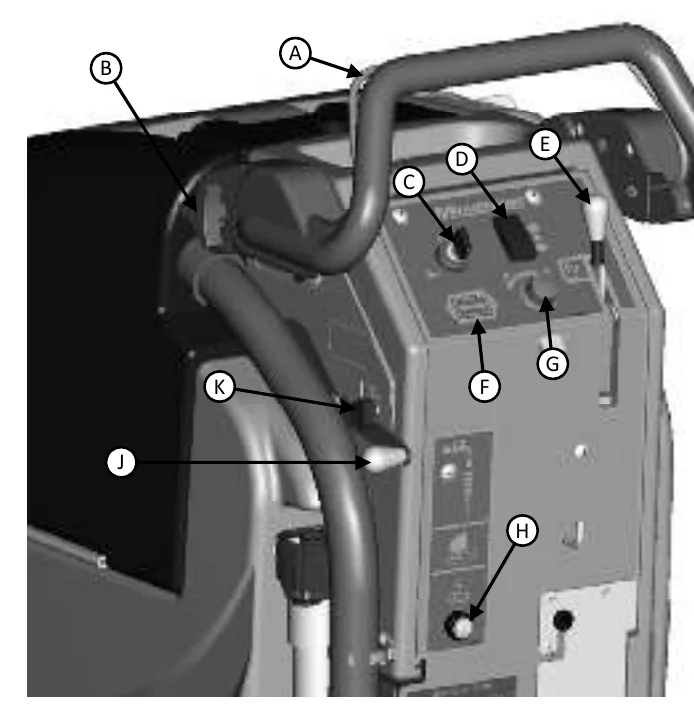
Machine Overview
Bail Handle
(A) When the scrub deck is lowered to the floor, the bail handle enables the brush motor and moves the machine forward once depressed.
Handle Adjustment Knobs
(B) Allows the handle position to be raised or lowered.
Key Switch
(C) Controls the machine’s power (Off/On) with a key for safety. When it is turned to the on position, the machine will operate (after 5 second diagnostic check, see battery gauge).
Direction Switch
(D) This 3 position switch sets the direction the machine will move when the bail handle is pulled. The middle position is neutral - brushes & vacuum will operate but machine will not move.
Squeegee Lift Lever
(E) When moved to the top position, the squeegee is lowered and the vacuum motor is turned on. When locked in the bottom position, the squeegee is raised and the vacuum motor shuts off (after a 10 second delay).
Battery / Fault Gauge
(F) This gauge displays the remaining battery charge. This gauge also displays any fault codes that might occur with the Drive Motor Controller (see Diagnostic Codes). Gauge will blink for 5 seconds when key is first turned on, to run diagnostic check before machine can be used.
Speed Control
(G) This control sets the speed at which the machine will move.
Charge Status Indicator
(H) This gauge displays the status of the batteries during charging. The gauge has a readout of 3 LEDs. 1 Green, 1 Yellow, 1 Red. Green indicating a full charge, Yellow indicating 80% charged, Red indicating the batteries are charging.
Solution Control Lever
(J) This lever controls the rate at which solution is dispensed. Moving the lever up will increase the amount of solution. Moving the lever down will decrease the amount. Moving the lever all the way down shuts off solution flow.
Aquastop Solution Setting
(K) This bracket is a guide to limit the amount of solution dispensed for consistent performance.
Machine Overview
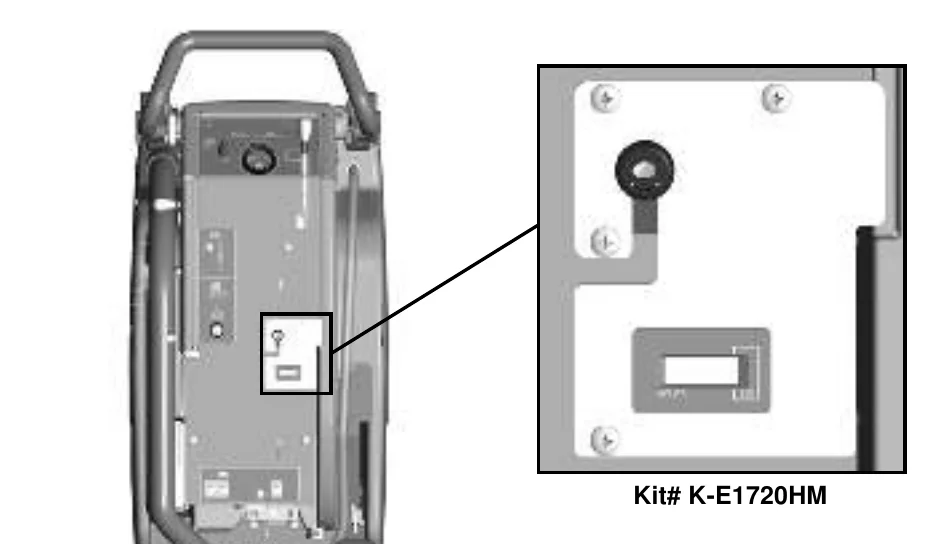
Optional Hour Meter
Minuteman offers an optional hour meter for the E26ECO. The optional kit replaces the power cord mounting bracket at the rear of the machine with one that contains an hour meter, which records the brush motor operating time.
Machine Overview
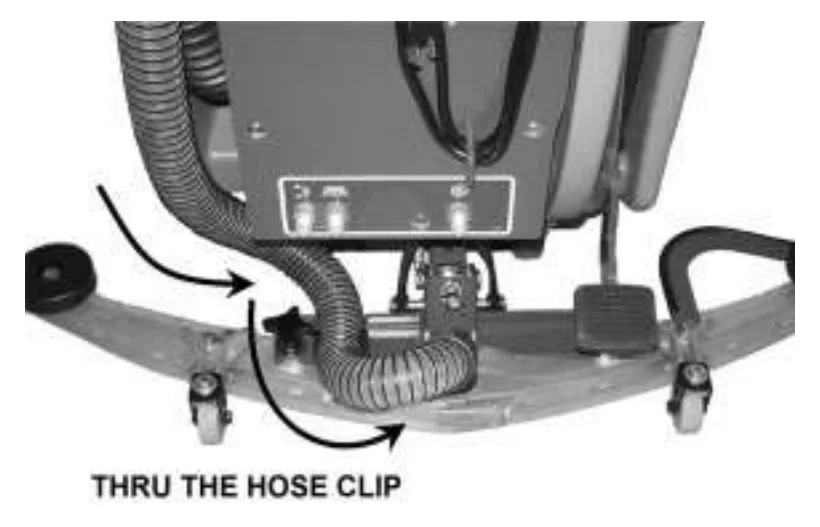
Vacuum Hose Routing
For best results, route the vacuum hose as shown below:
Circuit Breakers
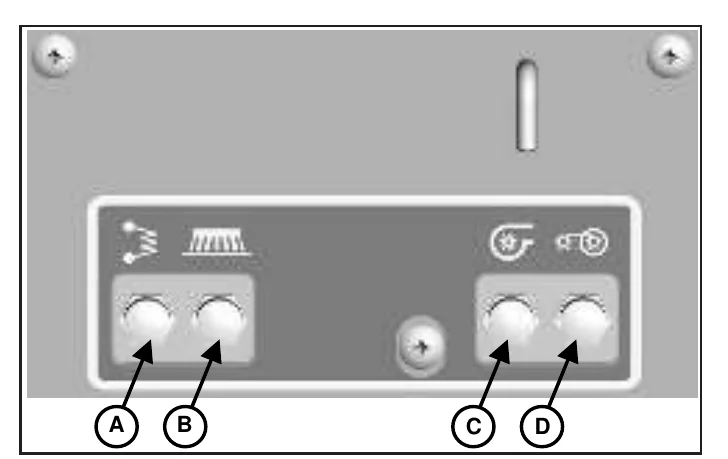
The circuit breakers are located at the bottom of the back panel of the machine.
| Key | Circuit Breaker |
|---|---|
| A | Main Control Circuit Breaker - 4A |
| B | Brush Motor Circuit Breaker - 30A |
| C | Vacuum Motor Circuit Breaker - 20A |
| D | Drive Motor Circuit Breaker - 20A |
If any of the functions above are not operating, check if the circuit breaker buttons have tripped. Press to reset.
Battery Compartment
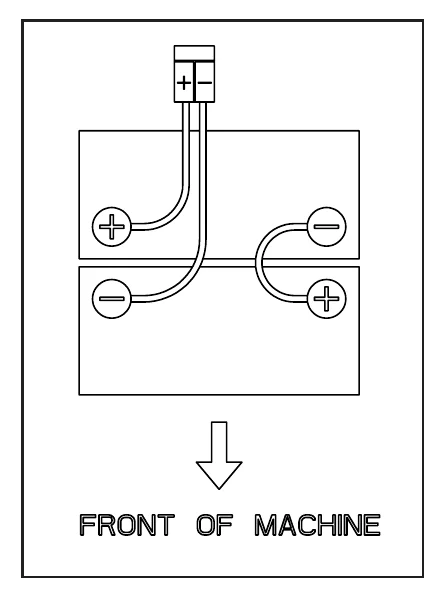
The battery compartment is located under the recovery tank. The Battery compartment can be accessed for servicing and maintenance by tilting the recovery tank (make sure recovery tank has been drained before tilting). The battery compartment contains two 12-volt batteries connected in series. Connect the batteries according to the battery connection diagram (see diagram). The recommended batteries are 140Ah (Minuteman P/N 956140) or 95Ah (minuteman P/N 956100) Gel. The battery tray may be drained if necessary using the orange drain hose located above the rear caster on the right side of the machine.
Diagnostic Code Guide
When an error or fault occurs within the machine, a fault code will appear on the battery gauge represented by a specified number of flashing LEDs. (See “Troubleshooting” for further information)
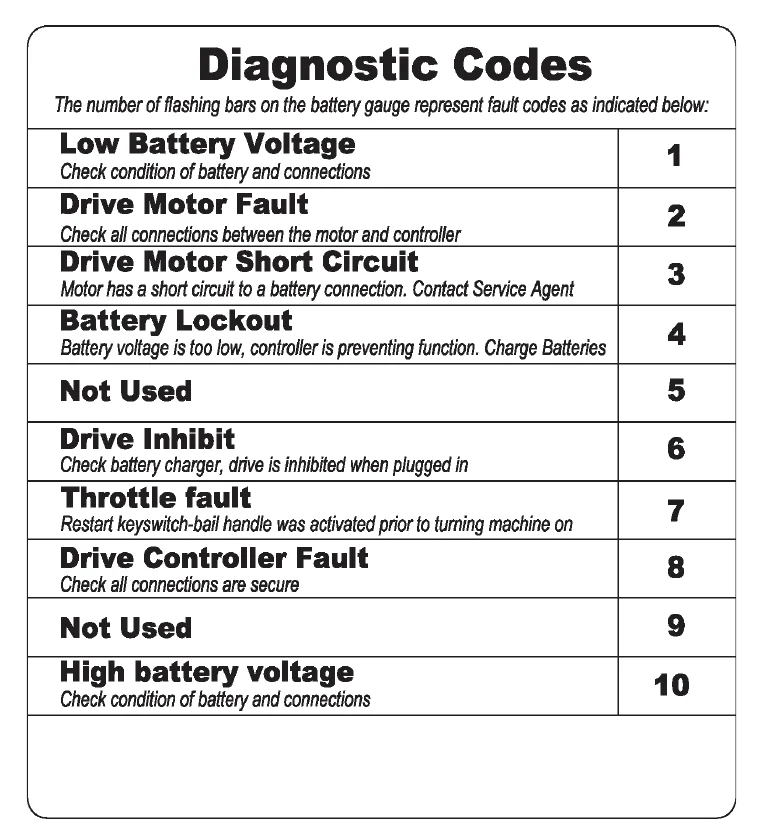
| Fault | Check | Flashing bars |
|---|---|---|
| Low Battery Voltage | Check condition of battery and connections | 1 |
| Drive Motor Fault | Check all connections between the motor and controller | 2 |
| Drive Motor Short Circuit | Motor has a short circuit to a battery connection. Contact Service Agent | 3 |
| Battery Lockout | Battery voltage is too low, controller is preventing function. Charge Batteries | 4 |
| Not Used | 5 | |
| Drive Inhibit | Check battery charger, drive is inhibited when plugged in | 6 |
| Throttle fault | Restart keyswitch-bail handle was activated prior to turning machine on | 7 |
| Drive Controller Fault | Check all connections are secure | 8 |
| Not Used | 9 | |
| High battery voltage | Check condition of battery and connections | 10 |
Handle Adjustment
The E26ECO handle was designed with operator comfort in mind. The angle and horizontal position of the handle can be adjusted to suit the needs of the operator.
Angle Adjustment
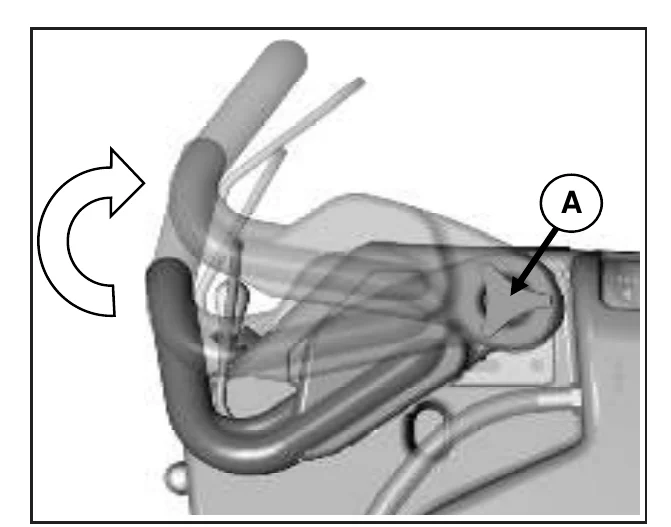
The handle angle can be adjusted without tools by loosening the Angle Adjustment Knob (A) on each side and rotating the handle to the desired position. There are 5 angular positions 11.25° apart for a total of 45° between the minimum and maximum position.
Horizontal Adjustment
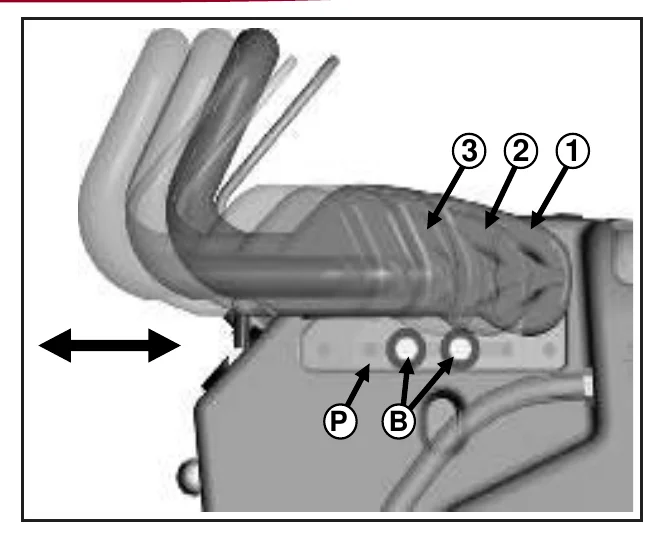
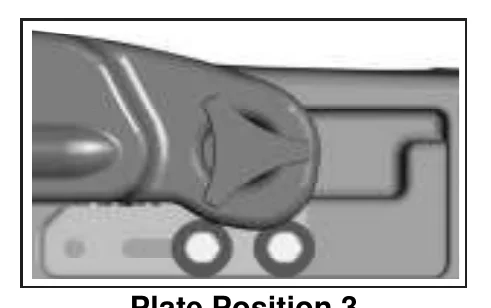
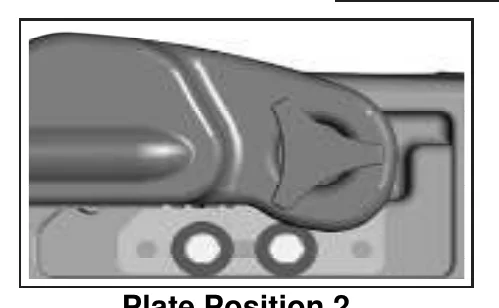
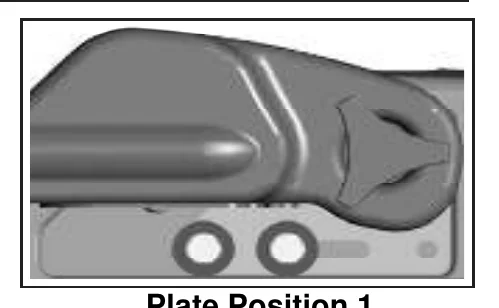
The horizontal position can be adjusted by removing the 4 Mounting Bolts (B) (2 each side) with a 9/16” socket and sliding the Mounting Plate (P) to one of the 3 available positions. The machine is shipped from the factory in position 1.
Solution Tank Drain Hose
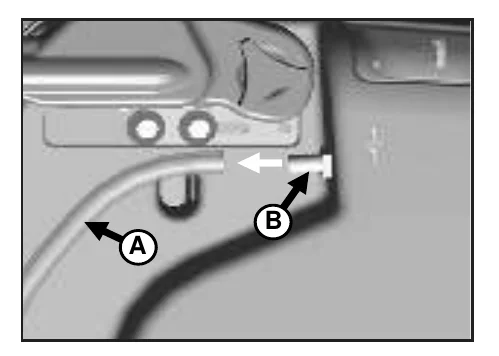
The solution tank may be drained by removing the Solution Tank Drain Hose (A) from the Hose Barb (B) and routing the hose to a floor drain.
Solution Level Indicator
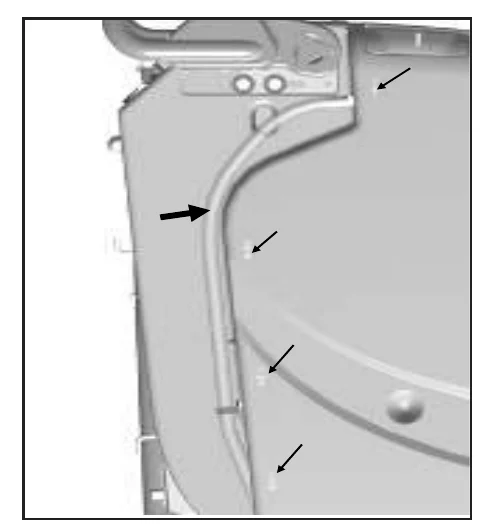
The Solution Tank Drain Hose also serves as a water level indicator for the solution tank. The amount of water remaining in the solution tank can be seen through the clear drain hose. Level markers molded into the solution tank are positioned at 1/4, 1/2, 3/4, and full levels.
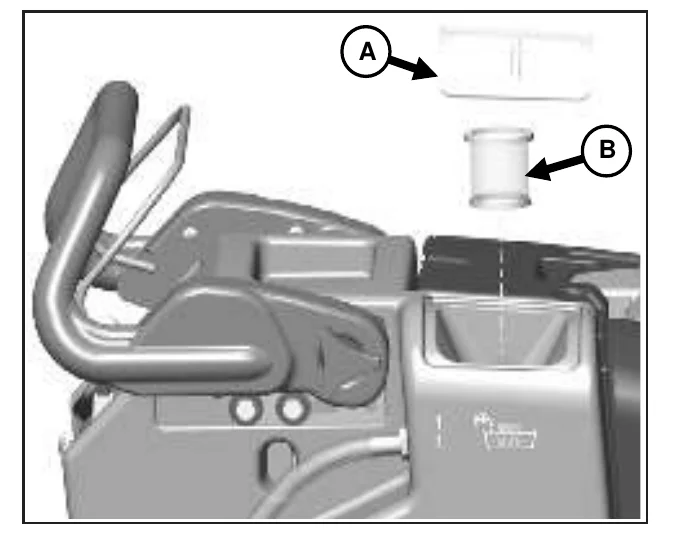
Solution Fill Filter
The Solution Fill Filter (B) should be cleaned regularly. To remove, simply open the Solution Tank Lid (A) and pull the filter out.
Recovery Tank Drain Hose
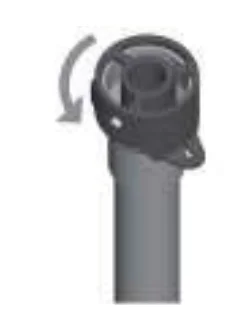
Twist Cap to Open and Drain
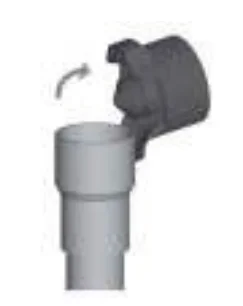
Twist & Lift cap to clean out debris
Screened Float
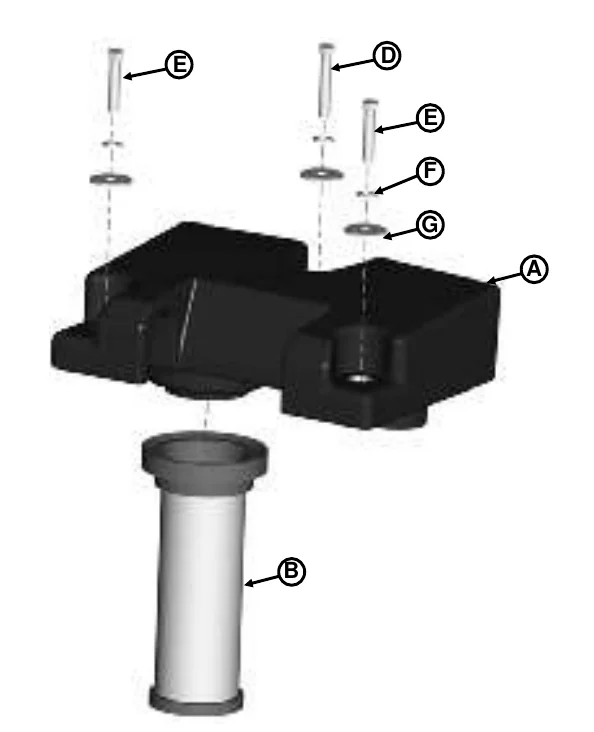
If the recovery tank (C) is overfilled or a large amount of foaming is present, the screened float (B) blocks the vacuum intake inside the tank protecting the vacuum motor and internal electronics from water damage. It is essential to keep the float in working order through regular maintenance.
The float should be cleaned daily by thoroughly rinsing with a hose. Removal of the screened float is not necessary for daily maintenance.
At least once a month the screened float should be completely removed, cleaned, and checked for any damage to the seal or metal screen.
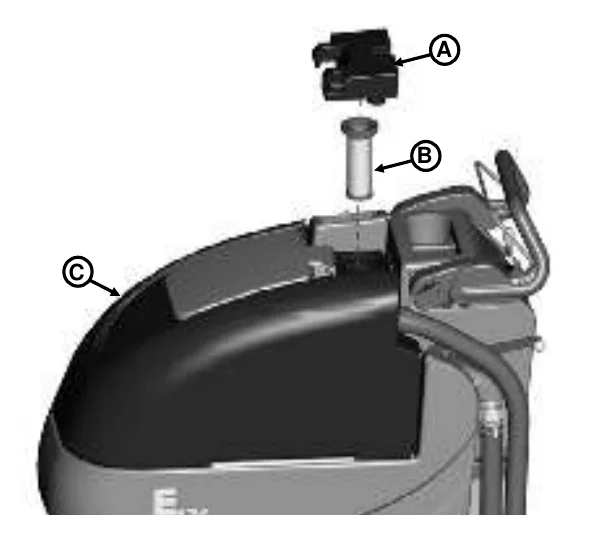
Screened Float Removal
The screened float is positioned between the vacuum manifold (A) and recovery tank (C). The screened float (B) can be accessed by removing the 1.5” bolt (D) and two 1.25” bolts (E) that attach the manifold to the recovery tank using a 7/16” socket.
| Key | Item |
|---|---|
| A | Vacuum Manifold |
| B | Screened Float |
| C | Recovery Tank |
| D | 1.5” Bolt |
| E | 1.25” Bolt (2) |
| F | Helical Washer (3) |
| G | Flat Washer (3) |
Machine Overview
In-Line Solution Filter Assembly
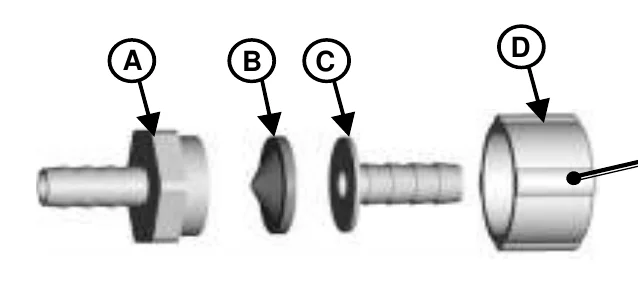
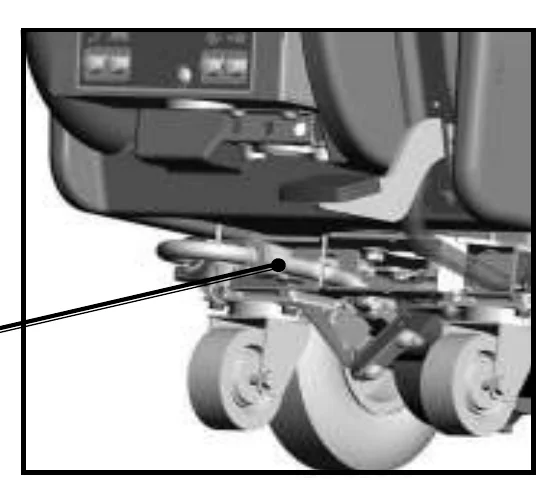
The solution solenoid, which shuts off solution flow when the bail handle is released, is protected from debris by the in-line filter assembly. The filter assembly is located at the rear of the machine on the left hand side, just under the solution tank. It is important to check and clean the screened washer inside the assembly regularly to ensure proper solution flow. To open, unscrew the assembly (Note that the cone of the washer is facing out toward the rear of the machine). Remove washer and rinse, reinsert and screw assembly together, tightening by hand. Overtightening with tools may damage the plastic threads.
| Key | Part |
|---|---|
| A | Fitting, MGHT |
| B | Screened Washer |
| C | Hose Barb Insert |
| D | Fitting, FGHT |
Rear Squeegee
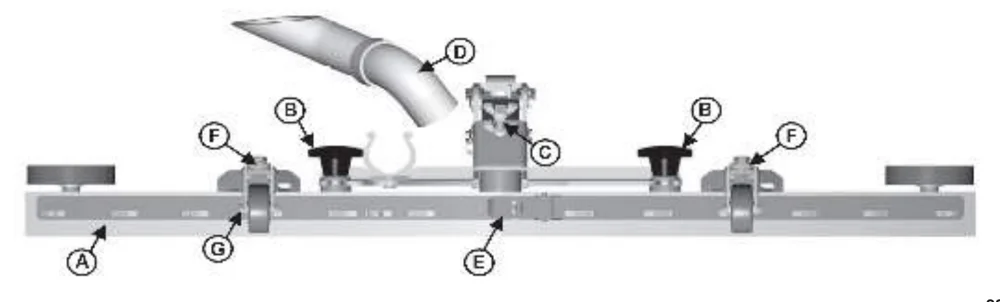
| Key | Part |
|---|---|
| A | Squeegee |
| B | Star-shaped knob |
| C | Adjusting screw for angle adjustment |
| D | Suction hose |
| E | Blade fastening latch |
| F | Washers for caster height adjustment |
| G | Caster Wheel Axle |
Cleaning the Squeegee
Check the squeegee (A) daily and clean as necessary.
- Pull off the suction hose (D).
- loosen the two star-shaped knobs (B).
- Remove the squeegee (A).
Changing the Squeegee Blades
Check the inner and outer squeegee blades on the squeegee (A) weekly for signs of wear. The squeegee blades can be reused by turning them (can be turned for 4 total uses).
- Pull off the suction hose (D), loosen the two star-shaped knobs (B) and remove the squeegee.
- Unlock the fastening device (E) and remove the outer squeegee blade. Turn the squeegee blade or install a new one, as necessary. Change the inner squeegee blade in the same way.
Machine Overview
Squeegee Blades Angle Adjustment
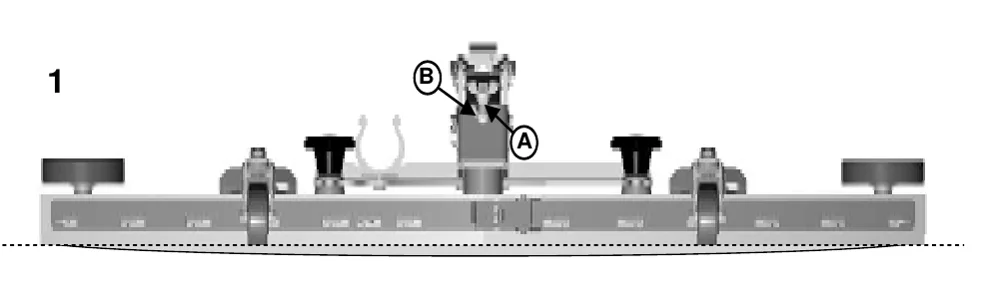
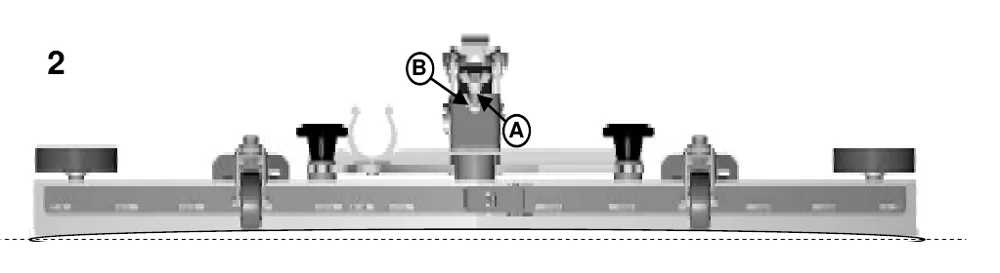
The angle adjustment is the decisive factor in ensuring that the squeegee blades on the squeegee lie evenly on the floor.
- Park the machine on a level surface and lower the squeegee.
- Loosen the lower wing nut (B) on the adjusting screw (C) and adjust the squeegee using the adjusting screw so that the ends of the squeegee blades still have contact with the floor. By turning the adjusting screw (C) counterclockwise, the clearance between squeegee blade and floor is increased in the center (Fig. 1). When turning the adjusting screw (C) clockwise, the clearance between squeegee blade and floor is reduced in the center (Fig. 2).
- Switch the machine on and check the suction pattern. When the machine is in operation, the entire surface of the squeegee blades (center and outer areas) must be applied as evenly as possible.
- Tighten the lower wing nut (B) on the adjusting screw (C) against the metal bracket to lock in the pitch setting.
Squeegee Blades Height Adjustment
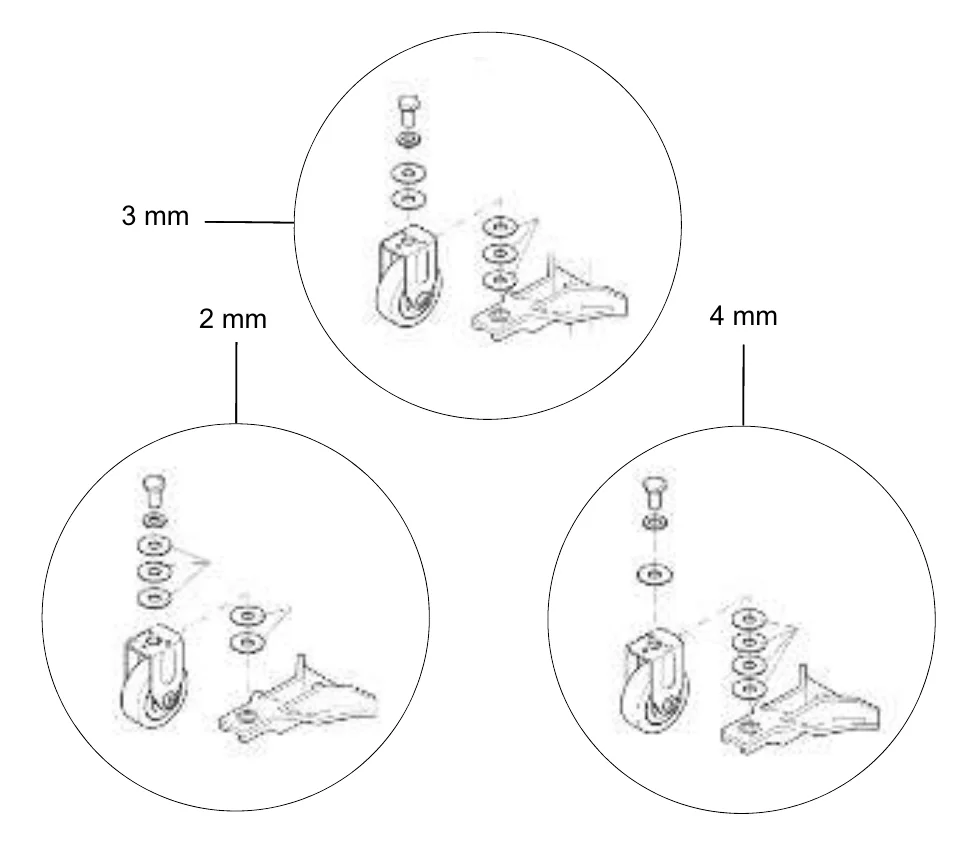
If streaks are present, despite an optimum angle adjustment, the clearance between the caster wheels and floor must be adjusted by changing the number of washers underneath the bracket that holds the wheel. The squeegee height is preset at the factory to 3mm.
In cases of very smooth floors, e.g. finished floors, PVC, linoleum, etc., see 2mm illustration for washer configuration.
In cases of very uneven floors, e.g. poorly laid tiles (water does not run off) ,, configure as shown in 4mm illustration.
Machine Overview
Brush Deck
Brush Loading / Unloading
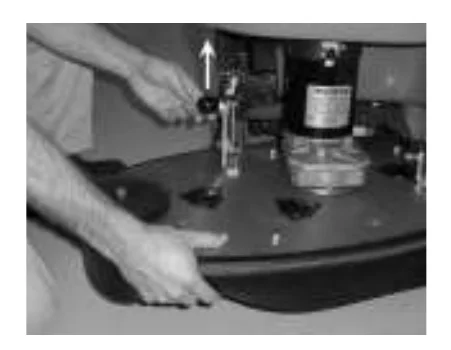
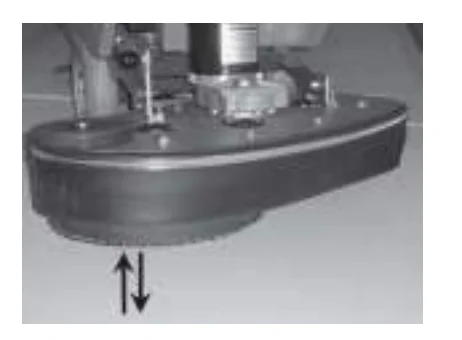
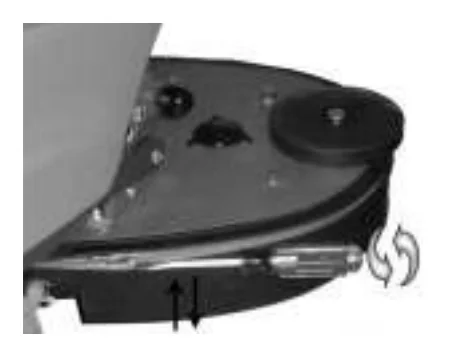
- Brush Deck may be tilted up for easier brush installation/removal & to clear steep ramps. Lift the handle on the upper lever which connects the brush deck to the machine, tilt the deck up, release the handle & the lever will lock into place. Lift the handle again to move the deck back to horizontal.
- Brushes are installed/removed by hand. Push each brush up onto the hub until it “clicks”. To remove, pull down on the edge of each brush.
- The splash guard may be moved up or down as the brush/pad wears by loosening the clamp on the back side of the deck with a flathead screwdriver or 9/32” (7mm) socket, then slide the splash guard to the desired height & retighten the clamp.
Aquastop Solution Control
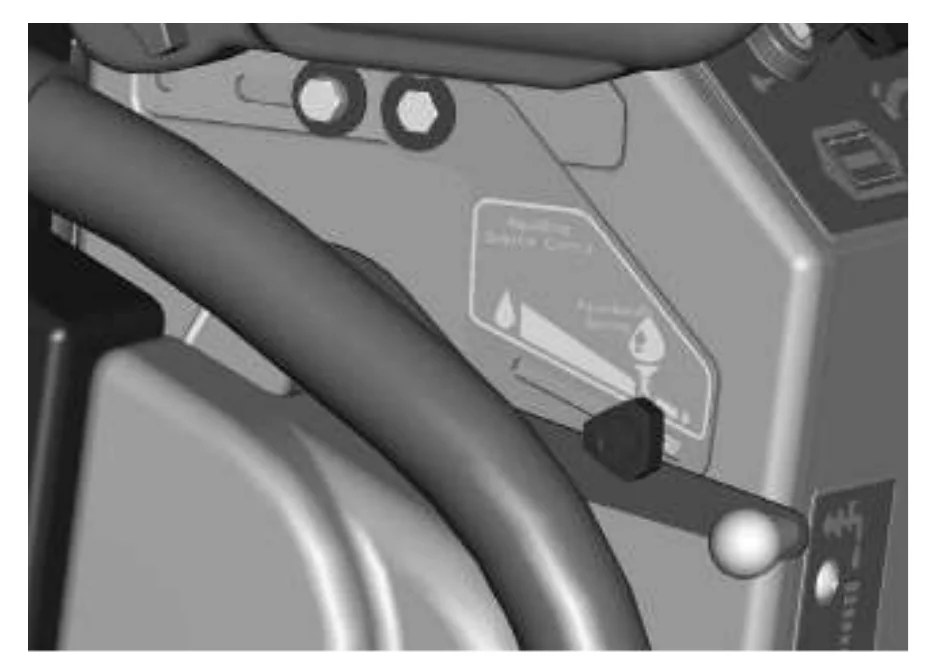
In order to consistently conserve water when using Aquastop brushes, the guide will stop the solution control lever at a low rate setting. This setting may be adjusted by loosening the knob, adjusting the lever, and retightening the knob. Slide the knob all the way forward to dispense maximum solution.
The E26ECO
Batteries and chargers: make sure your charger is compatible with your batteries, and set its charging algorithm to your battery pack before you use it.
This machine was designed with total operator comfort and ease of use in mind. All machine components have been designed as a total system to efficiently clean dirty floors. Please contact your Minuteman representative for specific recommendations for the correct brush type and chemical applications.
Before using the machine, always perform the following steps to ensure proper machine operation:
- Check under the machine for leaks.
- Check the rear squeegee for wear and damage.
- Check the solution and recovery tank levels.
After using the machine, always perform the following steps:
- Check the battery charge level. Charge batteries if necessary. When charging batteries, extra precaution is required:
- Battery acid can cause burns.
- When working on or around batteries, always wear protective clothing and safety glasses.
- Remove metal jewelry. Do not lay tools or metal objects on top of the batteries.
- Charging batteries generate explosive gasses.
DO NOT CHARGE BATTERIES WHEN OPEN FLAMES OR SPARKS ARE PRESENT. DO NOT SMOKE.
- Charge the batteries in a well-ventilated area.
- Fluid levels should be checked before and after charging and maintained at the proper levels. If low, add distilled water until the metal plates are covered.
- If the machine is not used for an extended period of time, batteries should be kept fully charged with a boost charge once a week.
- Check for wire, string, or twine wrapped around the scrub brushes.
- Check the rear squeegee for wear and damage.
- Check the rear squeegee suction hose for obstructions.
- Drain and rinse the recovery tank.
- Check under the machine for leaks.
- Check the service records to determine maintenance requirements.
- Be sure you understand the machine controls and their functions.
- While on ramps or inclines, avoid sudden stops when tanks are filled.
- Avoid abrupt sharp turns. Slow down driving speed when going downhill.
Machine Operation
To Turn ON Machine:
Turn key to operate position ( I ). Wait for battery gauge to stop flashing, approximately 5 seconds. (If flashing continues, see troubleshooting guide)
To Turn ON Vacuum:
Lower squeegee into operating position, vacuum motor will turn ON automatically.
To Turn ON Brush Motor:
Lower the scrub deck to the floor by moving the brush lift pedal from the “home” (down) position to the operating position (up). Depress the operator bail handle. Brush motor will turn ON.
To Turn on Cleaning Solution:
Move solution lever from closed (down) position up to the desired flow position. With the scrub deck on the floor, depress the bail handle, solution will begin to flow.
Direction Switch:
Select direction of machine by moving the directional rocker switch from the neutral position to the forward or reverse position. The direction of the machine movement is shown on the operator panel with forward and reverse arrows.
Speed control:
Move the speed dial to the desired position. Turning the dial clockwise increases the speed. Turning the dial counterclockwise decreases the speed.
Driving:
Depress the operator bail handle, the machine will move in the direction selected.
To Charge Batteries:
When the battery / fault gauge reaches the red zone the batteries need to be recharged. Take the machine to a well ventilated area, unwind the battery charger power cord from the electrical box cover and plug into an appropriate power source. After approximately 10 seconds the battery charge status indicator will turn on. Check the battery water levels before each use, refill as needed with distilled water. Caution: do not overfill. Fill water 1/4 “ - 1/2” above the separators. Failure to maintain the batteries may result in battery failures.
Hour Meter (Optional):
Hour meter will automatically record operating time of the brush motor.
After Use
- When finished scrubbing, lift the scrub deck. Lift the rear squeegee (the vacuum motor will turn off after 10 seconds). Move the machine to a service area for daily maintenance and review items that may need service.
- Empty the solution tank by disconnecting the solution tank drain hose from the barb fitting and routing hose to a drain. Rinse the tank with clean water to prevent any buildup of dried chemicals that could clog the plumbing.
- Empty and clean the recovery tank by flushing with a hose. Be sure to also clean the float shut off screen.
- Remove the brushes or pad holders and rinse them in warm water and hang to dry.
- Remove the rear squeegee and recovery hose, rinse with warm water and reinstall after cleaning (see page 13 for correct hose installation).
- Check the maintenance schedule in the next section and perform any required maintenance before storing the machine.
- Store the machine indoors in a clean dry place. Keep from freezing. Leave solution and recovery tank lids open for ventilation to prevent odor buildup.
- Turn Key switch OFF (O) and remove key.
Maintenance
| Daily | Weekly | Monthly | Yearly |
|---|---|---|---|
| Charge Batteries | Inspect Brush Deck Splash Guard for Debris | Lubrication – Grease Fittings | Check Carbon Brushes |
| Check/Clean Tanks & Hoses | Inspect and Clean In-Line Solution Filter | ||
| Check/Clean/Rotate the Brushes | Rinse off the underside of brush deck | ||
| Check/Clean the Squeegee | Check Each Battery Cell(s) Water Level | ||
| Check/Clean Vacuum Shut-Off Float in Recovery Tank |
Have a qualified service technician check the vacuum motor carbon motor brushes once a year or after 300 operating hours.
The brush motor and transaxle motor carbon brushes should be checked every 500 hours or once a year.
Regularly scheduled lubrication of certain machine parts should be performed to insure trouble-free operation of the machine. Apply a generous amount of grease into the fittings on the machine until grease seeps out around the bearings.
The grease points are listed below:
- Rear caster swivel (2)
Apply lubricant or light machine oil to lubricate the:
- Pivot mounting point of the squeegee lift mechanism to the chassis (1)
- Rear squeegee caster wheel axle (2)
Troubleshooting
| Problem | Possible Cause | Remedy |
|---|---|---|
| Poor water pick-up | Worn or torn squeegee blades | Rotate or replace blades |
| Recovery tank full | Empty recovery tank | |
| Recovery tank drain hose leak | Secure drain hose cap or replace | |
| Recovery tank lid gasket leak | Replace gasket lid cover properly | |
| Debris caught in squeegee | Clean squeegee | |
| Recovery hose clogged | Remove debris and flush hose | |
| Recovery hose to squeegee or tank disconnected or damaged | Reconnect or replace recovery hose | |
| Poor scrubbing performance | Worn brushes | Rotate or replace brushes |
| Wrong brush or cleaning chemical | Consult Minuteman | |
| Debris caught on scrub brushes | Remove debris | |
| Moving machine too fast | Use appropriate speed | |
| Low battery charge | Recharge batteries | |
| Not using enough solution | Adjust solution flow setting | |
| Inadequate solution flow or no solution to the floor | Solution tank empty | Fill solution tank |
| Solution lines or filter clogged | Flush lines and clean solution filter | |
| Brush motor circuit breaker has tripped | Reset circuit breaker | |
| Solution Lever in down position | Raise lever up | |
| Machine does not move | Squeegee is down and directional switch is in reverse position | Raise squeegee when in reverse mode |
| Traction drive circuit breaker has tripped | Reset circuit breaker | |
| Batteries lost power | Recharge batteries | |
| Directional switch in neutral position | Activate FWD or REV position |
Troubleshooting
Batteries and chargers: make sure your charger is compatible with your batteries, and set its charging algorithm to your battery pack before you use it.
| Problem | Possible Cause | Remedy |
|---|---|---|
| Machine does not operate | Tripped Control Power circuit breaker | Reset circuit breaker |
| Batteries have low charge | Recharge batteries | |
| Battery charger operating | Unplug battery charger when charge is complete | |
| Key switch off | Turn key on | |
| Bail handle depressed too quickly after turning key on | Turn key off, turn on, wait until battery gauge lights up without flashing | |
| Vacuum motor does not turn on | Recovery tank full | Empty recovery tank |
| Excessive foaming in recovery tank. | Empty recovery tank. Rinse off the screened float inside recovery tank. Use less or change chemical. Use de-foaming agent. | |
| Squeegee in raised position | Lower squeegee | |
| Tripped vacuum motor circuit breaker | Reset breaker | |
| Broken vacuum limit switch | Replace switch | |
| Carbon Brushes worn | Replace carbon brushes | |
| Vacuum switch disconnected | Connect wiring | |
| Batteries do not charge | Charger not plugged to wall outlet | Plug into wall outlet |
| Circuit breaker tripped in wall outlet | Reset breaker | |
| Battery disconnected from machine | Connect battery to machine | |
| Charger malfunction | Call service |
| LED Status | Description | |
|---|---|---|
| Warning | RED LED lamp blink once | Output open circuit or short circuit or reverse polarity connection of charger to battery. Battery voltage is too high (may be connected to wrong voltage battery). |
| RED LED lamp blink twice | Abnormal cycle (may be weak or bad battery) Charging time has safety timed out due to battery problem. |
Troubleshooting
Fault / Diagnostic Codes
Batteries and chargers: make sure your charger is compatible with your batteries, and set its charging algorithm to your battery pack before you use it.
The Battery / Fault gauge will flash when a fault is detected. A decal labeled “Diagnostic Codes” is located below the battery gauge as an abbreviated and convenient guide to determine the cause of the fault and the remedy (refer to machine or see “Diagnostic Code Guide” section of this manual). The flashing codes are for the following:
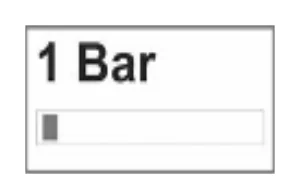
The battery needs charging, there is a bad connection to the battery or dependent on programming, may indicate that the battery lockout function is active and the controller is in a restricted mode of operation. Check the connections to the battery. If the connections are good, try charging the battery.
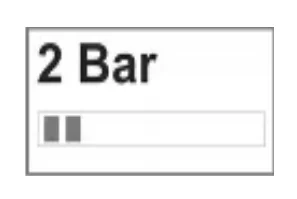
There is a bad connection to the motor. Check all connections between the motor and the controller.
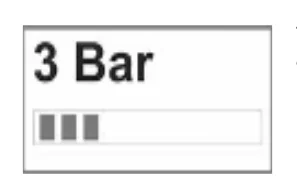
The motor has a short circuit to a battery connection. Contact your service agent.
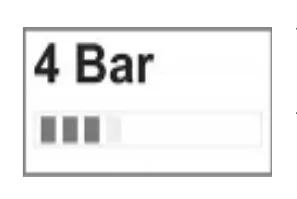
The battery charge level has fallen below the Battery Lockout level and the controller is inhibiting certain machine functions. Charge the battery.
Troubleshooting
| Display | Meaning |
|---|---|
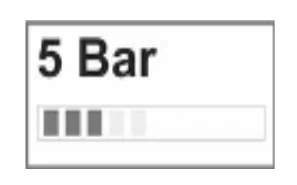 | Not used. |
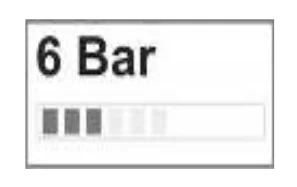 | The controller is being inhibited from driving, this may be because the battery charger is connected. |
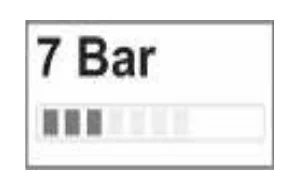 | The bail handle was activated prior to turning the machine on. Make sure that the bail handle is in the rest position. Restart the key switch. |
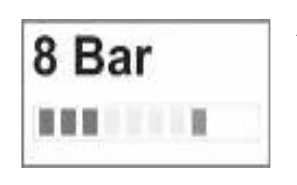 | A controller fault is indicated. Make sure that all connections are secure. |
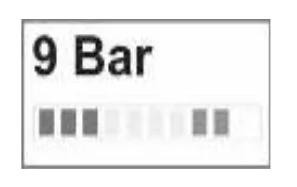 | Not used. |
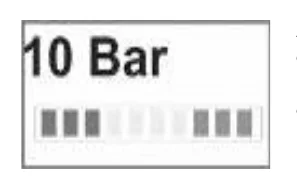 | An excessive voltage has been applied to the controller. This is usually caused by a poor battery connection. Check the battery connections. |
Minuteman International Made Simple Commercial Limited Warranty
REVISION F EFFECTIVE 6/1/2009
Minuteman International, Inc. warrants to the original purchaser/user that the product is free from defects in workmanship and materials under normal use. Minuteman will, at its option, repair or replace without charge, parts that fail under normal use and service when operated and maintained in accordance with the applicable operation and instruction manuals. All warranty claims must be submitted through and approved by factory authorized repair stations.
This warranty does not apply to normal wear, or to items whose life is dependent on their use and care, such as belts, cords, switches, hoses, rubber parts, electrical motor components or adjustments. Parts manufactured by Minuteman are covered by and subject to the warranties and/or guarantees of their manufacturers. Please contact Minuteman for procedures in warranty claims against these manufacturers.
Special warning to purchaser — Use of replacement filters and/or prefilters not manufactured by Minuteman or its designated licensees, will void all warranties expressed or implied. A potential health hazard exists without original equipment replacement.
All warranted items become the sole property of Minuteman or its original manufacturer, whichever the case may be.
Minuteman disclaims any implied warranty, including the warranty of merchantability and the warranty of fitness for a particular purpose. Minuteman assumes no responsibility for any special, incidental or consequential damages.
This limited warranty is applicable only in the U.S.A. and Canada, and is extended only to the original user/purchaser of this product. Customers outside the U.S.A. and Canada should contact their local distributor for export warranty policies. Minuteman is not responsible for costs or repairs performed by persons other than those specifically authorized by Minuteman. This warranty does not apply to damage from transportation, alterations by unauthorized persons, misuse or abuse of the equipment, use of non-compatible chemicals, or damage to property, or loss of income due to malfunctions of the product.
If a difficulty develops with this machine, you should contact the dealer from whom it was purchased.
This warranty gives you specific legal rights, and you may have other rights which vary from state to state. Some states do not allow the exclusion or limitation of special, incidental or consequential damages, or limitations on how long an implied warranty lasts, so the above exclusions and limitations may not apply to you.
Cord Electric Group: Three years parts, two years labor, ninety days travel (Not to exceed two hours)
Exceptions……….
| Model | Parts | Labor | Poly | Travel |
|---|---|---|---|---|
| Port A Scrub | 1 yr | 6 months | 10 yrs | 0 |
| MPV 13 | 1 yr | 0 | 0 | 0 |
| MPV 14 & 18 | 2 yrs | 1 yr | 0 | 0 |
| V Series Upright Vacuums | 1 yr | 1yr | 0 | 0 |
| Rapid Air Blower | 1 yr | 1 yr | 10 yrs | 0 |
| Explosion Proof Vacuum | 1 yr | 1 yr | 0 | 0 |
| X12, X12H & TRS 14 | 1 yr | 1 yr | 10 yrs | 0 |
| E17 & E20 Electric Scrubbers | 1 yr | 6 months | 10 yrs | 0 |
| Pneumatic Vacuums | 3 yr | 1 yr | 0 | 0 |
| Description | Parts | Labor | Poly | Travel |
|---|---|---|---|---|
| Battery Operated Group | 3 yrs | 2 yrs | 10yrs | 90 days |
| Sweepers | 1 yr | 1 yr | 10yrs | 90 days |
| Internal Combustion Group | 1 yr | 1 yr | 10yrs | 90 days Not to exceed two hours |
| Exception: PAS 14B | 1 yr | 1 yr | 10 yr | 0 |
Battery Chargers:
One year replacement
Replacement Parts: Ninety days
Batteries: 0-3 months replacement, 4-12 months pro-rate
Polyethylene Plastic Tanks: Tanks have 10yr warranty, no additional labor
Minuteman International · 14N845 U.S. Route 20 · Pingree Grove, Illinois 60140 USA
Phone 800-323-9420 · Fax 800-422-6933
www.minutemanintl.com
A Member of the Hako Group
988737UM
Rev A 08/10
Minuteman and PowerBoss are trademarks of Minuteman International, Inc. Southeastern Equipment & Supply is an independent dealer.