Free Shipping on Equipment & Parts orders of $200 or more! * Click for Restrictions

Have a question? 800-440-6723 International: 803-252-0100

English Se habla español
Parts › PartFinder › Kaivac 1715 S/N 1-44 / 1720 S/N 1-161 / 1750 S/N 1-4998 › Operator manual
Form 1750_SN_1_thru_4998_on_01, Rev. 2007
Kaivac · Cleaning machine

Kaivac 1715 S/N 1-44 / 1720 S/N 1-161 / 1750 S/N 1-4998 Operator Manual

1750_SN_1_thru_4998_on_01 Rev. 200719 of 31 pages shownKaivac 1700 Series edition A: posted by Kaivac for 1715 S/N 1-44, 1720 S/N 1-161 and 1750 S/N 1-4998 (same manual; the 1715 file is a re-export, kaivac-aztec page compare 11-02) (KV1715, KV1720, KV1750)
Free to read, no account neededEvery page has its own linkPart numbers link to the part
COVER

KaiVac® 1700 Series Operator and Parts Manual
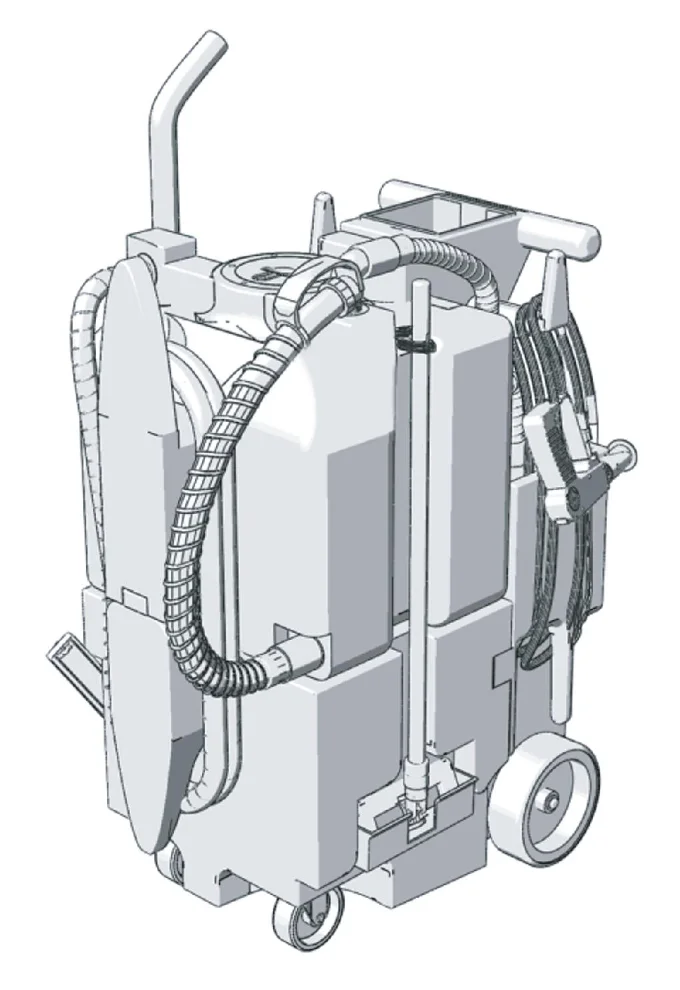
Line drawing of the KaiVac 1700 Series cleaning machine on wheels, with a hose coiled around the tanks, a tall handle at the left and tools stored on the right side

© 2006 Kaivac, Inc. All Rights Reserved.‌‌​⁠​⁠‍‌​​​​‍‍‌​‌‌‌⁠​​​​​​​‌​​​‌​⁠​‌‍​​‍‌⁠⁠​‌‌​‍​‌‌‍‌⁠⁠⁠‌⁠⁠‍

Source: Kaivac 1715 S/N 1-44 / 1720 S/N 1-161 / 1750 S/N 1-4998 Operator Manual 1750_SN_1_thru_4998_on_01 Rev. 2007, page 1, used with permission. SES ref PF-5LD3-GBAP‌‌​⁠​⁠‍‌​​​​‍‍‌​‌‌‌⁠​​​​​​​‌​​​‌​⁠​‌‍​​‍‌⁠⁠​‌‌​‍​‌‌‍‌⁠⁠⁠‌⁠⁠‍
1715 S/N 1-44 / 1720 S/N 1-161 / 1750 S/N 1-4998 1750_SN_1_thru_4998_on_01 (2007)Page 1 of 31
READ FIRST

Read First

In short This page asks you to read the manual before operating the machine and to record the install date and serial number. It also explains how to handle shipping damage and returns, and lists the contents of the manual.‌‌​⁠​⁠‍‌​​​​‍‍‌​‌‌‌⁠​​​​​​​‍​​​‌​⁠​‌‌​‌​‌‌⁠⁠⁠‍​⁠‌‌⁠‌‌‍​‍‌​​⁠

INSTALL DATE

Please fill out card for future records‌‌​⁠​⁠‍‌​​​​‍‍‌​‌‌‌⁠​​​​​​​‍​​​‌​⁠​‌‌​‌​‌‌⁠⁠⁠‍​⁠‌‌⁠‌‌‍​‍‌​​⁠

Install date
Serial No.

Read this manual prior to operation. This machine will operate at its optimal efficiency if:

  • The machine is operated as described in this manual.
  • The machine is maintained properly and regularly-per maintenance instructions.
  • The machine is maintained with manufacturer parts only.

Carefully unpack and inspect your new KaiVac cleaning machine for shipping damage. Each unit is tested and thoroughly inspected before shipping. For instructions regarding shipping damage, contact Kaivac, Inc. immediately. All returns must have a Return Authorization Number (RAN), which is available by calling the Kaivac, Inc. Customer Service Department. Remember to protect your investment by registering your Warranty online at www.kaivac.com or mailing/faxing in the form on page ii.

Table of contents

Getting Started

TopicPage
Limited Warranty Protection Plani
Warranty Registration Formii
Introduction1
Safety Precautions2-3

Operating your KaiVac

TopicPage
Out of Box Setup Instructions4
Preparing your KaiVac for use5
Operating your KaiVac using the S-I-M-P-L-E Process6

Maintaining your KaiVac

TopicPage
Machine Maintenance7
Vac Tank Cleanout Instructions8
Vac Tank Removal Instructions8.5
Black Box Removal Instructions9
Troubleshooting10-12
Machine Diagrams13-19
Parts Listings20-22
Source: Kaivac 1715 S/N 1-44 / 1720 S/N 1-161 / 1750 S/N 1-4998 Operator Manual 1750_SN_1_thru_4998_on_01 Rev. 2007, page 2, used with permission. SES ref PF-FB3B-CVKH‌‌​⁠​⁠‍‌​​​​‍‍‌​‌‌‌⁠​​​​​​​‍​​​‌​⁠​‌‌​‌​‌‌⁠⁠⁠‍​⁠‌‌⁠‌‌‍​‍‌​​⁠
1715 S/N 1-44 / 1720 S/N 1-161 / 1750 S/N 1-4998 1750_SN_1_thru_4998_on_01 (2007)Page 2 of 31
Limited warranty

Limited Warranty Protection Plan

In short This warranty covers defects in workmanship or materials under normal use from the date of purchase. Coverage depends on which chemicals are used, and warranty claims need a Return Authorization Number (RAN); for help with a claim, call us at 800-440-6723.‌‌​⁠​⁠‍‌​​​​‍‍‌​‌‌‌⁠​​​​​​​⁠​​​‌​⁠​‌​⁠‌‍‍‌‍​‌‍‌​‍‌⁠​‌‌‍​‌​​⁠

The KaiVac has been engineered and tested to provide long lasting performance. This warranty covers defects in workmanship or materials under normal use and service from the date of purchase.‌‌​⁠​⁠‍‌​​​​‍‍‌​‌‌‌⁠​​​​​​​⁠​​​‌​⁠​‌​⁠‌‍‍‌‍​‌‍‌​‍‌⁠​‌‌‍​‌​​⁠

Kaivac, Inc. warrants the following components to be free from defects in materials and workmanship for these time periods:

1.) Extended Warranty for end users who use only Kaivac chemicals for the life of the machine.

  • 5 years on rotationally molded parts
  • 3 years on other parts (excluding wear items)
  • 1 year on labor

2.) Standard Warranty (for approved non-Kaivac chemicals)

  • 1 year parts and labor

3.) Chemicals that have not been approved by Kaivac. (If uncertain, please call Kaivac to check.)

  • No warranty

All KaiVac replacement parts are guaranteed for 90 days from the date of installation. Normal wear items such as wheels, hoses, seals, gaskets, cords, casters, squeegees and GFCI are excluded from warranty coverage.

All warranty claims must be accompanied by a Return Authorization Number (RAN), which is available by calling the Kaivac, Inc. Customer Service Department. No returns will be accepted without a RAN.

This warranty does not apply to return freight costs, damage or defect caused by accident, negligence, misuse, fire or repair done by anyone other than a Kaivac authorized repair center. In no event shall Kaivac, Inc. be liable for incidental or consequential damages, or any damages to persons or property.

Please Note: Under no circumstances will the seller be liable for any loss, damage, expenses or consequential damages arising in connection with the use or inability to use seller’s product. Kaivac, Inc. reserves the right to make changes or improvements to its equipment without notice. Some states do not allow the exclusion or limitation of incidental or consequential damages. This warranty is in lieu of any other warranty expressed or implied, including any warranty of merchantability or fitness for a particular purpose.

Source: Kaivac 1715 S/N 1-44 / 1720 S/N 1-161 / 1750 S/N 1-4998 Operator Manual 1750_SN_1_thru_4998_on_01 Rev. 2007, page 3, used with permission. SES ref PF-RLQA-TFWS‌‌​⁠​⁠‍‌​​​​‍‍‌​‌‌‌⁠​​​​​​​⁠​​​‌​⁠​‌​⁠‌‍‍‌‍​‌‍‌​‍‌⁠​‌‌‍​‌​​⁠
1715 S/N 1-44 / 1720 S/N 1-161 / 1750 S/N 1-4998 1750_SN_1_thru_4998_on_01 (2007)Page 3 of 31
FRONT MATTER

Warranty Registration Form

In short This form is filled in by the customer who buys the equipment and returned to Kaivac within ten days of purchase. It asks for purchaser details, the model and serial number, type of business and intended uses.‌‌​⁠​⁠‍‌​​​​‍‍‌​‌‌‌⁠​​​​​​‌​​​​‌​⁠​‌​‌‌‍​‌‍​​⁠⁠​⁠⁠⁠‍‌​‌‍⁠⁠‌‌

To be completed and mailed or faxed by the customer purchasing equipment.
Return this warranty card within ten days of purchase.‌‌​⁠​⁠‍‌​​​​‍‍‌​‌‌‌⁠​​​​​​‌​​​​‌​⁠​‌​‌‌‍​‌‍​​⁠⁠​⁠⁠⁠‍‌​‌‍⁠⁠‌‌

Purchased By:

  • Name
  • Title
  • Company
  • Street Address
  • City
  • State
  • Zip Code
  • Phone Number
  • Fax
  • Date Purchased
  • Name of Distributor

I would like to receive updated information Yes No
Email address:

  • ☐ KaiVac® 1550 (KaiZen™)
  • ☐ KaiVac® 1750
  • ☐ KaiVac® 1220
  • ☐ KaiVac® 1720
  • ☐ KaiVac® 2150
  • ☐ KaiVac® 1250

Serial Number

Type of Business

  • ☐ School/University
  • ☐ Hospital/Health Care
  • ☐ Contract Cleaner
  • ☐ Industrial
  • ☐ Office
  • ☐ Other

Intended Uses (check all that apply):

  • ☐ Restroom Cleaning
  • ☐ Floor Stripping
  • ☐ Kitchen Cleaning
  • ☐ Carpet Extraction
  • ☐ Cleaning Around Machinery
  • ☐ Stairwell Cleaning
  • ☐ Locker and Shower Room
  • ☐ Hallway Cleaning
  • ☐ Classroom Cleaning
  • ☐ Other

Thank you for registering for our warranty program. As our way of saying thanks, we'd like to send you a free microfiber KaiTowel™.

Please return completed forms to:

Kaivac, Inc.
401 S. Third Street
Hamilton, OH 45011

Or Fax to: (513) 887-4601

© 2006 Kaivac, Inc. All Rights Reserved.

Source: Kaivac 1715 S/N 1-44 / 1720 S/N 1-161 / 1750 S/N 1-4998 Operator Manual 1750_SN_1_thru_4998_on_01 Rev. 2007, page 4, used with permission. SES ref PF-3N4X-F5VT‌‌​⁠​⁠‍‌​​​​‍‍‌​‌‌‌⁠​​​​​​‌​​​​‌​⁠​‌​‌‌‍​‌‍​​⁠⁠​⁠⁠⁠‍‌​‌‍⁠⁠‌‌
1715 S/N 1-44 / 1720 S/N 1-161 / 1750 S/N 1-4998 1750_SN_1_thru_4998_on_01 (2007)Page 4 of 31
Introduction

Introduction

Inspection

In short Unpack the machine and check it for shipping damage. If you find any, call us at 800-440-6723 right away; returns need a Return Authorization Number.‌‌​⁠​⁠‍‌​​​​‍‍‌​‌‌‌⁠​​​​​​‌‌​​​‌​⁠​‌‍‍​​‍‍‌‍​‍‌‍​⁠​⁠​​⁠⁠​‍‌‍

Carefully unpack and inspect your new KaiVac cleaning machine for shipping damage. Each unit is tested and thoroughly inspected before shipping. For instructions regarding any shipping damage, contact Kaivac, Inc. immediately. All returns must have a Return Authorization Number (RAN), which is available by calling the Kaivac, Inc. Customer Service Department.‌‌​⁠​⁠‍‌​​​​‍‍‌​‌‌‌⁠​​​​​​‌‌​​​‌​⁠​‌‍‍​​‍‍‌‍​‍‌‍​⁠​⁠​​⁠⁠​‍‌‍

Warnings

DO NOT operate with a frayed, worn or damaged electrical cord.
DO NOT use to pick up flammable or combustible materials.
DO NOT run the pump without water in the water tank.
DO NOT use hot water.
DO NOT remove the float shutoff.
ALWAYS test chemicals for compatibility on surfaces to be cleaned.
ALWAYS winterize your Kaivac equipment between uses if it will be exposed to freezing temperatures.

Grounding Instructions

THE KAIVAC MUST BE GROUNDED. If it should malfunction or stop working, grounding provides a path of least resistance for the electrical current and reduces the risk of electrical shock. The KaiVac is equipped with a ground fault circuit interrupter (GFCI) to further reduce danger of electric shock. It must be maintained and tested regularly. An equipment grounding cord and plug is included with the unit. The plug must be inserted in an appropriate outlet that has been properly installed and grounded in accordance with all local codes and ordinances. Cutting off the ground wire or using a cord with an ungrounded plug will void the warranty on the unit, and Kaivac, Inc. will NOT accept responsibility for the unit.

Improper connection of the equipment grounding cord can result in the risk of electrical shock. Ask a qualified electrician or service person to check the outlet grounding if you are unsure. Do not modify the plug provided with the KaiVac. If it will not fit the outlet, have a properly grounded outlet installed by a qualified electrician.

Source: Kaivac 1715 S/N 1-44 / 1720 S/N 1-161 / 1750 S/N 1-4998 Operator Manual 1750_SN_1_thru_4998_on_01 Rev. 2007, page 5, used with permission. SES ref PF-GJW2-32DB‌‌​⁠​⁠‍‌​​​​‍‍‌​‌‌‌⁠​​​​​​‌‌​​​‌​⁠​‌‍‍​​‍‍‌‍​‍‌‍​⁠​⁠​​⁠⁠​‍‌‍
1715 S/N 1-44 / 1720 S/N 1-161 / 1750 S/N 1-4998 1750_SN_1_thru_4998_on_01 (2007)Page 5 of 31
Safety Precautions

Safety Precautions

In short This section lists the safety rules for using the KaiVac: get proper training, use the machine only as intended, use and test the GFCI, wear protective gear, and avoid damaging the pump. It also explains how to winterize the machine with windshield wiper fluid.‌‌​⁠​⁠‍‌​​​​‍‍‌​‌‌‌⁠​​​​​​‌‍​​​‌​⁠​‌⁠⁠​‌‍‍⁠‍‌⁠​‍‍​‍‌‌​‍‍⁠​‍⁠

Equipment Warning

  • Read all instructions to ensure safe operation of the KaiVac.

Training

  • Proper training is required before using the KaiVac. Contact your authorized Kaivac distributor for training information.
  • Instruction placards are attached to each KaiVac and should not be removed.
  • These placards show proper cleaning procedures and safety precautions.

Equipment Use

  • Use the equipment for the purposes specified by the manufacturer. Do not use the equipment for any other purpose.
  • See the S-I-M-P-L-E operation section for proper use of equipment.

Spray Gun

  • Never point the spray gun at people.

Prevention of Electrocution

  • Use the ground fault circuit interrupter (GFCI) with the KaiVac at all times.
  • Test the GFCI before each use.
  • Do not spray liquid from the KaiVac onto electrical outlets or on any electrical devices.

Personal Protection

  • Wear gloves, eye protection and ear protection when operating the KaiVac.

Machine Integrity

  • Do not run the pump dry. This will void the machine warranty.
  • Do not run hot water through the pump. This can cause pump cavitation and will void the warranty.
  • Always be sure the water tank and water line filters are clear of debris. Running the pump with clogged filters can cause pump damage.
  • Replace any damaged cords before use.

Winterize Your Kaivac Equipment

  • Your Kaivac machinery should be winterized between uses if it is to be exposed to freezing temperatures.
  • To winterize your machine:
    • Pour 1/2 gallon of windshield wiper fluid into the empty water tank.
    • Aim the spray gun into the water tank.
    • Run the pump and spray the gun until the fluid begins running through.
Source: Kaivac 1715 S/N 1-44 / 1720 S/N 1-161 / 1750 S/N 1-4998 Operator Manual 1750_SN_1_thru_4998_on_01 Rev. 2007, page 6, used with permission. SES ref PF-GALV-QAZW‌‌​⁠​⁠‍‌​​​​‍‍‌​‌‌‌⁠​​​​​​‌‍​​​‌​⁠​‌⁠⁠​‌‍‍⁠‍‌⁠​‍‍​‍‌‌​‍‍⁠​‍⁠
1715 S/N 1-44 / 1720 S/N 1-161 / 1750 S/N 1-4998 1750_SN_1_thru_4998_on_01 (2007)Page 6 of 31
SAFETY

Chemical use

In short This page covers safe handling of chemicals, the power cord and building surfaces. Use only approved chemicals, keep them out of the water tank, plug into a grounded outlet, and use the machine only on water resistant surfaces.‌‌​⁠​⁠‍‌​​​​‍‍‌​‌‌‌⁠​​​​​​‌⁠​​​‌​⁠​‌​‌​⁠‍⁠‍⁠⁠⁠⁠​‍‌‍⁠⁠‍⁠​‌⁠⁠​
  • Only use chemicals approved for use with the KaiVac. Use of non-Kaivac chemicals may cause machine damage and will reduce warranty periods. Turn chemical line off when not in use.
  • Keep the appropriate chemical MSDS on hand at all times.
  • Cleaning chemicals should not be put in the water tank (with the exception of KaiDri in small amounts). Chemicals in the water tank can harm operator and machine because:
    • Chemicals in the water tank must pass through the pump, which may cause premature pump failure.
    • Use of chemicals in the water tank voids the warranty.
    • Chemicals in the water tank will be aerosolized and may harm the operator.

Electrical

  • Connect to a properly grounded outlet only.
  • Do not pull the KaiVac by the cord or use the cord as a handle.
  • Do not close a door on the cord or pull the cord around sharp edges or corners.
  • Do not run over the cord.
  • Keep the cord away from heated surfaces.
  • Turn off the unit before unplugging.
  • Do not pull on the cord to unplug. Grasp the plug at the outlet and pull.

Prevention of Water Damage to Buildings

The KaiVac is to be used on water resistant building surfaces only. These include concrete, terrazzo, ceramic tile and quarry tile.‌‌​⁠​⁠‍‌​​​​‍‍‌​‌‌‌⁠​​​​​​‌⁠​​​‌​⁠​‌​‌​⁠‍⁠‍⁠⁠⁠⁠​‍‌‍⁠⁠‍⁠​‌⁠⁠​

The KaiVac may be used for stripping on vinyl composite tile floors, but daily cleaning of resilient flooring using the KaiVac is not recommended.

Never overflow the water tank or the vacuum recovery tank.

Discontinue use if any leaks occur in the KaiVac.

CAUTION: Prior to cleaning, always inspect area to ensure that the surfaces to be cleaned are water- safe. In addition, check for poor construction, damaged walls and floors, missing or damaged tiles or grout, missing or insufficient caulk, and loose wall coverings. If problems are discovered, resolve them prior to cleaning in order to avoid any harm that may result from exposure to water or cleaning solution.
Source: Kaivac 1715 S/N 1-44 / 1720 S/N 1-161 / 1750 S/N 1-4998 Operator Manual 1750_SN_1_thru_4998_on_01 Rev. 2007, page 7, used with permission. SES ref PF-JHWV-LRR7‌‌​⁠​⁠‍‌​​​​‍‍‌​‌‌‌⁠​​​​​​‌⁠​​​‌​⁠​‌​‌​⁠‍⁠‍⁠⁠⁠⁠​‍‌‍⁠⁠‍⁠​‌⁠⁠​
1715 S/N 1-44 / 1720 S/N 1-161 / 1750 S/N 1-4998 1750_SN_1_thru_4998_on_01 (2007)Page 7 of 31
Out of Box Setup Instructions

Out of Box Setup Instructions

In short This page shows seven steps for setting up the machine after it comes out of the box. You join the vac wand sections, fit the elbow and vac motor hose, secure the dump hose, put the tools and brush head in place, and hang the tote bag over the nose of the machine.‌‌​⁠​⁠‍‌​​​​‍‍‌​‌‌‌⁠​​​​​​‍​​​​‌​⁠​‌​‍‍‍‍‍⁠​​⁠‍⁠‍‌​⁠‌‌‍‍‍‌‌​
  1. Remove vac wand section from top of machine and attach to remaining section of vac wand by sliding the sections together until the locking pin engages as shown here.
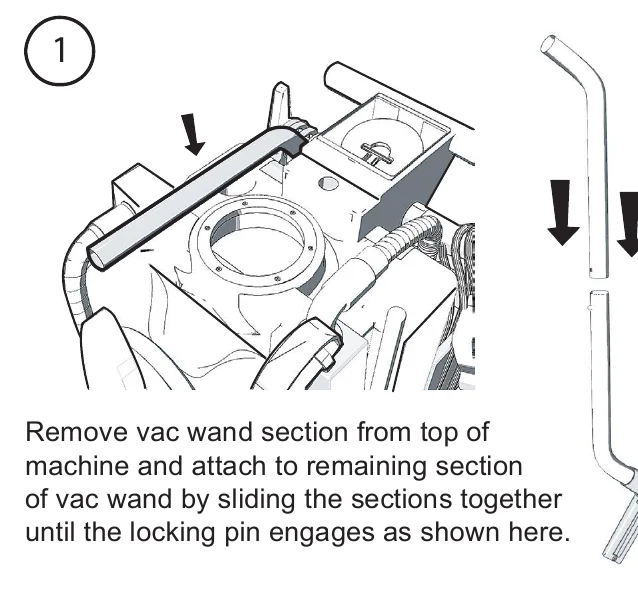
    Top of the machine with the vac wand section lying across it and an arrow pointing to it; beside it the two wand sections are shown sliding together until the locking pin engages, with the squeegee tool at the bottom
    1
  2. After removing machine from container, Attach the plastic elbow to the vac tank as shown above.
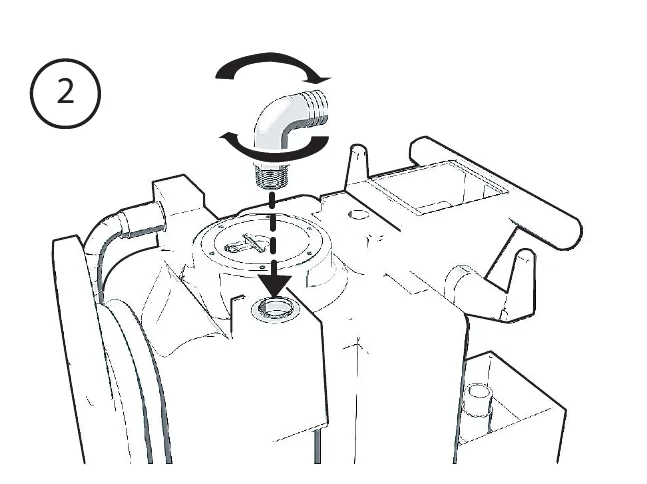
    Plastic elbow with rotating arrows being lowered by a dashed arrow onto the vac tank opening
    2
  3. Attach vac motor hose to elbow and vac motor inlet as shown above.
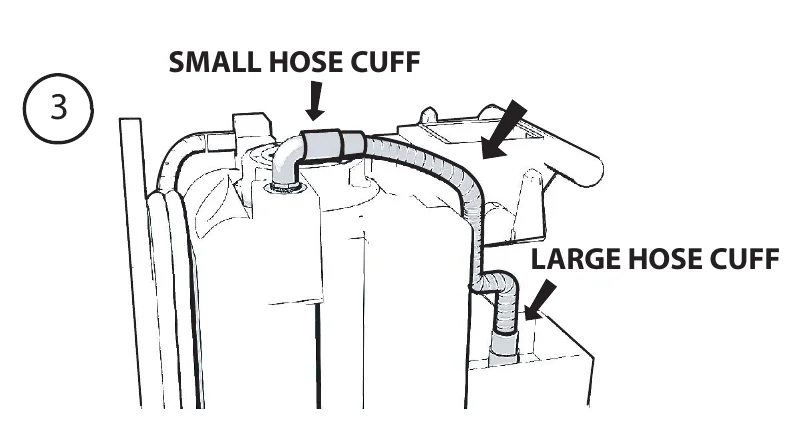
    Vac tank top with arrows to the SMALL HOSE CUFF at the elbow and the LARGE HOSE CUFF at the vac motor inlet, with the vac motor hose connecting them
    3
  4. Attach dump hose to retainer bolt with rubber strap on dump hose as shown above.
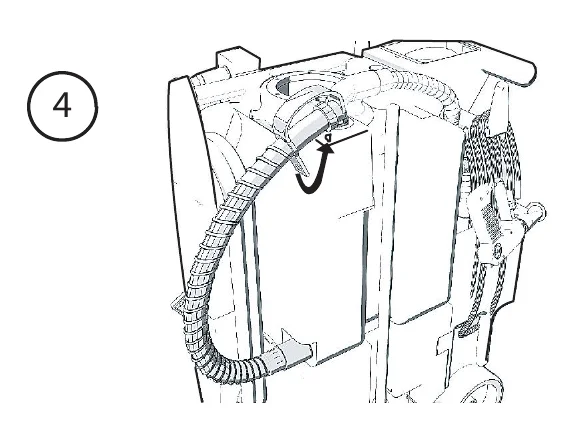
    Dump hose coiled on the machine with an arrow showing its rubber strap attaching to the retainer bolt
    4
  5. Remove the tools from the vac tank and place them in the appropriate locations as shown above.
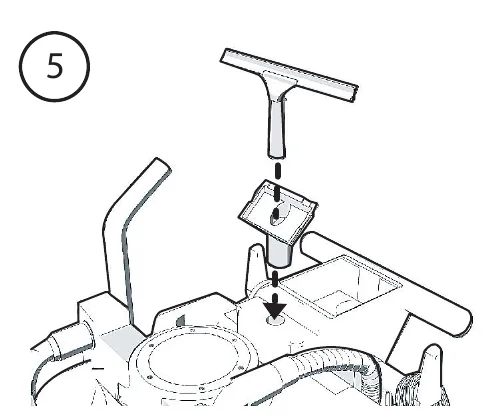
    Machine top with the squeegee tool shown being placed into its holder on the machine with dashed arrows
    5
  6. Place the brush head onto the telescoping handle located on the left side of machine as shown above.
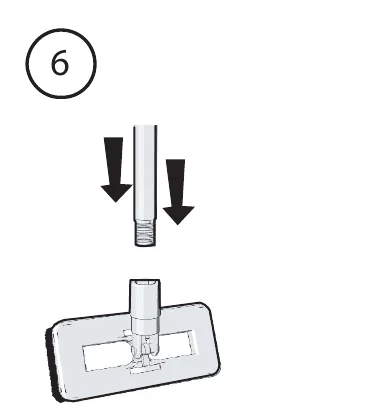
    Telescoping handle with arrows pointing down to a brush head to be attached
    6
  7. Make sure all tools are removed from vac tank and replace vac lid on vac tank as shown above. Place tools in tote bag and hang bag over nose of machine.
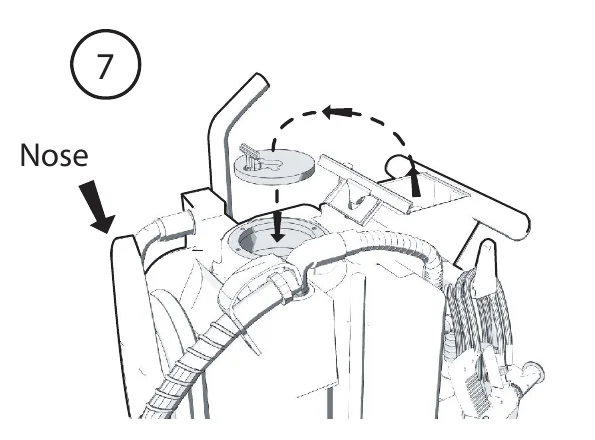
    Machine with vac lid being replaced on the vac tank, curved dashed arrow, and arrow pointing to the Nose of the machine where the tote bag hangs
    7
Source: Kaivac 1715 S/N 1-44 / 1720 S/N 1-161 / 1750 S/N 1-4998 Operator Manual 1750_SN_1_thru_4998_on_01 Rev. 2007, page 8, used with permission. SES ref PF-GXDH-B54T‌‌​⁠​⁠‍‌​​​​‍‍‌​‌‌‌⁠​​​​​​‍​​​​‌​⁠​‌​‍‍‍‍‍⁠​​⁠‍⁠‍‌​⁠‌‌‍‍‍‌‌​
1715 S/N 1-44 / 1720 S/N 1-161 / 1750 S/N 1-4998 1750_SN_1_thru_4998_on_01 (2007)Page 8 of 31
Preparing your Kaivac for use

Preparing your KaiVac for use

In short This section lists five checks to make before using the machine: fill it with water, prepare the cleaning solution, check tools and supplies, inspect hoses and spray lines, and test the GFCI.‌‌​⁠​⁠‍‌​​​​‍‍‌​‌‌‌⁠​​​​​​‍‌​​​‌​⁠​‌​⁠​‌​‌‍‌‍​⁠​​‌‌⁠‍⁠​‌⁠‍‌‌
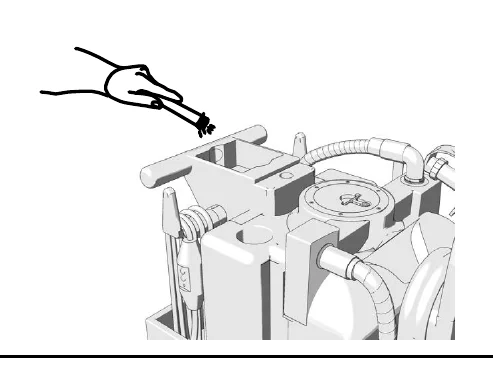
  1. Fill machine with clean, cool water.
    A hand pouring water into the top opening of the machine's tank
  2. Prepare the cleaning solution you will be using by attaching the chemical feed line and cap to the top of your chemical bottle and selecting the proper metering tip. (See placards for metering tip information.)
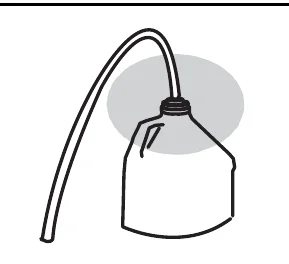
    A chemical bottle with a feed line attached to the cap at the top, the tube curving up and over the bottle
  3. Check machine for all tools and supplies needed to complete task.
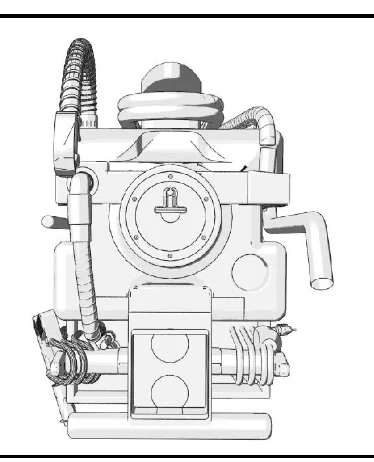
    Front view of the machine showing its tank, hoses and fittings, for checking tools and supplies
  4. Check all hoses and spray lines for damage prior to use. If damage is found, do not continue until proper repairs are completed.
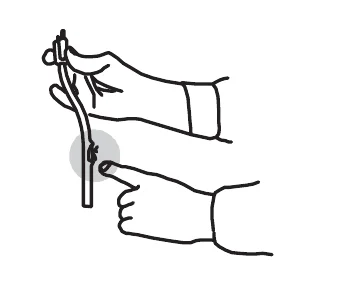
    Gloved hands holding a hose and pointing to a damaged spot on it
  5. Plug in machine and test GFCI (Ground Fault Circuit Interrupter) to ensure it is working properly. You are now ready.
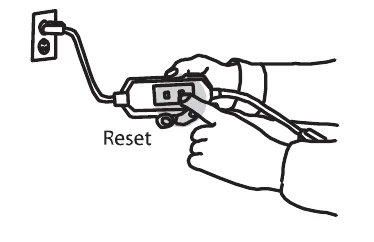
    Gloved hands pressing the Reset button on an in-line GFCI plugged into a wall outlet
Source: Kaivac 1715 S/N 1-44 / 1720 S/N 1-161 / 1750 S/N 1-4998 Operator Manual 1750_SN_1_thru_4998_on_01 Rev. 2007, page 9, used with permission. SES ref PF-Z6XS-U4SY‌‌​⁠​⁠‍‌​​​​‍‍‌​‌‌‌⁠​​​​​​‍‌​​​‌​⁠​‌​⁠​‌​‌‍‌‍​⁠​​‌‌⁠‍⁠​‌⁠‍‌‌
1715 S/N 1-44 / 1720 S/N 1-161 / 1750 S/N 1-4998 1750_SN_1_thru_4998_on_01 (2007)Page 9 of 31
OPERATION

Operating your KaiVac using the S-I-M-P-L-E Process

In short This page shows the six steps of the S-I-M-P-L-E process in pictures: set up, inject chemicals, manually brush if needed, pressure wash and rinse, loop the spray line, and extract and dry.‌‌​⁠​⁠‍‌​​​​‍‍‌​‌‌‌⁠​​​​​​‍‍​​​‌​⁠​‌​‌​​‍‌​‍‍⁠‍⁠‍‍⁠‍‌⁠⁠‍⁠‍‌‌

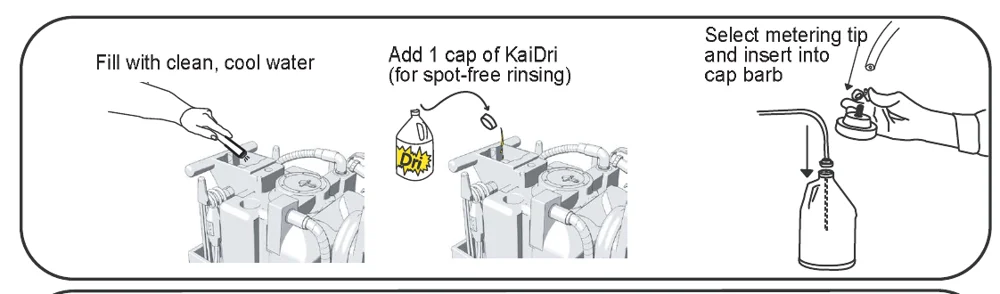
Set-up

Set-up: a hand pours clean, cool water into the machine tank, then 1 cap of KaiDri is added for spot-free rinsing, then a metering tip is selected and inserted into the cap barb of a chemical bottle
Fill with clean, cool water. Add 1 cap of KaiDri (for spot-free rinsing). Select metering tip and insert into cap barb

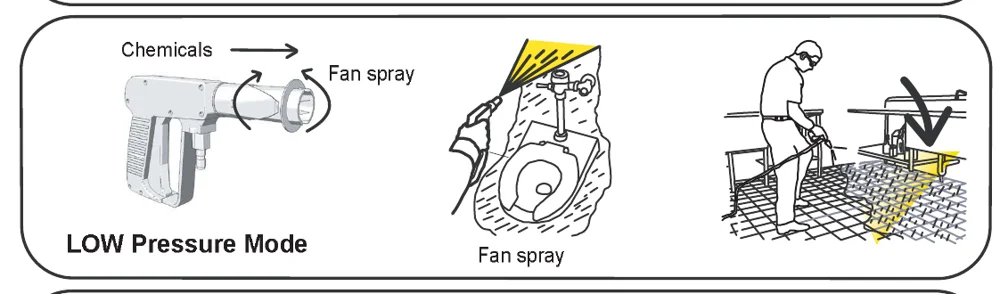
Inject chemicals

Inject chemicals: spray gun in low pressure mode with chemicals flowing in and a fan spray, fan spraying a urinal, and a worker applying chemicals to a floor
LOW Pressure Mode. Chemicals. Fan spray

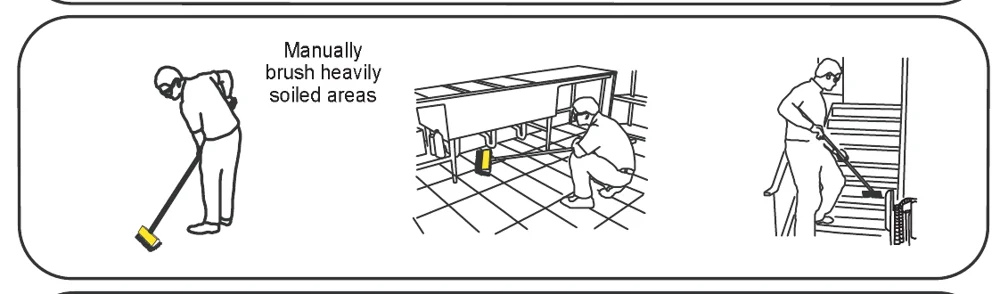
Manual brush (optional)

Manual brush: workers manually brushing heavily soiled areas with a long-handled brush on a floor, under urinals and on stairs
Manually brush heavily soiled areas

Pressure wash and rinse

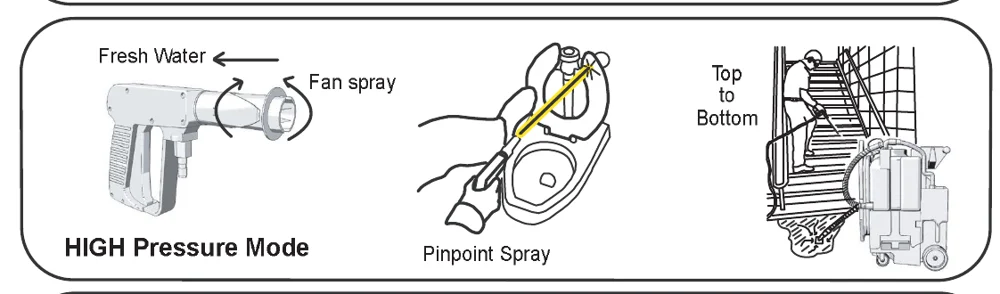
Pressure wash and rinse: spray gun in high pressure mode with fresh water and fan spray, pinpoint spray into a toilet, and a worker rinsing stairs from top to bottom beside the machine
HIGH Pressure Mode. Fresh Water. Fan spray. Pinpoint Spray. Top to Bottom

Loop spray line

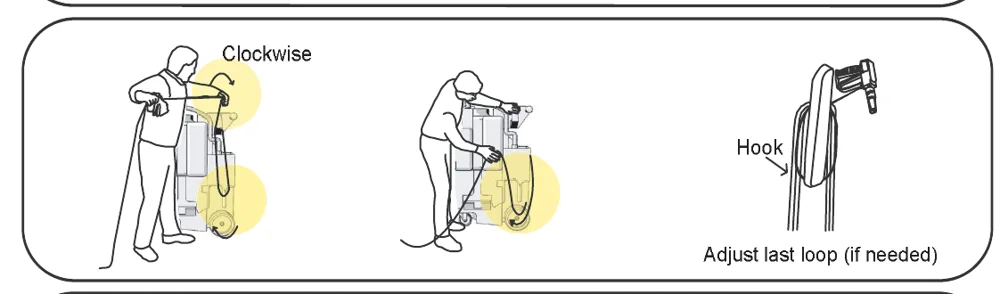
Loop spray line: a worker coils the spray hose clockwise around the machine, then hangs the last loop on a hook, adjusting the last loop if needed
Clockwise. Hook. Adjust last loop (if needed)

Extract and dry

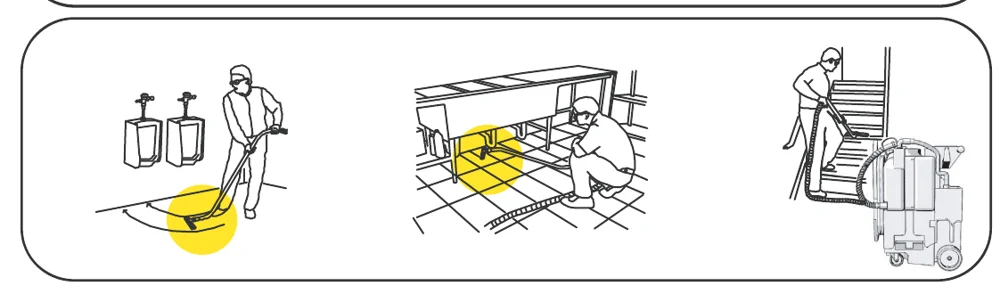
Extract and dry: workers using the vacuum squeegee tool on a floor by urinals, under fixtures, and on stairs next to the machine
Source: Kaivac 1715 S/N 1-44 / 1720 S/N 1-161 / 1750 S/N 1-4998 Operator Manual 1750_SN_1_thru_4998_on_01 Rev. 2007, page 10, used with permission. SES ref PF-4PZS-5W3F‌‌​⁠​⁠‍‌​​​​‍‍‌​‌‌‌⁠​​​​​​‍‍​​​‌​⁠​‌​‌​​‍‌​‍‍⁠‍⁠‍‍⁠‍‌⁠⁠‍⁠‍‌‌
1715 S/N 1-44 / 1720 S/N 1-161 / 1750 S/N 1-4998 1750_SN_1_thru_4998_on_01 (2007)Page 10 of 31
Machine Maintenance

Machine Maintenance

In short This page is a checklist of items to check and maintain on the machine, such as the squeegee, spray gun, hoses, tanks and electrical system. Unplug the machine before lifting the electric cover assembly, and stop using it if leaks are found.‌‌​⁠​⁠‍‌​​​​‍‍‌​‌‌‌⁠​​​​​​‍⁠​​​‌​⁠​‌‌‌‍⁠​​‍⁠‌⁠‌‍‍⁠‍‍​⁠‌⁠‌‌​‌
CAUTION Always make sure machine is unplugged before lifting electric cover assembly.
ItemProcedure
Floor Squeegee
  • Check condition of rubber squeegee blades and wheels on the floor tool.
  • Rough floor surfaces will cause the blades and wheels to wear out more quickly. Replace as necessary.
Spray Gun
  • Check spray pattern. If spray pattern will not pinpoint, clean orifice by removing it with an Allen wrench and flushing. Replace if not pinpointing.
  • If nozzle becomes difficult to move from high to low pressure lubricate nozzle with lithium grease.
Pressure Hose
  • Wipe clean after each use.
  • Check for cuts or frays in the hose jacket, particularly at the end of the fittings. Replace hose if cuts are found.
Water Tank
  • Check condition of filter in water tank. Clean as needed.
  • Empty the water tank to prevent mildew and bacteria growth. Empty tank by dipping the vacuum hose onto the water tank and transferring the water to the vacuum tank.
Vacuum Tank
  • Empty and flush vacuum tank.
  • Clean and disinfect.
  • Check the float shutoff screen to be sure it is not plugged up. A plugged filter screen restricts airflow and results in reduced suction.
Leaks
  • Be alert for leaks around hoses, fittings, spray wand, tanks or elsewhere.
  • Discontinue use until leaks are repaired.
Electrical System
  • The ground fault circuit interrupter (GFCI) must be tested before each use.
  • Electric cords must be inspected for tears or cuts in the insulation.
Source: Kaivac 1715 S/N 1-44 / 1720 S/N 1-161 / 1750 S/N 1-4998 Operator Manual 1750_SN_1_thru_4998_on_01 Rev. 2007, page 11, used with permission. SES ref PF-VF4Y-F66Z‌‌​⁠​⁠‍‌​​​​‍‍‌​‌‌‌⁠​​​​​​‍⁠​​​‌​⁠​‌‌‌‍⁠​​‍⁠‌⁠‌‍‍⁠‍‍​⁠‌⁠‌‌​‌
1715 S/N 1-44 / 1720 S/N 1-161 / 1750 S/N 1-4998 1750_SN_1_thru_4998_on_01 (2007)Page 11 of 31
OPERATION

Vac Tank Cleanout Instructions

In short This page shows how to clean out the vac tank after use: dump the contents, rinse the tank, lock the front caster wheels and drain the remaining water. Re-attach the dump hose and unlock the wheels when finished.‌‌​⁠​⁠‍‌​​​​‍‍‌​‌‌‌⁠​​​​​​⁠​​​​‌​⁠​‌​‍⁠⁠‌⁠⁠‍​​⁠​‍​‌‌​‌⁠‌‍‍‌​
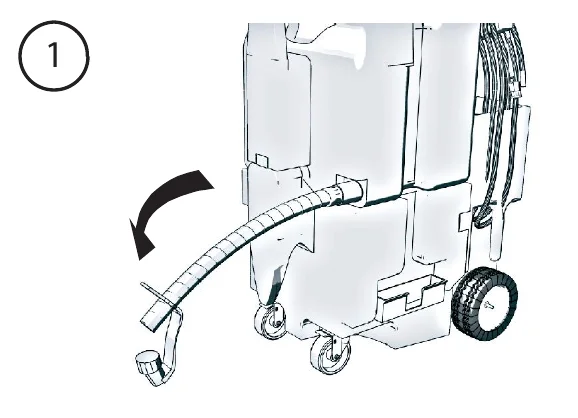
Step 1: rear of the machine with the dump hose being detached, an arrow showing the hose swinging away from its fitting
1

Disconnect dump hose and empty contents into proper location.‌‌​⁠​⁠‍‌​​​​‍‍‌​‌‌‌⁠​​​​​​⁠​​​​‌​⁠​‌​‍⁠⁠‌⁠⁠‍​​⁠​‍​‌‌​‌⁠‌‍‍‌​

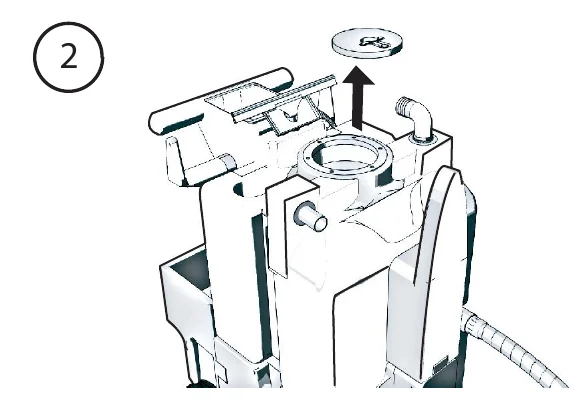
Step 2: vac lid being lifted straight up off the opening of the vac tank, shown by an upward arrow
2

After dumping is complete, remove vac lid from vac tank.
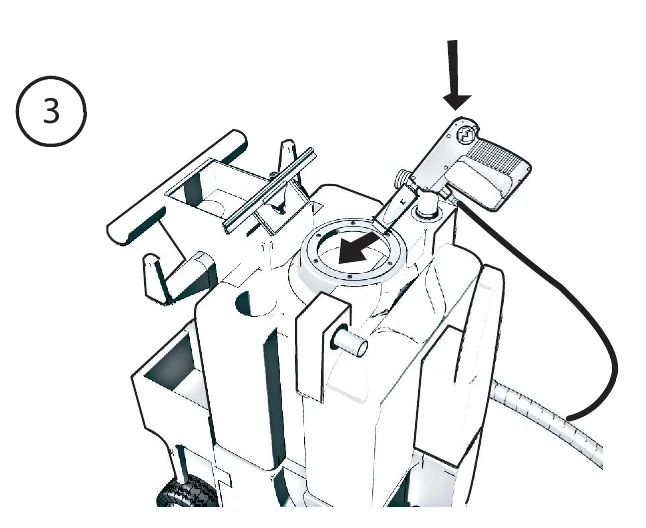
Step 3: pressure gun held over the open vac tank opening, with arrows showing the trigger being pressed and water spraying into the tank
3

Using pressure gun or other water source, rinse inside of tank thoroughly.
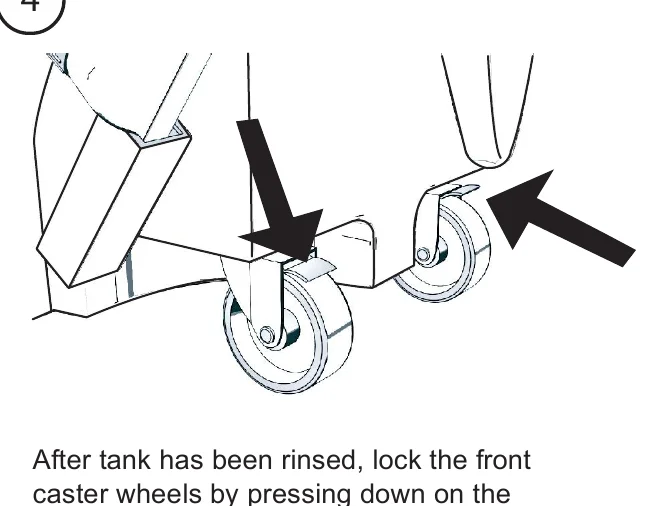
Step 4: two front caster wheels with arrows pointing to the wheel locks being pressed down
4

After tank has been rinsed, lock the front caster wheels by pressing down on the locks as shown above.
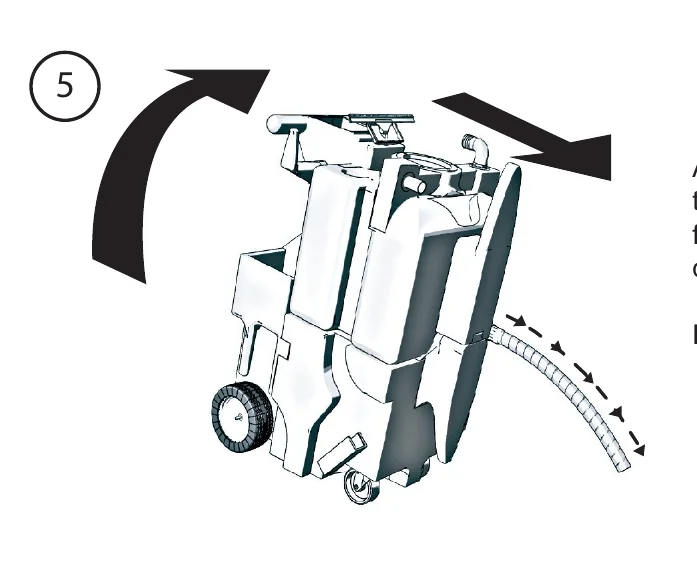
Step 5: machine tipped to the left and slightly forward with large arrows showing the tipping direction and the dump hose hanging down so remaining water drains
5

After caster wheels have been locked, tip the machine to the left and slightly forward to allow the remaining water to drain.

Re-attach dump hose and unlock wheels.

Source: Kaivac 1715 S/N 1-44 / 1720 S/N 1-161 / 1750 S/N 1-4998 Operator Manual 1750_SN_1_thru_4998_on_01 Rev. 2007, page 12, used with permission. SES ref PF-RBSE-RA75‌‌​⁠​⁠‍‌​​​​‍‍‌​‌‌‌⁠​​​​​​⁠​​​​‌​⁠​‌​‍⁠⁠‌⁠⁠‍​​⁠​‍​‌‌​‌⁠‌‍‍‌​
1715 S/N 1-44 / 1720 S/N 1-161 / 1750 S/N 1-4998 1750_SN_1_thru_4998_on_01 (2007)Page 12 of 31
Vac Tank Removal Instructions

Vac Tank Removal Instructions

In short This page shows how to take the vac tank off the unit. Remove the accessories and vac inlet hose, un-snap the upper and lower straps, then tip the tank back and lift it away.‌‌​⁠​⁠‍‌​​​​‍‍‌​‌‌‌⁠​​​​​​⁠‌​​​‌​⁠​‌‍‌​‍‌‌‌‍⁠‌​⁠⁠‌​​‍‌​‍‌‌‌‌
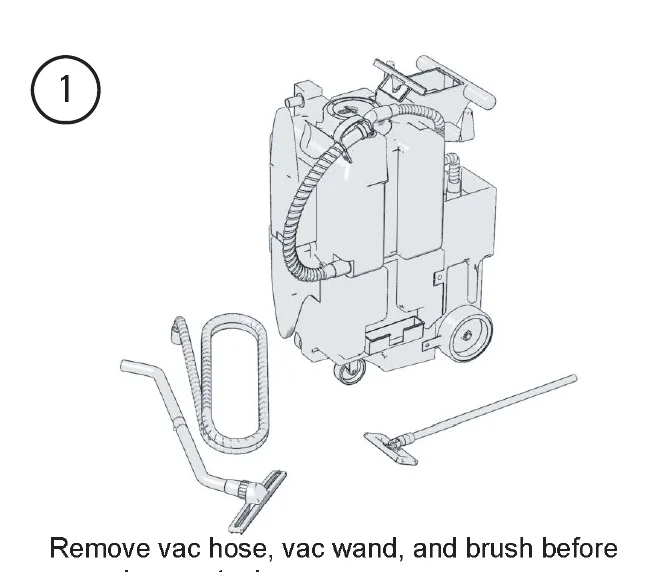
Machine with vac hose attached, and the removed vac hose, bent vac wand and brush lying beside it
1

Remove vac hose, vac wand, and brush before removing vac tank.‌‌​⁠​⁠‍‌​​​​‍‍‌​‌‌‌⁠​​​​​​⁠‌​​​‌​⁠​‌‍‌​‍‌‌‌‍⁠‌​⁠⁠‌​​‍‌​‍‌‌‌‌

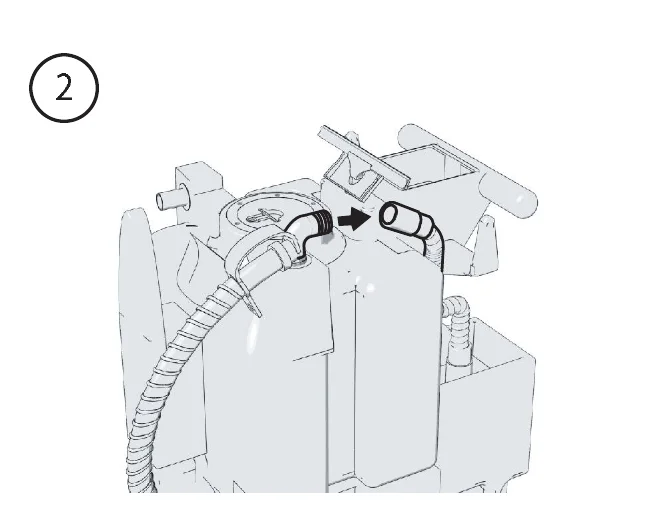
Close view of the top of the vac tank with an arrow showing the vac inlet hose being pulled off the 90 degree fitting
2

Disconnect vac inlet hose from 90 degree fitting on vac tank.
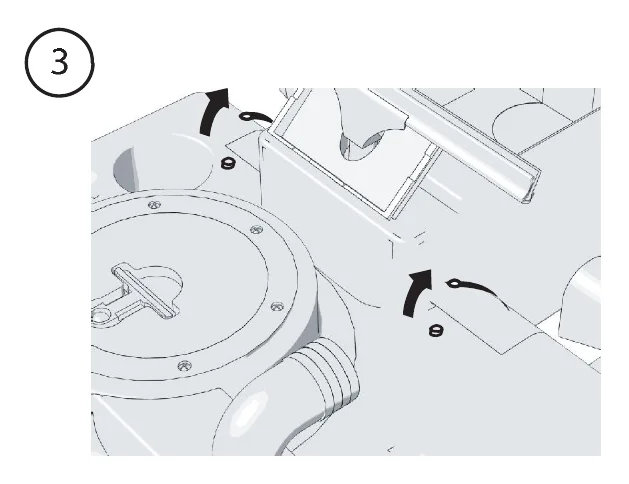
Top view of the tank area with arrows showing the upper straps being un-snapped
3

Un-snap straps holding the vac tank to the water tank upper assembly.
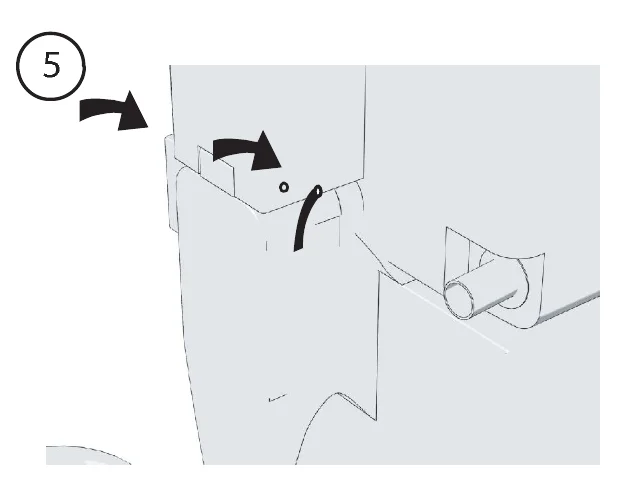
Side view of the lower tank area with arrows showing the lower strap being un-snapped
5

Un-snap straps holding the vac tank to the water tank lower assembly.
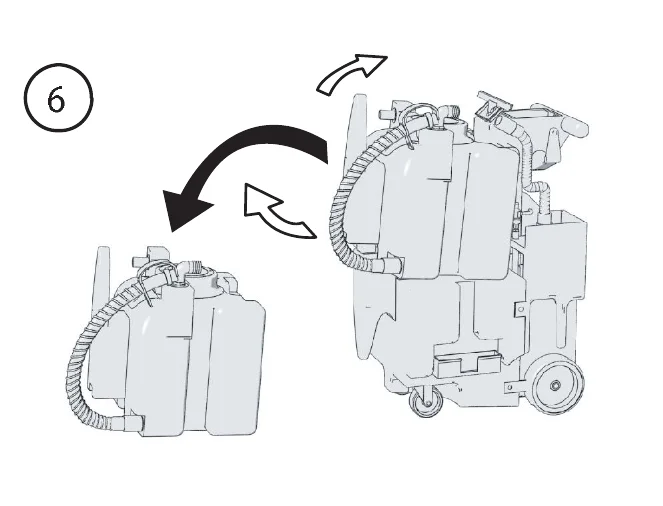
Vac tank tipped backwards at the bottom with arrows showing it being pulled out and lifted away from the unit
6

Slightly pull the bottom section of the vac tank out while tipping it backwards.

Lift and pull the vac tank away from the unit.

Repeat the steps backwards to replace tank.

Source: Kaivac 1715 S/N 1-44 / 1720 S/N 1-161 / 1750 S/N 1-4998 Operator Manual 1750_SN_1_thru_4998_on_01 Rev. 2007, page 13, used with permission. SES ref PF-IHNL-KFHJ‌‌​⁠​⁠‍‌​​​​‍‍‌​‌‌‌⁠​​​​​​⁠‌​​​‌​⁠​‌‍‌​‍‌‌‌‍⁠‌​⁠⁠‌​​‍‌​‍‌‌‌‌
1715 S/N 1-44 / 1720 S/N 1-161 / 1750 S/N 1-4998 1750_SN_1_thru_4998_on_01 (2007)Page 13 of 31
Black box removal

Black Box Removal Instructions

In short This section shows how to take the black box assembly off the machine in five illustrated steps. You clear off hoses, cords and tools, remove the bolts, disconnect the water and return lines, and slide the assembly away from the water tank.‌‌​⁠​⁠‍‌​​​​‍‍‌​‌‌‌⁠​​​​​​⁠‍​​​‌​⁠​‌‍‍⁠‍‌‍⁠​‍‌⁠‍​‍​‌​‍‌​⁠‌​‍
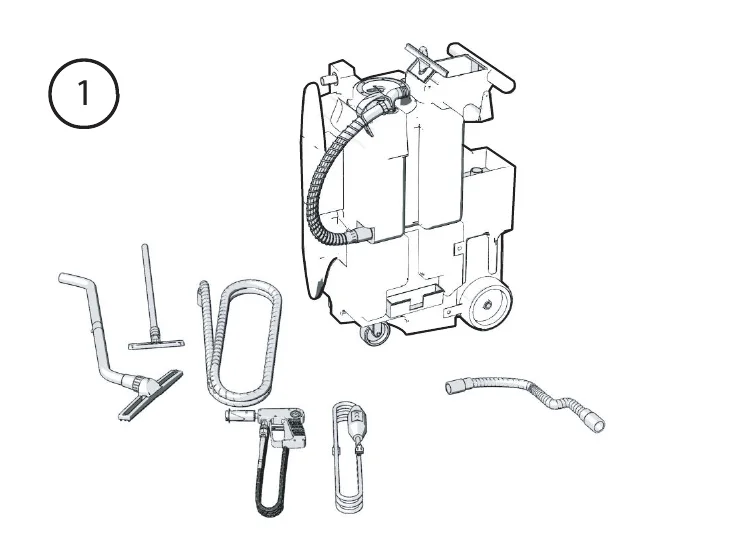
Machine standing upright with its hoses, wand tools, vacuum hose and spray gun laid out beside it, all removed before taking off the black box
1

Remove all hoses, cords, and tools prior to black box removal.‌‌​⁠​⁠‍‌​​​​‍‍‌​‌‌‌⁠​​​​​​⁠‍​​​‌​⁠​‌‍‍⁠‍‌‍⁠​‍‌⁠‍​‍​‌​‍‌​⁠‌​‍

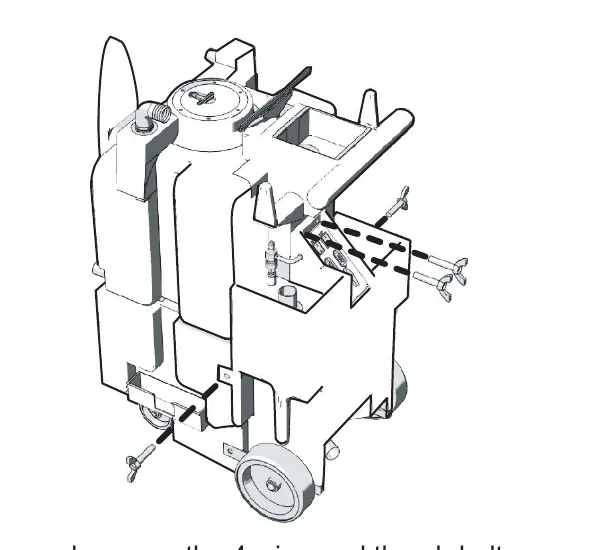
Machine seen from the side with dashed lines and arrows showing the four wing and thumb bolts to remove at the top of the control panel and on the left and right of the black box mid section
2

Loosen and remove the 4 wing and thumb bolts located at the top of the control panel and on the left and right of the black box mid section.
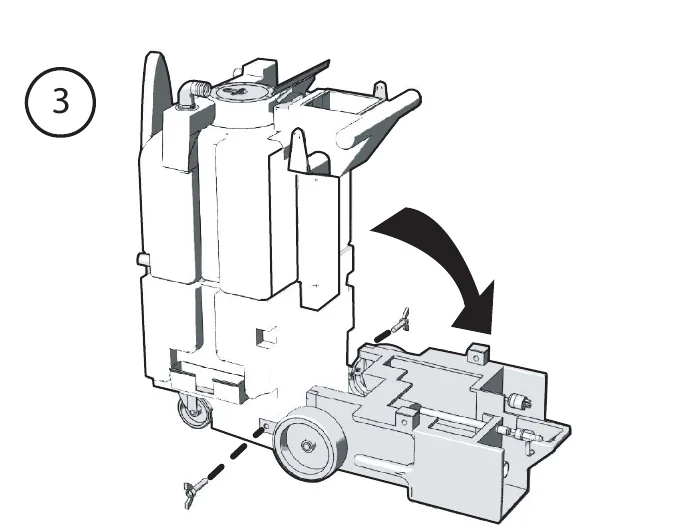
Black box assembly tilted away from the machine with a curved arrow until it rests on the floor, with dashed lines showing the axle strap wing bolts to remove behind the wheels
3

Tilt the black box assembly away from machine until it rests on the floor. Next, remove the 2 axle strap wing bolts on either side of the machine behind the wheels.
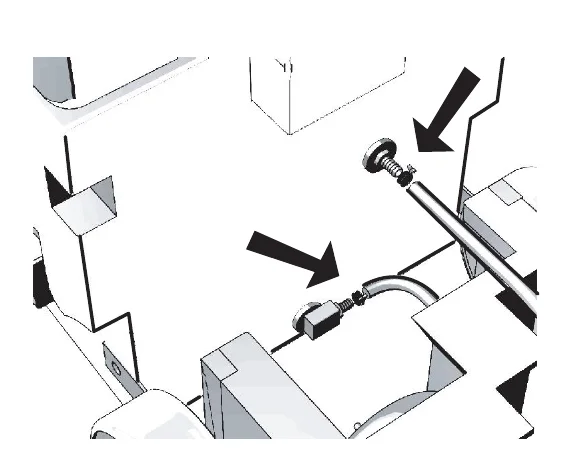
Close view behind the black box with arrows pointing to the water line and return line connections to disconnect
5

Locate and disconnect the water line and return line behind the black box on the machine.
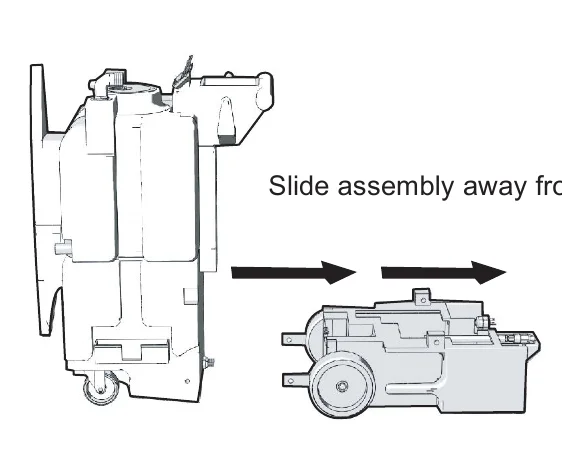
Machine on the left and the black box assembly on the right, with arrows showing the assembly sliding away from the water tank
6

Slide assembly away from water tank.

Source: Kaivac 1715 S/N 1-44 / 1720 S/N 1-161 / 1750 S/N 1-4998 Operator Manual 1750_SN_1_thru_4998_on_01 Rev. 2007, page 14, used with permission. SES ref PF-7N7L-3QVF‌‌​⁠​⁠‍‌​​​​‍‍‌​‌‌‌⁠​​​​​​⁠‍​​​‌​⁠​‌‍‍⁠‍‌‍⁠​‍‌⁠‍​‍​‌​‍‌​⁠‌​‍
1715 S/N 1-44 / 1720 S/N 1-161 / 1750 S/N 1-4998 1750_SN_1_thru_4998_on_01 (2007)Page 14 of 31
Troubleshooting

Troubleshooting

In short This table lists common problems by area (electrical, vacuum, blow dry and optional DVD), with the possible causes and the fix for each. Always unplug the machine before lifting the electric cover assembly.‌‌​⁠​⁠‍‌​​​​‍‍‌​‌‌‌⁠​​​​​​⁠⁠​​​‌​⁠​‌​​‌‍‍​​⁠‌​⁠‍‍‌​‍⁠⁠​‌‌‍​‌
CAUTION Always make sure machine is unplugged before lifting electric cover assembly.
AreaProblemPossible CauseSolution
ElectricalNo power to pump or vac motor.
  1. Machine not plugged in.
  2. Switch not “on.”
  3. GFCI tripped.
  4. Building circuit overloaded.
  5. Switch wires loose.
  6. Connections loose.
  1. Plug machine in.
  2. Check switches for “on."
  3. Test and reset GFCI.
  4. Check and reset circuit.
  5. Disconnect power and check for loose wire.
  6. Disconnect power and check for loose wire under panel.
Electrical burning smell.
  1. Vac motor brushes worn.
  2. Vac motor hung up.
  3. Pump motor hung up.
  1. Remove vac motor and repair.
  2. Release pressure on hose and jog pump switch, or replace.
Vacuum SystemNo/Weak vacuum.
  1. Vac tank full.
  2. Squeegee blades or wheels worn.
  3. Float shutoff screen dirty.
  4. Float ball stuck.
  5. Damaged hose.
  6. Dump hose plug missing.
  7. Access lid not tight.
  8. Vacuum hose plugged.
  9. Too much liquid in vac hose.
  10. Vac hose still wrapped.
  11. Muffler plugged.
  12. Leak in vac tank.
  1. Empty vac tank.
  2. Replace wheels or blades and check periodically.
  3. Wipe off float screen to clean.
  4. Tap float and release/clean.
  5. Cut and repair/replace.
  6. Contact dealer and replace.
  7. Tighten lid hand tight.
  8. Flush hose to remove debris.
  9. Allow air in when vacuuming.
  10. Unwrap vac hose fully.
  11. Remove HEPA filter and clean.
  12. If repairable, clean and dry affected area and seal with silicone.
Moisture from exhaust.
  1. Vac tank full.
  2. Float shutoff missing.
  3. Excessive foam in vac tank.
  1. Dump vac tank.
  2. Replace.
  3. Use defoamer.
Blow Dry SystemNo air flow.
  1. Hose disconnected.
  1. Reconnect hose.
Moisture from nozzle.
  1. Water in blow hose.
  1. Dry blow line.
Suction, not blow action.
  1. Vacuum hose connected to vac tank.
  1. Reconnect to vac motor exhaust hose.
DVD System (optional)No power.
  1. Power cord not connected
  2. Power switch not on.
  1. Plug cord into DVD player.
  2. Turn switch on DVD player on.
No picture.
  1. Screen is blank.
  1. Close and re-open lid. Play.
No audio.
  1. No sound from player
  1. Check volume control knob.
Source: Kaivac 1715 S/N 1-44 / 1720 S/N 1-161 / 1750 S/N 1-4998 Operator Manual 1750_SN_1_thru_4998_on_01 Rev. 2007, page 15, used with permission. SES ref PF-SDPY-ERPI‌‌​⁠​⁠‍‌​​​​‍‍‌​‌‌‌⁠​​​​​​⁠⁠​​​‌​⁠​‌​​‌‍‍​​⁠‌​⁠‍‍‌​‍⁠⁠​‌‌‍​‌
1715 S/N 1-44 / 1720 S/N 1-161 / 1750 S/N 1-4998 1750_SN_1_thru_4998_on_01 (2007)Page 15 of 31
Troubleshooting

Troubleshooting

In short This table lists problems with the high pressure system and the chemical injection system, with the possible causes and the solution for each. Always unplug the machine before lifting the electric cover assembly.‌‌​⁠​⁠‍‌​​​​‍‍‌​‌‌‌⁠​​​​​‌​​​​​‌​⁠​‌‌⁠​‍​​​⁠‌​‌⁠‌‍⁠‌⁠‌⁠‍‍⁠⁠‍
CAUTION Always make sure machine is unplugged before lifting electric cover assembly.
AreaProblemPossible CauseSolution
High Pressure SystemNo water from pump or low pressure.
  1. Out of water.
  2. Gun nozzle plugged.
  3. Air in pump (vapor lock).
  4. Gun orifice missing.
  5. Water tank filter plugged.
  6. In-line bowl filter plugged.
  7. Bowl filter lid loose.
  8. Pressure hose damaged.
  9. Quick disconnect leaking.
  10. Injector plugged.
  11. Pulse hose damaged.
  12. Regulator failed.
  13. Hose kinked.
  14. Seals in pump need replaced.
  1. Fill water tank.
  2. Remove orifice with Allen wrench and clean.
  3. Use power prime technique.
  4. Replace orifice.
  5. Clean tank and filter.
  6. Remove filter cover and clean.
  7. Gently tighten bowl cover.
  8. Repair or replace.
  9. Tighten or replace.
  10. Remove safety cap from chemical and blow small amounts of compressed air into line.
  11. Repair or replace.
  12. Replace.
  13. Unkink and check for damage
  14. Remove and replace seals.
Bad fan pattern or pinpoint pattern on gun.
  1. Debris in nozzle.
  2. Orifice damaged.
  1. Remove orifice with Allen wrench and clean.
  2. Remove and replace.
Chemical Injection SystemNo chemical flow.
  1. Out of chemical.
  2. Safety cap not secure.
  3. Chemical valve "off."
  4. Safety cap plugged.
  5. Spray gun in wrong mode.
  6. Metering tip plugged.
  7. Injector plugged.
  8. Air entering system.
  9. Injector installed backwards.
  1. Refill chemical.
  2. Check safety cap / tighten.
  3. Check on / off valve.
  4. Replace cap.
  5. Make sure gun nozzle is pulled out away from gun chemical mode.
  6. Check metering tip for clog.
  7. Remove safety cap from chemical and blow small amounts of compressed air into line.
  8. Check for air entering system around chemical lines or injector.
  9. If fluttering or pulsing sound can be heard while spraying or when machine is running it is possible that your injector is in backwards. Remove and reinstall.
Source: Kaivac 1715 S/N 1-44 / 1720 S/N 1-161 / 1750 S/N 1-4998 Operator Manual 1750_SN_1_thru_4998_on_01 Rev. 2007, page 16, used with permission. SES ref PF-I4DV-MYLH‌‌​⁠​⁠‍‌​​​​‍‍‌​‌‌‌⁠​​​​​‌​​​​​‌​⁠​‌‌⁠​‍​​​⁠‌​‌⁠‌‍⁠‌⁠‌⁠‍‍⁠⁠‍
1715 S/N 1-44 / 1720 S/N 1-161 / 1750 S/N 1-4998 1750_SN_1_thru_4998_on_01 (2007)Page 16 of 31
Troubleshooting

Troubleshooting

In short This chart lists common problems by area, with the possible causes and the solution for each. This page covers the chemical injection system, dump system, wheels and casters, and squeegee head. Always make sure the machine is unplugged before lifting the electric cover assembly.‌‌​⁠​⁠‍‌​​​​‍‍‌​‌‌‌⁠​​​​​‌​‌​​​‌​⁠​‌​‍‍‍‌⁠​‍‌⁠​‍‌‌‌‌​⁠‍‌​⁠⁠‌
CAUTION Always make sure machine is unplugged before lifting electric cover assembly.
AreaProblemPossible CauseSolution
Chemical Injection System Con’t.Not enough chemical flow.
  1. Metering tip plugged.
  2. Wrong metering tip.
  1. Remove and clean.
  2. Check and replace per chart.
Chemical line blows off safety cap.
  1. Debris in injector.
  1. Remove safety cap from chemical and blow small amounts of compressed air into line.
Water backflows into chemical bottle.
  1. Bad seat on injector check valve.
  2. Bad safety cap.
  1. Check injector o-ring or replace.
  2. Replace safety cap.
Dump SystemDump hose will not empty tank.
  1. Dump hose plug not removed.
  2. Clog in bottom of tank.
  1. Remove plug.
  2. Tip dump contents, remove debris.
Dump hose leaks.
  1. Hose cut.
  2. Clamp loose.
  3. Dump plug bushing missing.
  4. Plug missing.
  1. If leak is less than 4" from tank side, cut and reattach, or replace.
  2. Tighten hose clamp.
  3. Replace bushing.
  4. Replace plug.
Wheels and CastersWheels won’t roll, or they rub.
  1. Flat tires.
  2. Debris wrapped around axle.
  3. Bearings tight.
  4. Wheels too loose on axle.
  5. Bearings falling out.
  1. Inflate tires to 30 p.s.i.
  2. Check for debris on axle.
  3. Grease bearings.
  4. Remove wheel, add washers to take up slack.
  5. Replace bearing assembly.
Squeegee HeadFloor streaks.
  1. Worn blades or wheels.
  1. Replace wheels and / or blades.
Squeegee head doesn’t easily rotate when installed on wand.
  1. Brass ring on wand not in groove.
  2. Coupling nut too tight.
  1. Loosen coupling nut and re-position head on groove.
  2. Loosen 1/2 turn.
Head won’t stay on wand.
  1. Coupling nut cracked.
  2. Brass ring worn.
  1. Replace.
  2. Replace.
Premature blade wear.
  1. Squeegee wheels worn.
  1. Check wheels for wear / replace.
Sucks to the floor too tightly.
  1. Squeegee wheels worn.
  1. Check wheels for wear / replace.
Source: Kaivac 1715 S/N 1-44 / 1720 S/N 1-161 / 1750 S/N 1-4998 Operator Manual 1750_SN_1_thru_4998_on_01 Rev. 2007, page 17, used with permission. SES ref PF-5HYZ-RW2V‌‌​⁠​⁠‍‌​​​​‍‍‌​‌‌‌⁠​​​​​‌​‌​​​‌​⁠​‌​‍‍‍‌⁠​‍‌⁠​‍‌‌‌‌​⁠‍‌​⁠⁠‌
1715 S/N 1-44 / 1720 S/N 1-161 / 1750 S/N 1-4998 1750_SN_1_thru_4998_on_01 (2007)Page 17 of 31
Wiring diagram

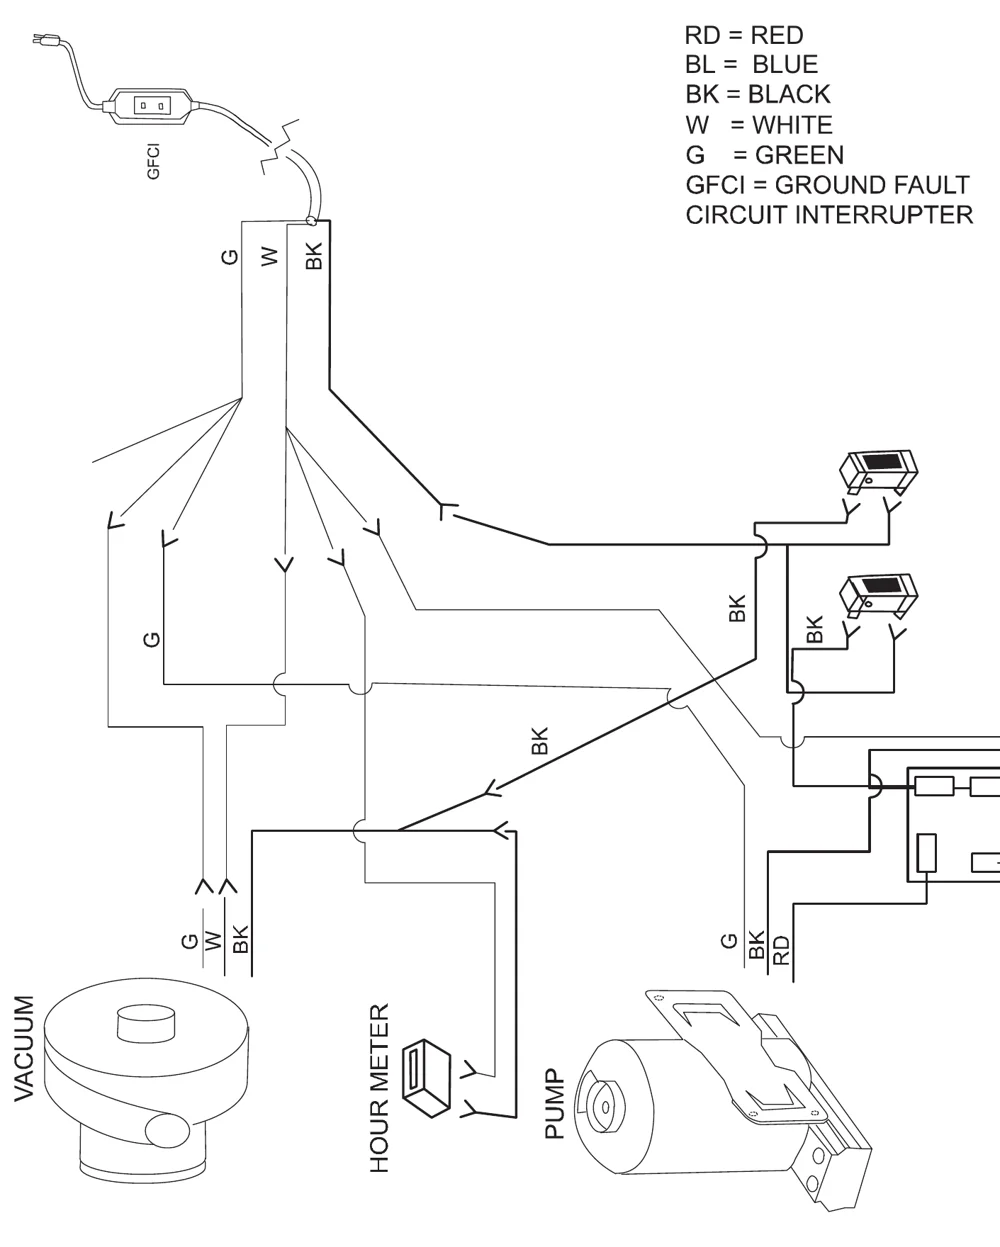
Wiring Diagram Kaivac 1700 series

In short This page shows the wiring layout of the Kaivac 1700 series, from the GFCI power cord to the vacuum, pump, hour meter and switches. A color key explains the wire abbreviations.‌‌​⁠​⁠‍‌​​​​‍‍‌​‌‌‌⁠​​​​​‌​‍​​​‌​⁠​‌⁠‌⁠​‌⁠‌⁠⁠​⁠‍‌‍⁠⁠​​⁠​​‍‌‍
AbbreviationMeaning
RDRED
BLBLUE
BKBLACK
WWHITE
GGREEN
GFCIGROUND FAULT CIRCUIT INTERRUPTER
Wiring diagram of the Kaivac 1700 series: power cord with GFCI at top, with green, white and black wires branching down to the vacuum motor, the hour meter, two switches, a control box and the pump. Wires are labeled G, W, BK and RD.

© 2007 Kaivac, Inc. All Rights Reserved‌‌​⁠​⁠‍‌​​​​‍‍‌​‌‌‌⁠​​​​​‌​‍​​​‌​⁠​‌⁠‌⁠​‌⁠‌⁠⁠​⁠‍‌‍⁠⁠​​⁠​​‍‌‍

Source: Kaivac 1715 S/N 1-44 / 1720 S/N 1-161 / 1750 S/N 1-4998 Operator Manual 1750_SN_1_thru_4998_on_01 Rev. 2007, page 18, used with permission. SES ref PF-HVVB-7VLV‌‌​⁠​⁠‍‌​​​​‍‍‌​‌‌‌⁠​​​​​‌​‍​​​‌​⁠​‌⁠‌⁠​‌⁠‌⁠⁠​⁠‍‌‍⁠⁠​​⁠​​‍‌‍
1715 S/N 1-44 / 1720 S/N 1-161 / 1750 S/N 1-4998 1750_SN_1_thru_4998_on_01 (2007)Page 18 of 31
Tool arrangement

Kaivac Tool Arrangement

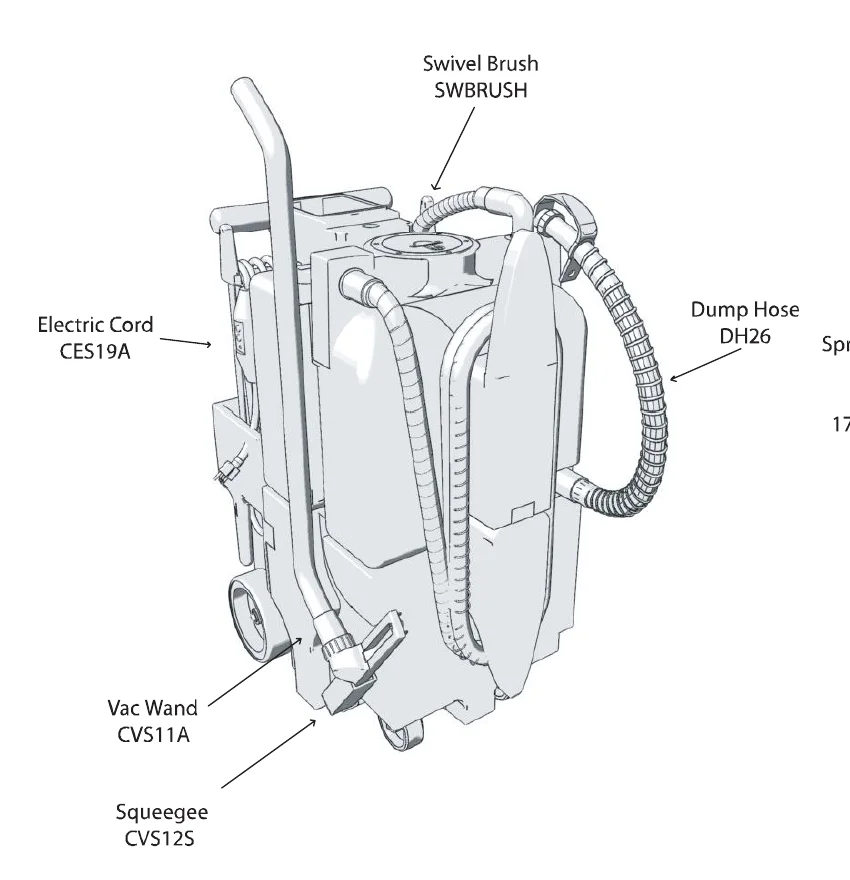
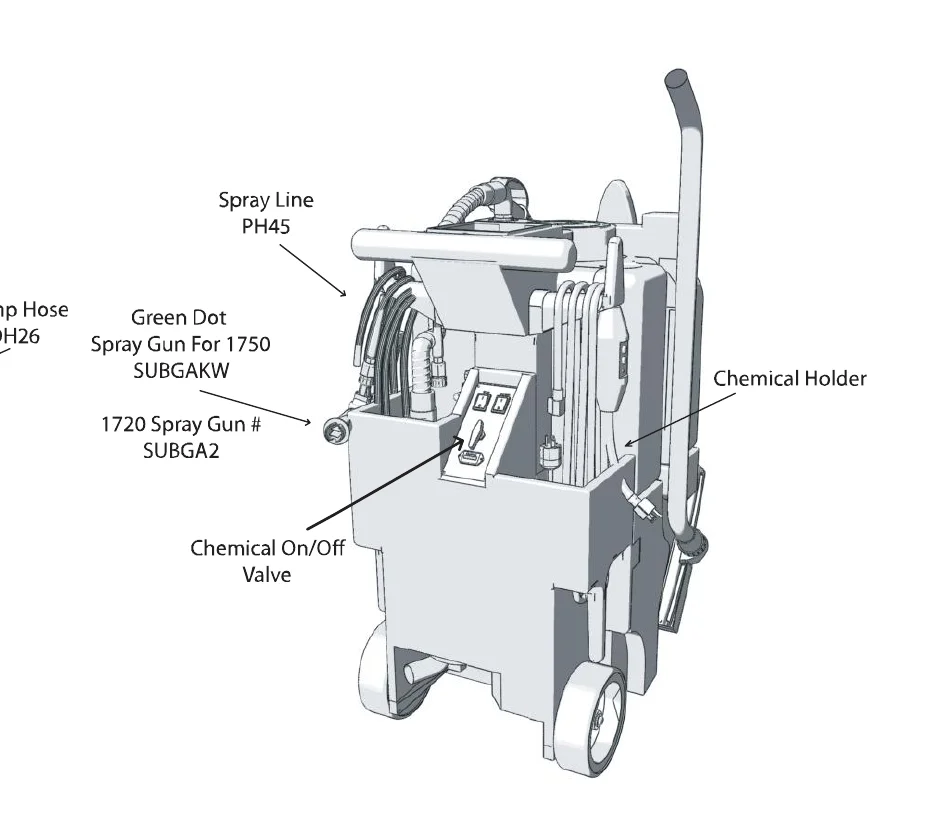
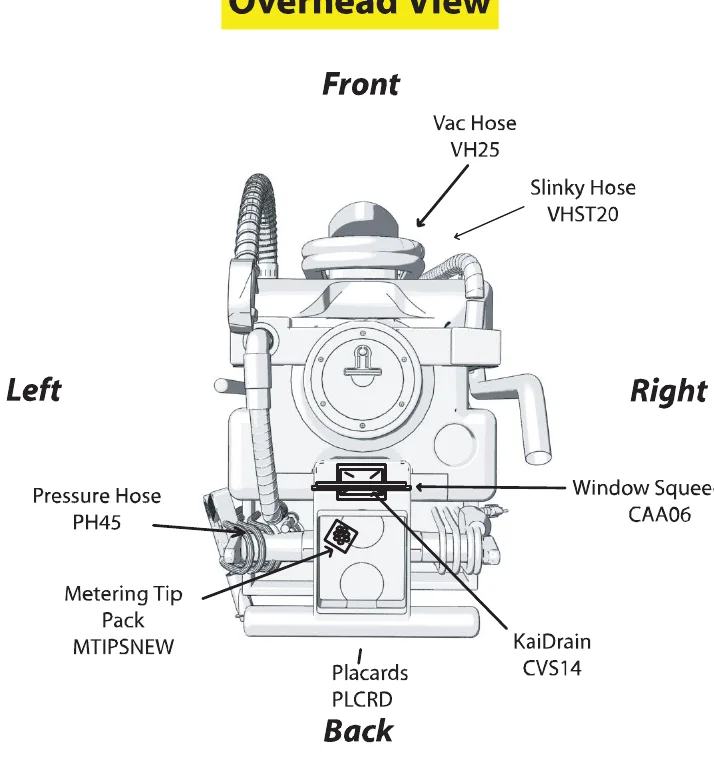
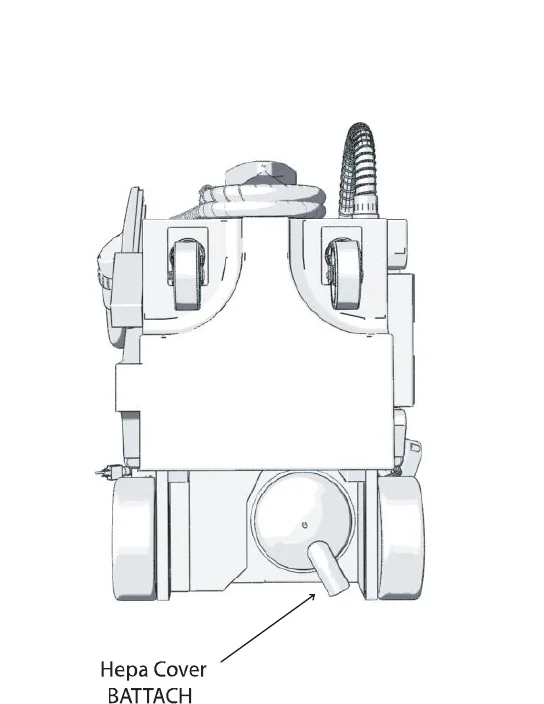
In short This page shows where each tool and hose is stored on the machine, in four views: front right, rear right, overhead and bottom. Each tool is labeled with its part code.‌‌​⁠​⁠‍‌​​​​‍‍‌​‌‌‌⁠​​​​​‌​⁠​​​‌​⁠​‌⁠⁠⁠‍​‍‌‌⁠‍‌‌‌‍‌‍⁠⁠⁠‌‌⁠​​

Front Right View

Front right view of the machine with tool locations: Swivel Brush SWBRUSH, Electric Cord CES19A, Dump Hose DH26, Vac Wand CVS11A and Squeegee CVS12S
Front Right View

Rear Right View

Rear right view of the machine with tool locations: Spray Line PH45, Green Dot Spray Gun for 1750 SUBGAKW, 1720 Spray Gun SUBGA2, Chemical On/Off Valve and Chemical Holder
Rear Right View

Overhead View

Overhead view of the machine, front at top, with tool locations: Vac Hose VH25, Slinky Hose VHST20, Window Squeegee CAA06, Pressure Hose PH45, Metering Tip Pack MTIPSNEW, KaiDrain CVS14 and Placards PLCRD
Overhead View

Bottom View

Bottom view of the machine with the Hepa Cover BATTACH labeled
Bottom View

© 2006 Kaivac, Inc. All Rights Reserved‌‌​⁠​⁠‍‌​​​​‍‍‌​‌‌‌⁠​​​​​‌​⁠​​​‌​⁠​‌⁠⁠⁠‍​‍‌‌⁠‍‌‌‌‍‌‍⁠⁠⁠‌‌⁠​​

Source: Kaivac 1715 S/N 1-44 / 1720 S/N 1-161 / 1750 S/N 1-4998 Operator Manual 1750_SN_1_thru_4998_on_01 Rev. 2007, page 19, used with permission. SES ref PF-X5Q6-FBJB‌‌​⁠​⁠‍‌​​​​‍‍‌​‌‌‌⁠​​​​​‌​⁠​​​‌​⁠​‌⁠⁠⁠‍​‍‌‌⁠‍‌‌‌‍‌‍⁠⁠⁠‌‌⁠​​
1715 S/N 1-44 / 1720 S/N 1-161 / 1750 S/N 1-4998 1750_SN_1_thru_4998_on_01 (2007)Page 19 of 31

Pages 20 to 31 of this manual repeat the instructions in other languages, so they are not shown here. View original PDF

Kaivac and KaiVac are trademarks of Kaivac, Inc. Southeastern Equipment & Supply is an independent dealer.


Not Sure Which Machine Fits Your Floors?

Talk to a real SES tech about new, demo or certified reconditioned options, parts and service.

© 2026 Southeastern Equipment and Supply. All Rights Reserved.

Visa Discover AMEX Mastercard