Free Shipping on Equipment & Parts orders of $200 or more! * Click for Restrictions

Have a question? 800-440-6723 International: 803-252-0100

English Se habla español
Parts › PartFinder › Advance Adgility 6XP / 10XP › Operator manual
Form 823 0100 040, Rev. P00 (2008-02)
Advance · Vacuum cleaner

Advance Adgility 6XP / 10XP Operator Manual

823 0100 040 Rev. P00 (2008-02)24 pagesAdvance Adgility 6XP and Adgility 10XP
Free to read, no account neededEvery page has its own linkPart numbers link to the part
INSTRUCTIONS FOR USE

Adgility™ 6XP, Adgility™ 10XP

READ THIS BOOK‌‌​⁠⁠⁠⁠⁠‌⁠‌‌⁠⁠‌⁠‌‌‌‌​​​​​​​‌​​​‌​⁠​​‍⁠​⁠‍‌‌​‍⁠‌‍⁠‍​⁠‍‍⁠‍‌⁠‍‌

INSTRUCTIONS FOR USE

823 0100 040
Edition P00 2008-02
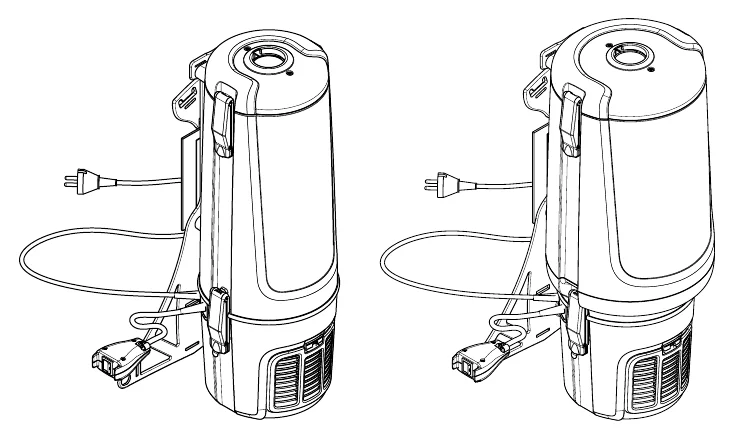
Two line drawings of the backpack vacuum cleaner side by side, one for each model, each showing the cylindrical body, the power cord with plug, the hose and the harness back plate with the lower fan housing
Source: Advance Adgility 6XP / 10XP Operator Manual 823 0100 040 Rev. P00 (2008-02), page 1, used with permission. SES ref PF-FXWU-LPXQ‌‌​⁠⁠⁠⁠⁠‌⁠‌‌⁠⁠‌⁠‌‌‌‌​​​​​​​‌​​​‌​⁠​​‍⁠​⁠‍‌‌​‍⁠‌‍⁠‍​⁠‍‍⁠‍‌⁠‍‌
Adgility 6XP / 10XP 823 0100 040 (P00 (2008-02))Page 1 of 24
FRONT MATTER

READ THIS BOOK

Read this book symbol: an open book icon above a warning triangle with an exclamation mark, beside the words READ THIS BOOK

Contents

PagesLanguage
2-16,English
2-12,17-19Français
2-12, 20-22Español
23Data
Source: Advance Adgility 6XP / 10XP Operator Manual 823 0100 040 Rev. P00 (2008-02), page 2, used with permission. SES ref PF-I63O-5T6O‌‌​⁠⁠⁠⁠⁠‌⁠‌‌⁠⁠‌⁠‌‌‌‌​​​​​​​‍​​​‌​⁠​​⁠‌​‌​⁠‌‍​​‌⁠‍​⁠‌‍⁠⁠‌⁠​‌⁠
Adgility 6XP / 10XP 823 0100 040 (P00 (2008-02))Page 2 of 24
FRONT MATTER

Contact information

USACanada
Nilfisk-Advance Inc.
14600 21st Avenue North
Plymouth, MN 55447-3408
Tel.: (763) 745 3500
Fax :(763) 745 3718
Nilfisk-Advance Canada Company
396 Watline Avenue
Mississauga
Ontario, L4Z 1X2
Tel.: 905-712-3260
Fax: 905-712-3255

www.mn.nilfisk-advance.com‌‌​⁠⁠⁠⁠⁠‌⁠‌‌⁠⁠‌⁠‌‌‌‌​​​​​​​⁠​​​‌​⁠​​⁠⁠​‍‍‍‍‍‍‍‍⁠​⁠‌⁠‌⁠‍​‌‍‍‌

© 2008 Nilfisk-Advance Group

Source: Advance Adgility 6XP / 10XP Operator Manual 823 0100 040 Rev. P00 (2008-02), page 3, used with permission. SES ref PF-MBPR-OQM2‌‌​⁠⁠⁠⁠⁠‌⁠‌‌⁠⁠‌⁠‌‌‌‌​​​​​​​⁠​​​‌​⁠​​⁠⁠​‍‍‍‍‍‍‍‍⁠​⁠‌⁠‌⁠‍​‌‍‍‌
Adgility 6XP / 10XP 823 0100 040 (P00 (2008-02))Page 3 of 24
OPERATION
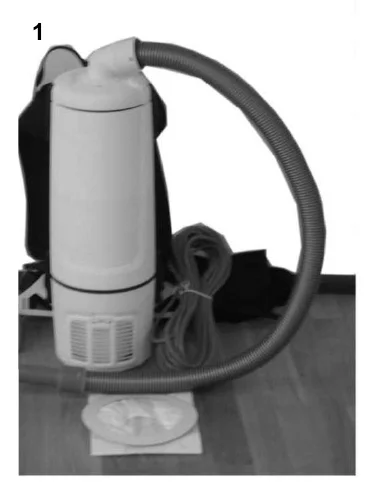
Backpack vacuum standing upright on a wooden floor with its hose looped around it and the harness and cord lying behind it
1

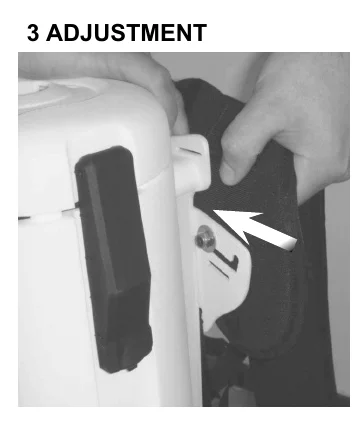
3 ADJUSTMENT

Close-up of the side of the vacuum with a hand holding the harness plate and a white arrow pointing up and left toward the mounting bracket
3 ADJUSTMENT
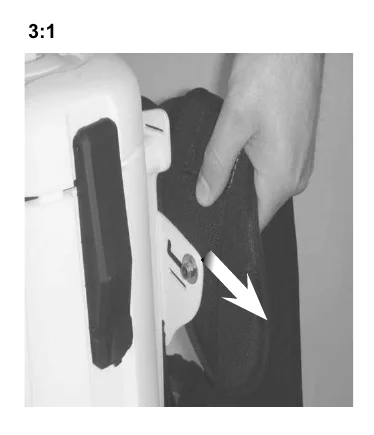
Same view of the vacuum side with the hand moving the harness plate and a white arrow pointing down and right
3:1

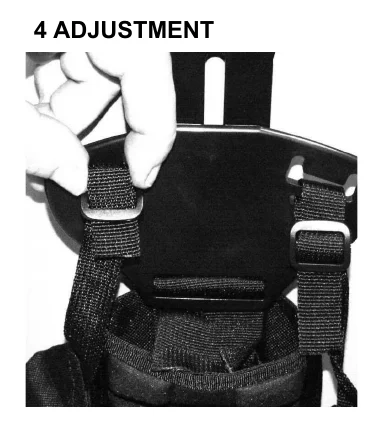
4 ADJUSTMENT

Hands adjusting the black harness shoulder straps and buckles on the harness back plate
4 ADJUSTMENT

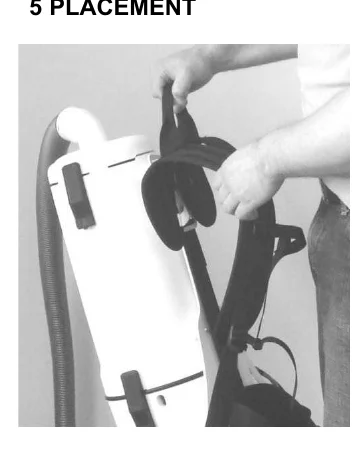
5 PLACEMENT

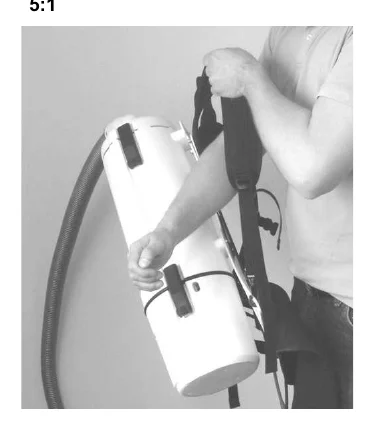
Person lifting the vacuum with the harness straps open, about to put it on
5 PLACEMENT
Person holding the vacuum by its harness strap while sliding an arm through the shoulder strap
5:1
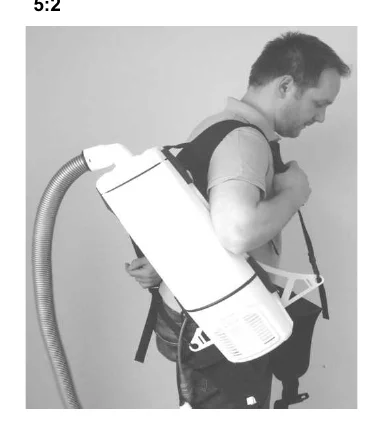
Person wearing the backpack vacuum with the hose arching over the shoulder and the harness fastened at the waist
5:2
Source: Advance Adgility 6XP / 10XP Operator Manual 823 0100 040 Rev. P00 (2008-02), page 4, used with permission. SES ref PF-USV6-4XCT‌‌​⁠⁠⁠⁠⁠‌⁠‌‌⁠⁠‌⁠‌‌‌‌​​​​​​‌​​​​‌​⁠​​‌⁠​⁠‍‌‌​⁠⁠⁠‌​​‌⁠‌‍‍⁠⁠​‌⁠
Adgility 6XP / 10XP 823 0100 040 (P00 (2008-02))Page 4 of 24
OPERATION

2 HOSE CONNECTION

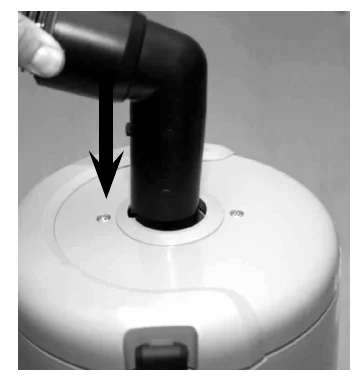
Hose elbow being pushed down onto the inlet on top of the vacuum, with a black arrow pointing downward
2 HOSE CONNECTION
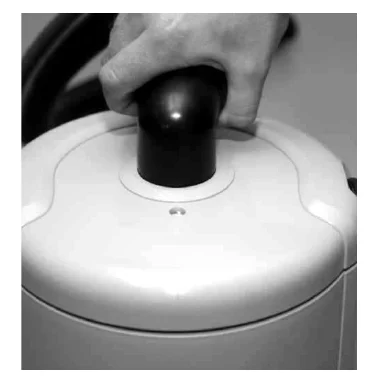
Hand holding the hose elbow seated on the inlet on top of the vacuum
2:1
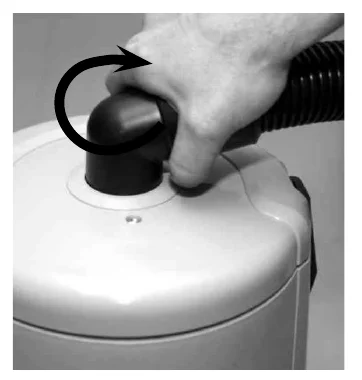
Hand turning the hose elbow on the inlet, with a curved arrow showing the direction of rotation
2:2
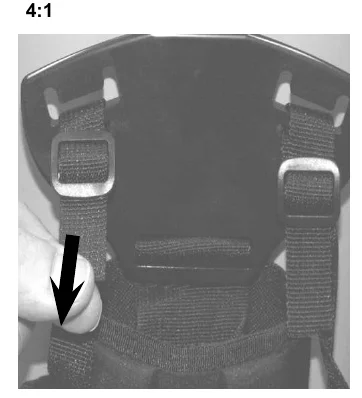
Back plate with harness straps; a finger pulls a strap downward, shown by a black arrow
4:1
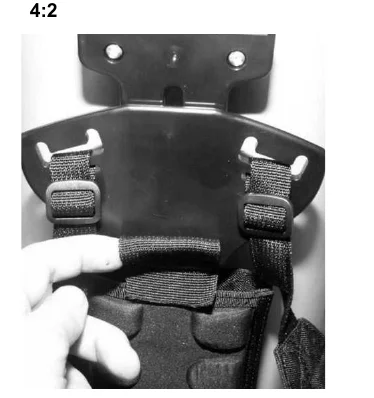
Close view of the back plate and harness straps with a hand holding the strap in place
4:2
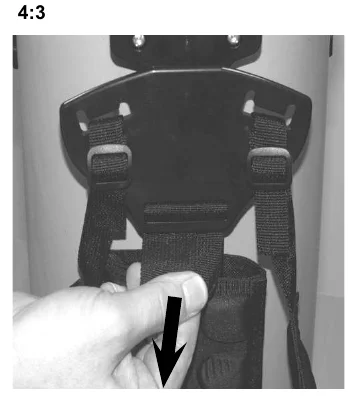
Back plate on the unit with a hand pulling a harness strap downward, shown by a black arrow
4:3
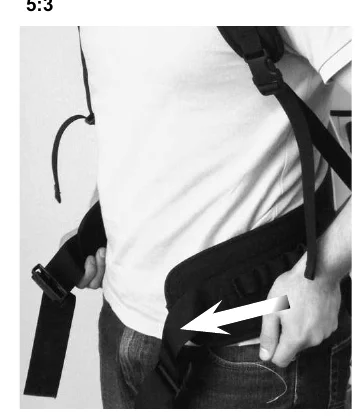
Person wearing the harness pulling the waist belt strap sideways, shown by a white arrow
5:3
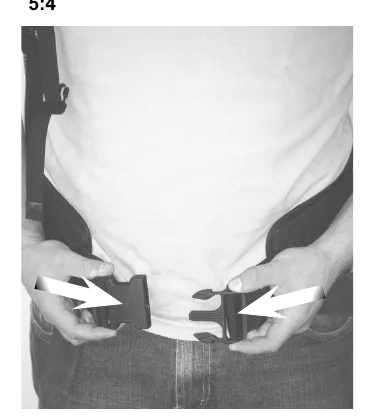
Hands bringing the two halves of the waist belt buckle together, with white arrows pointing inward
5:4
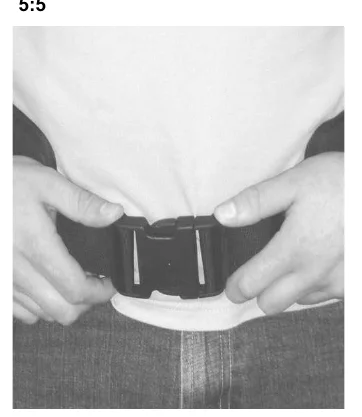
Waist belt buckle fastened at the person's front, with both hands on the belt
5:5
Source: Advance Adgility 6XP / 10XP Operator Manual 823 0100 040 Rev. P00 (2008-02), page 5, used with permission. SES ref PF-JMVW-JJ6Y‌‌​⁠⁠⁠⁠⁠‌⁠‌‌⁠⁠‌⁠‌‌‌‌​​​​​​‌‌​​​‌​⁠​​⁠​‍⁠⁠⁠⁠⁠‍​​​‌⁠⁠⁠‌‌‌‌‍‍⁠​
Adgility 6XP / 10XP 823 0100 040 (P00 (2008-02))Page 5 of 24
OPERATION
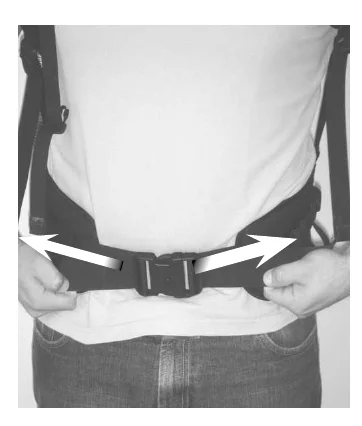
Person wearing the backpack harness with both hands pulling the waist belt straps outward, arrows pointing left and right away from the buckle at the waist
5:6
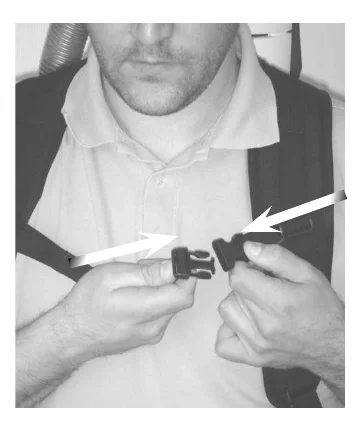
Person holding the two halves of the chest strap buckle in front of the chest, arrows pointing toward each other to connect them
5:7
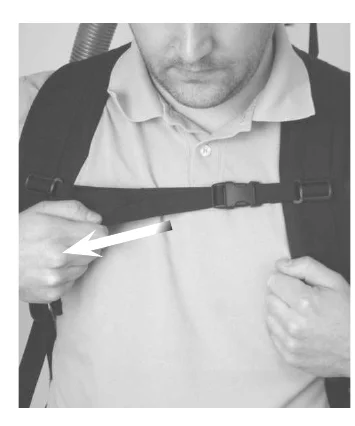
Person pulling the free end of the chest strap with one hand, arrow showing the pull direction, buckle fastened across the chest
5:8
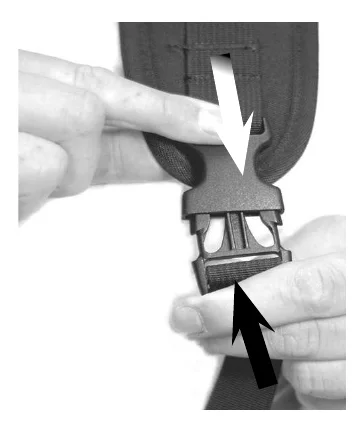
Hands holding a shoulder strap buckle, white arrow pointing down on the strap and black arrow pointing up at the buckle release
6:1
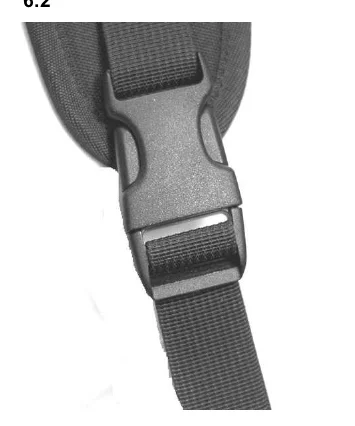
Close-up of a shoulder strap buckle connected to the padded strap and webbing
6:2
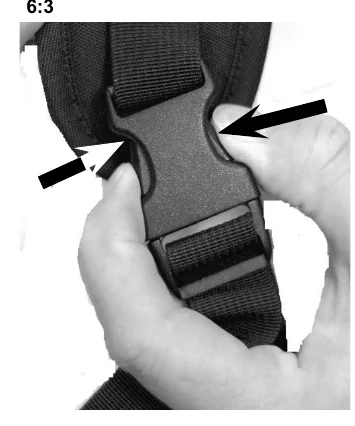
Hand squeezing the two sides of the buckle, black and white arrows pointing inward at the side release tabs
6:3

8 CORD RELIEF

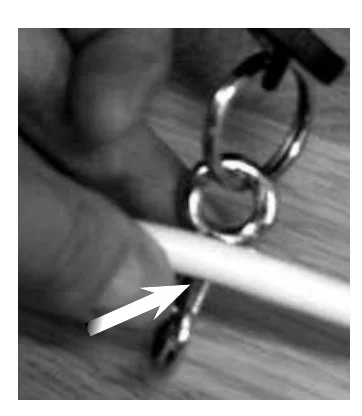
Hand holding a metal ring clip while the power cord is pushed into it, arrow pointing at the cord and clip
Cord relief
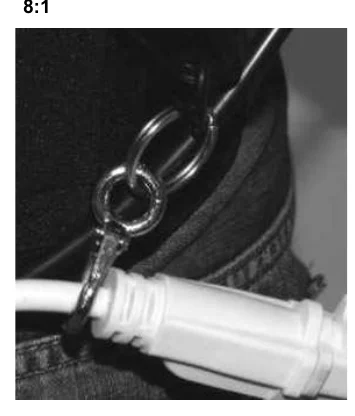
Cord relief clip attached to a ring on the harness at the waist, with the white cord connector held in the clip
8:1
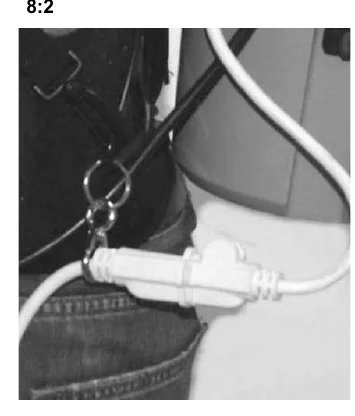
White power cord secured by the cord relief clip hanging from the harness at the waist, cord running down toward the floor
8:2
Source: Advance Adgility 6XP / 10XP Operator Manual 823 0100 040 Rev. P00 (2008-02), page 6, used with permission. SES ref PF-7GWU-R7Y4‌‌​⁠⁠⁠⁠⁠‌⁠‌‌⁠⁠‌⁠‌‌‌‌​​​​​​‌‍​​​‌​⁠​​‍⁠‌⁠‌⁠⁠‍⁠‍​⁠​‍‌‌⁠​‍‍⁠‌‍​
Adgility 6XP / 10XP 823 0100 040 (P00 (2008-02))Page 6 of 24
OPERATION
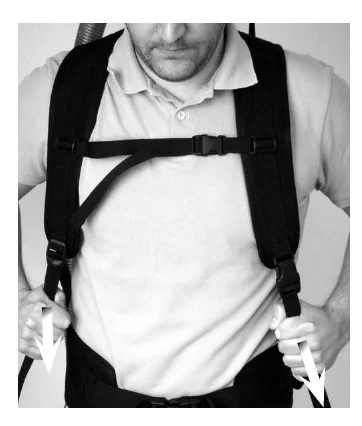
Man wearing the backpack harness, front view, with white arrows pointing down at the lower straps on both sides of his waist
5:9
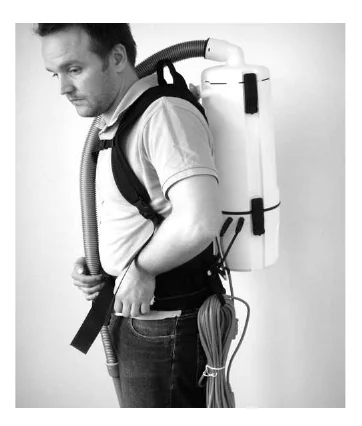
Side view of a man wearing the backpack vacuum, hose over his shoulder and cord coiled at his hip
5:10
Man adjusting the shoulder strap of the harness with one hand while holding the waist belt with the other
6

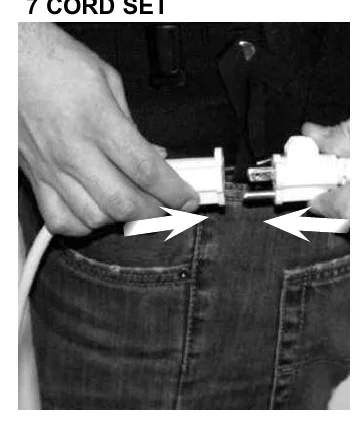
7 CORD SET

Hands holding the two plug ends of the cord set at the waist, white arrows pointing at the connection between them
7 CORD SET
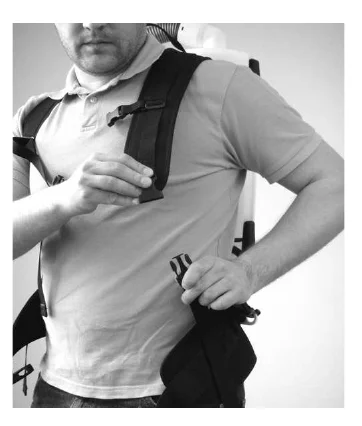
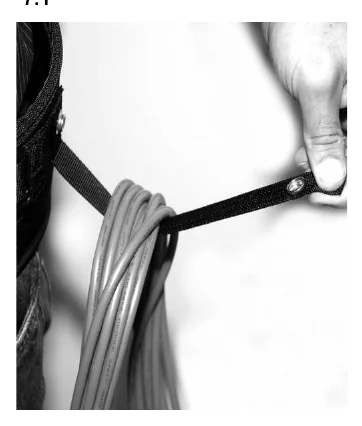
Hand attaching a strap to the belt while a coil of cord hangs from the strap
7:1
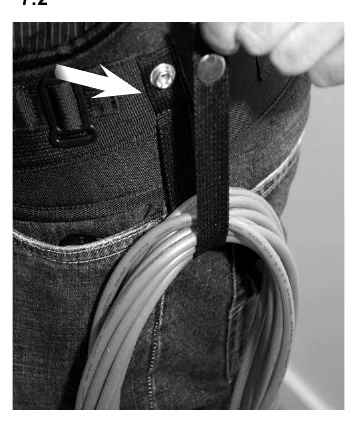
Coiled cord hanging on a belt strap, with a white arrow pointing to the fastener on the belt
7:2

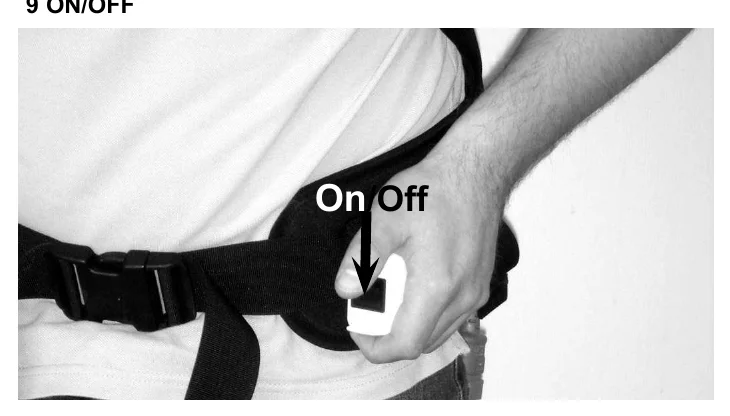
9 ON/OFF

Hand pressing the on/off switch on the waist belt, with an arrow and the label On/Off pointing at the switch
9 ON/OFF

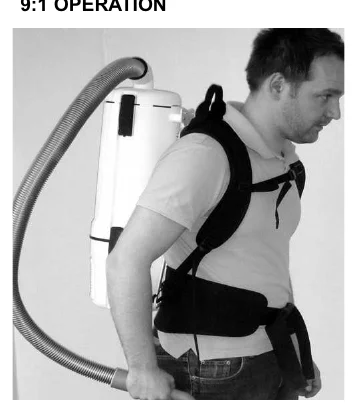
9:1 OPERATION

Man operating the vacuum wearing the backpack and waist belt, with the hose held in front of him
9:1 OPERATION
Source: Advance Adgility 6XP / 10XP Operator Manual 823 0100 040 Rev. P00 (2008-02), page 7, used with permission. SES ref PF-GOZR-XDPE‌‌​⁠⁠⁠⁠⁠‌⁠‌‌⁠⁠‌⁠‌‌‌‌​​​​​​‌⁠​​​‌​⁠​​⁠​‍‌‌‌​‌​‍​‍⁠‌​​‍⁠⁠​​‍⁠⁠
Adgility 6XP / 10XP 823 0100 040 (P00 (2008-02))Page 7 of 24
OPERATION

10 DUST BAG

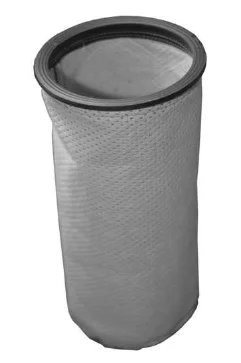
Dust bag with a round ring opening at the top and a long tapered white fabric bag
10 DUST BAG
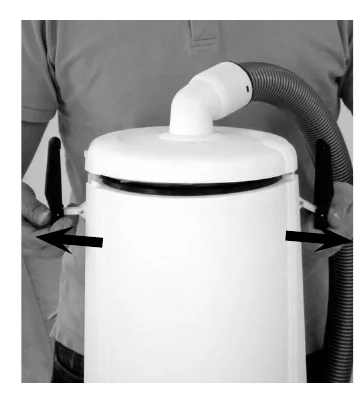
Person holding the sides of the vacuum with arrows pointing outward from the two side latches to release the lid
10:1
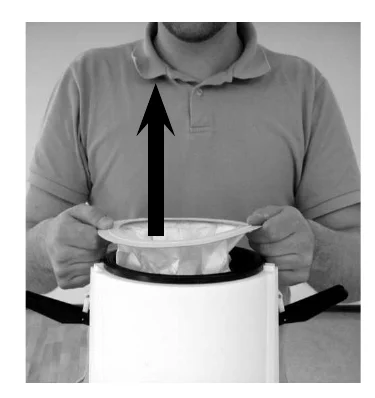
Person lifting the dust bag out of the open vacuum, with a large arrow pointing upward
10:2

11 MAIN FILTER

Main filter, a tall cylindrical fabric filter with a dark ring at the top
11 MAIN FILTER
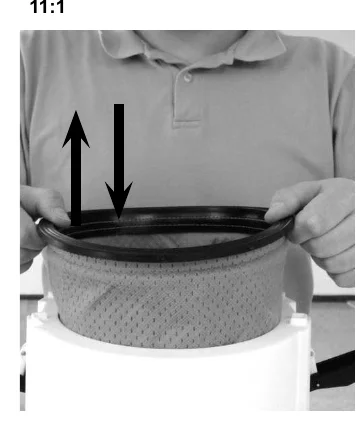
Person holding the main filter ring at the top of the vacuum, with arrows pointing up and down showing the filter being lifted out and put in
11:1
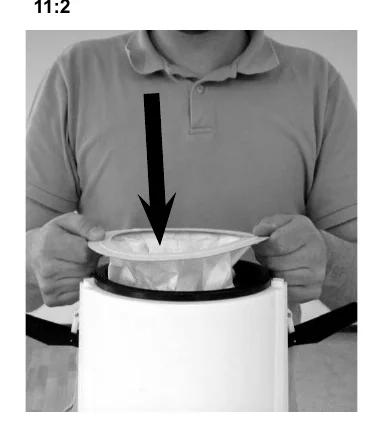
Person lowering the dust bag into the vacuum, with a large arrow pointing downward
11:2

12 HEPA-FILTER

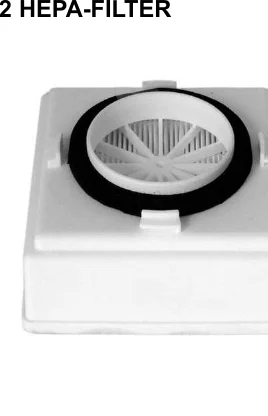
HEPA-filter, a square white housing with a round pleated filter and dark ring on top
12 HEPA-FILTER
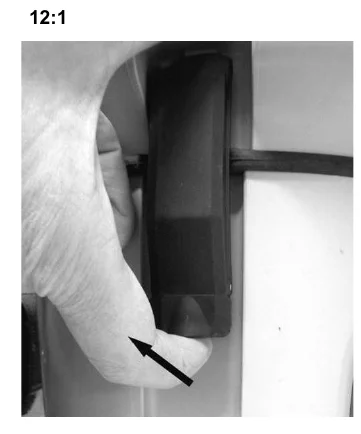
Close-up of a hand pressing a latch on the side of the vacuum, with an arrow pointing toward the latch
12:1
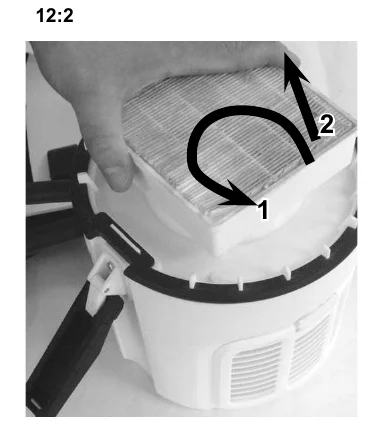
Hand lifting the square HEPA-filter off the vacuum, with arrow 1 showing a turning motion and arrow 2 showing lifting up
12:2
Source: Advance Adgility 6XP / 10XP Operator Manual 823 0100 040 Rev. P00 (2008-02), page 8, used with permission. SES ref PF-PGPO-OLXZ‌‌​⁠⁠⁠⁠⁠‌⁠‌‌⁠⁠‌⁠‌‌‌‌​​​​​​‍​​​​‌​⁠​​‍⁠⁠‌‍‌‌‌‍⁠‍‌‌​‌​‌​​⁠‌​‌⁠
Adgility 6XP / 10XP 823 0100 040 (P00 (2008-02))Page 8 of 24
OPERATION
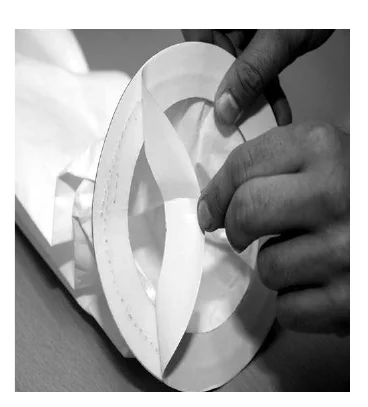
Hands folding the cardboard collar of a dust bag, with the collar opened out flat
10:3
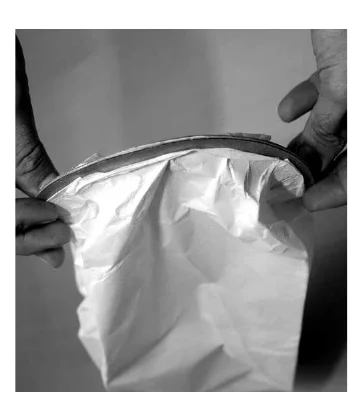
Hands holding the opening of a dust bag with its cardboard collar spread open
10:4
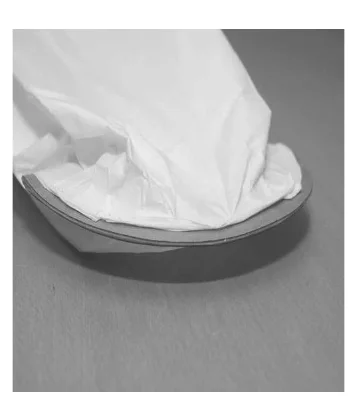
Dust bag with its collar lying on a flat surface
10:5
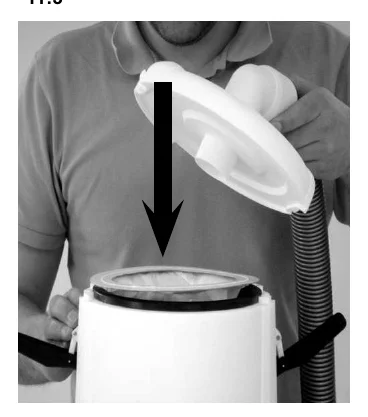
Person holding the lid with hose above the container, with an arrow pointing down to place the lid onto the container holding the dust bag
11:3
Lid with hose connector placed on the container, with an arrow pointing to the latch on the side
11:4
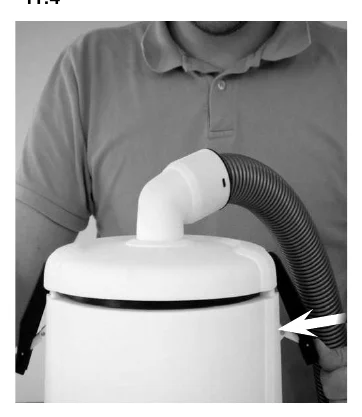
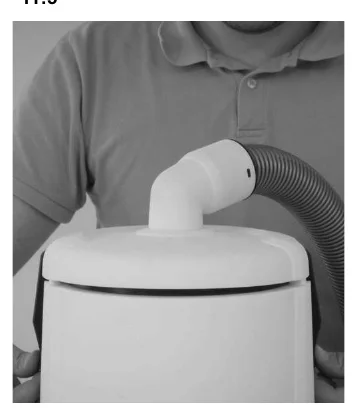
Closed unit with the lid fitted on the container and the hose connected
11:5
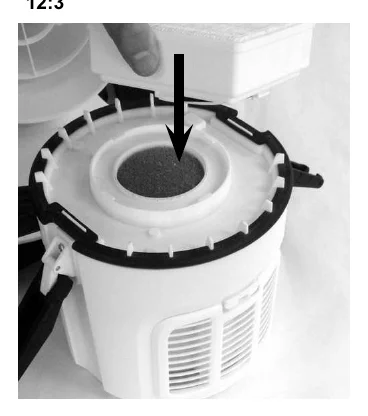
Open container seen from above with an arrow pointing down at the round filter opening
12:3
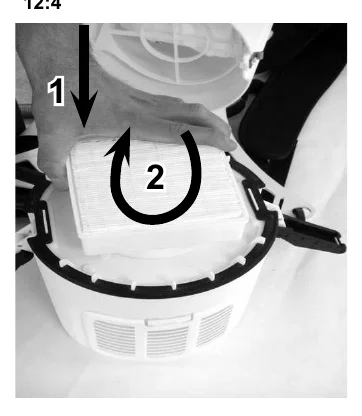
Hand pressing a filter down into the container (arrow 1) and turning it (arrow 2)
12:4
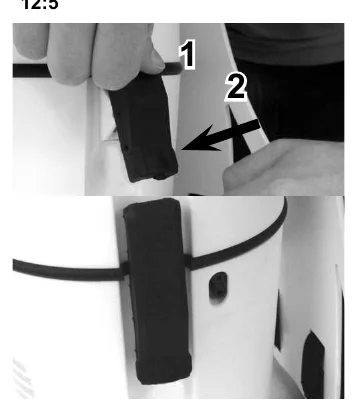
Top: a hand moving a black latch (arrow 1) and a second arrow (2) crossing it. Bottom: the black latch closed against the container
12:5
Source: Advance Adgility 6XP / 10XP Operator Manual 823 0100 040 Rev. P00 (2008-02), page 9, used with permission. SES ref PF-Q4OT-I7PL‌‌​⁠⁠⁠⁠⁠‌⁠‌‌⁠⁠‌⁠‌‌‌‌​​​​​​‍‌​​​‌​⁠​​‍⁠​​​⁠​‍⁠‍⁠​‌‍‍‌‌​⁠‍‌‌​‌
Adgility 6XP / 10XP 823 0100 040 (P00 (2008-02))Page 9 of 24
OPERATING INSTRUCTIONS

13 PRE-FILTER

Round dark pre-filter with a scalloped edge
13 PRE-FILTER
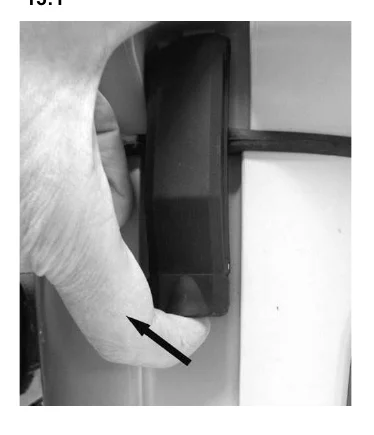
A thumb pressing the latch on the side of the machine, with an arrow pointing at the thumb
13:1
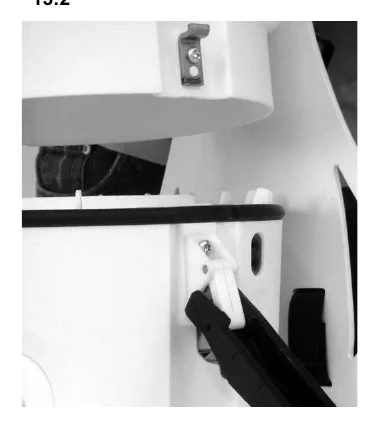
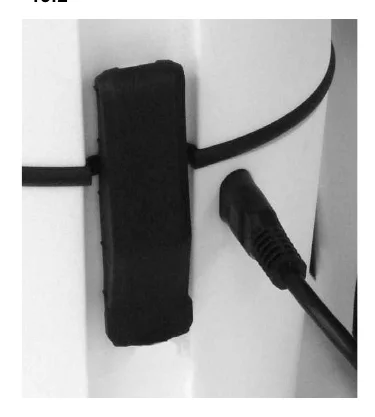
Latch on the machine body released, with the pre-filter cover or strap being pulled out
13:2

14 EXHAUST FILTER

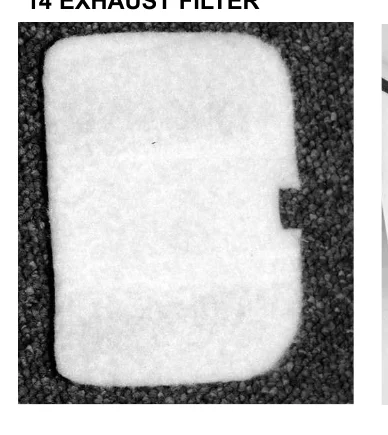
Rectangular white exhaust filter with a small tab on the right side, lying on a carpet
14 EXHAUST FILTER
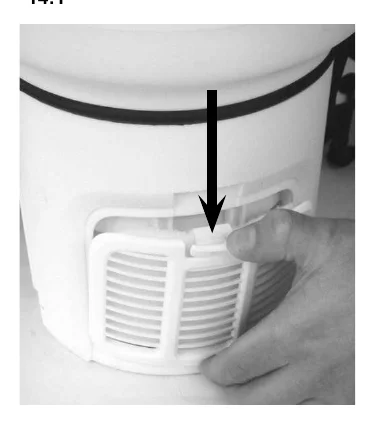
Exhaust grille on the machine with a downward arrow pointing at the latch while a finger presses it
14:1
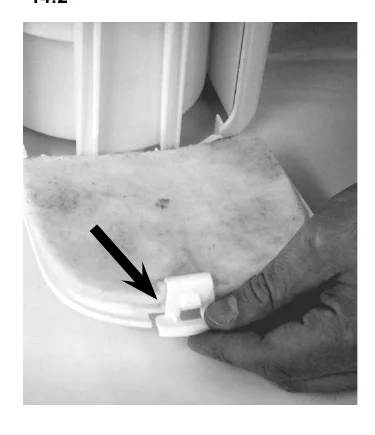
Hand holding the opened exhaust grille with the filter in it, arrow pointing at the grille latch tab
14:2

15 POWER NOZZLE

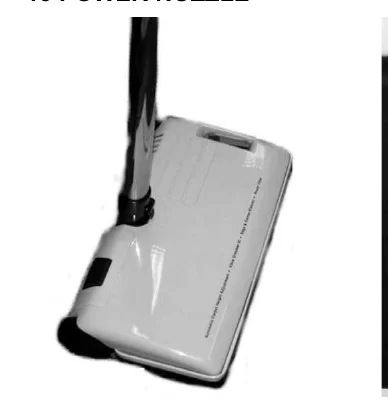
Power nozzle with hose and wand attached
15 POWER NOZZLE
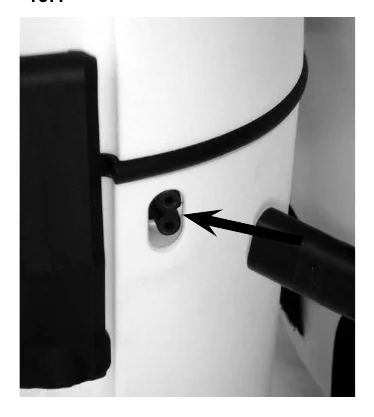
Power nozzle cord connector with an arrow pointing to the socket on the machine body
15:1
Power nozzle cord plugged into the socket on the machine body
15:2
Source: Advance Adgility 6XP / 10XP Operator Manual 823 0100 040 Rev. P00 (2008-02), page 10, used with permission. SES ref PF-RSJM-LJFG‌‌​⁠⁠⁠⁠⁠‌⁠‌‌⁠⁠‌⁠‌‌‌‌​​​​​​‍‍​​​‌​⁠​​‍‍⁠‌‌​⁠‌⁠‌‍‌​‌⁠‍‍​‍​‍‌‍‌
Adgility 6XP / 10XP 823 0100 040 (P00 (2008-02))Page 10 of 24
OPERATOR MANUAL
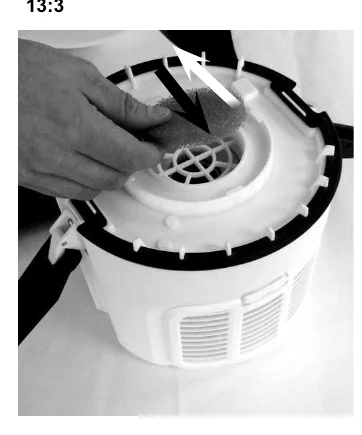
Hands fitting a round filter into the opening on top of the machine's container; a black arrow points down into the opening and a white arrow points up and to the right
13:3
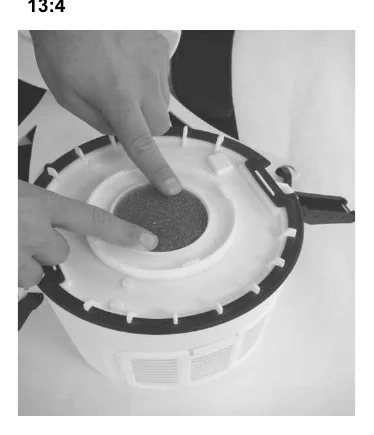
A finger pressing a round grey filter disc into the centre of the machine's top opening
13:4
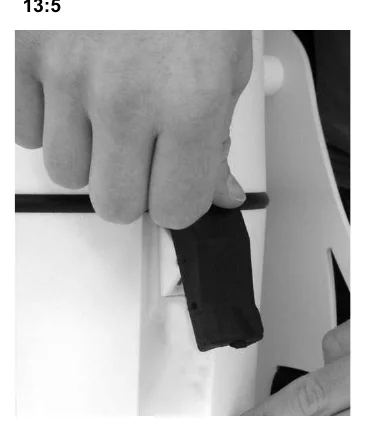
A hand pressing a black latch on the side of the machine to fasten the part in place
13:5
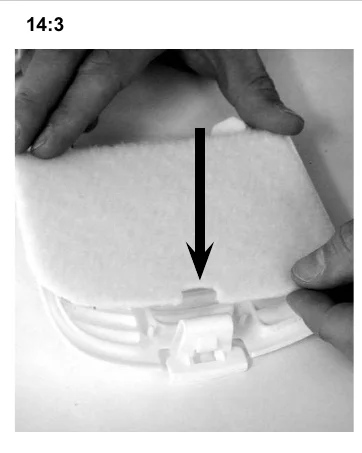
Hands holding a white filter pad above the open exhaust grid door; a black arrow points down toward the grid
14:3
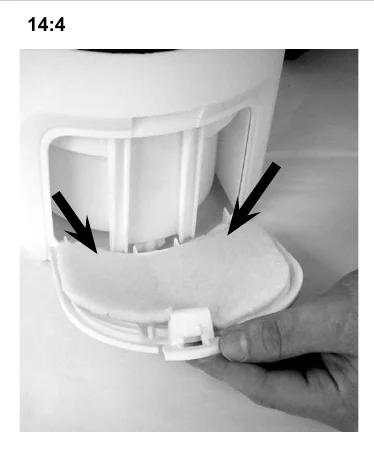
Open exhaust filter compartment on the machine; two black arrows point into the compartment while a hand holds the grid door with the white filter pad
14:4
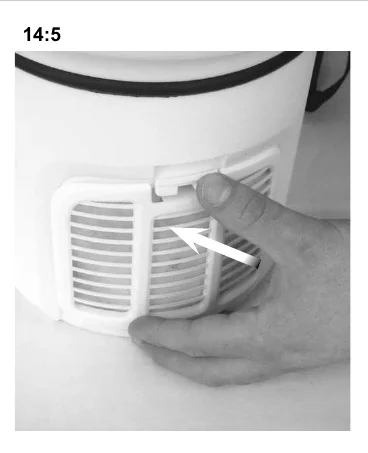
A hand closing the exhaust grid door on the machine; a white arrow points at the latch
14:5
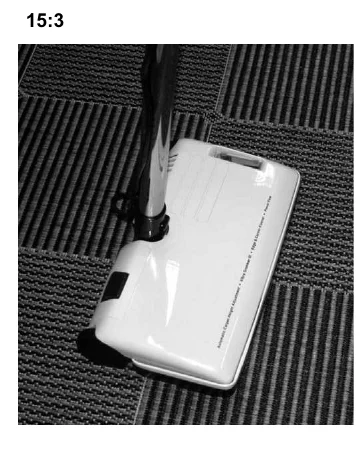
A white floor tool with its wand attached, resting on a dark patterned carpet
15:3
Source: Advance Adgility 6XP / 10XP Operator Manual 823 0100 040 Rev. P00 (2008-02), page 11, used with permission. SES ref PF-JFPK-SK73‌‌​⁠⁠⁠⁠⁠‌⁠‌‌⁠⁠‌⁠‌‌‌‌​​​​​​‍⁠​​​‌​⁠​​‌⁠⁠⁠​‌​​‍‍​‌‍‌‍‍‍​​​⁠⁠⁠‌
Adgility 6XP / 10XP 823 0100 040 (P00 (2008-02))Page 11 of 24
OPERATION
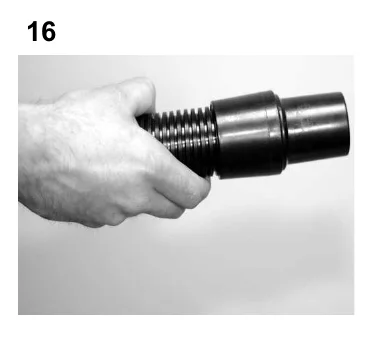
A hand holds the black hose end fitting with its ribbed hose section, ready for connecting
16
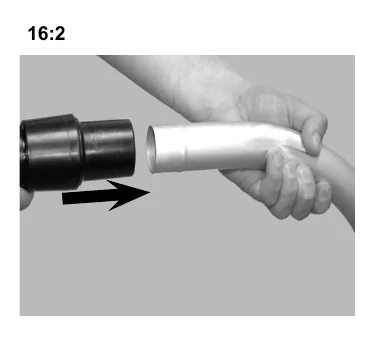
The black hose end fitting is pushed onto a bent wand end, with an arrow showing the push direction
16:2
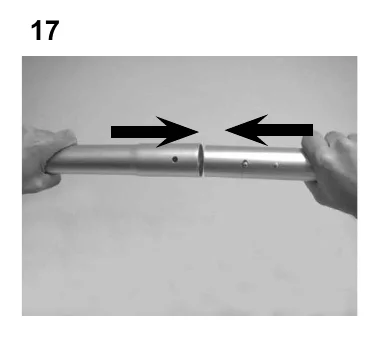
Two hands push two wand tubes together, with arrows pointing toward each other at the joint
17
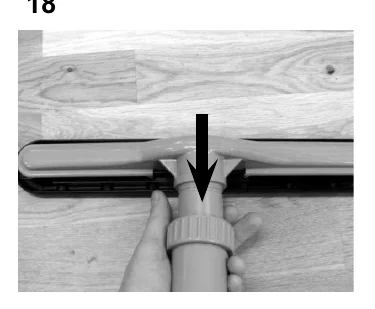
A hand holds the wand end under a wide floor tool while an arrow points down to the tool's connector
18
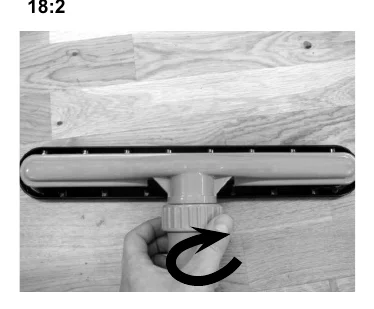
The wand is attached to the floor tool and the locking collar is turned, shown by a curved arrow
18:2
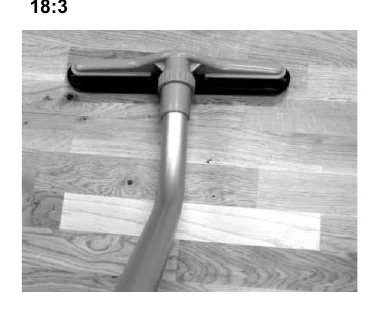
The wide floor tool with wand attached, lying on a wooden floor
18:3
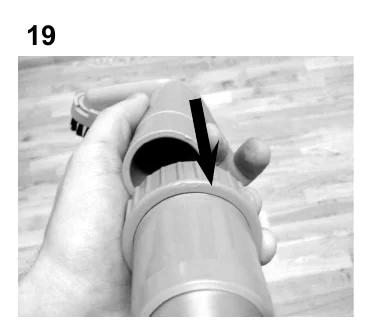
A hand pushes the tool connector down into the wand end, shown by a downward arrow
19
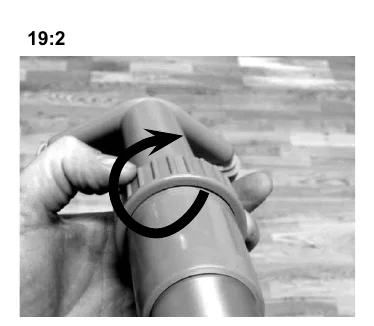
A hand turns the locking collar on the wand and tool connection, shown by a curved arrow
19:2
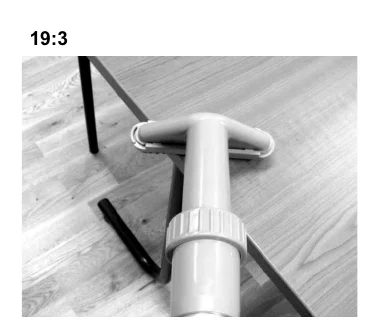
The upholstery tool attached to the wand, held over a table
19:3
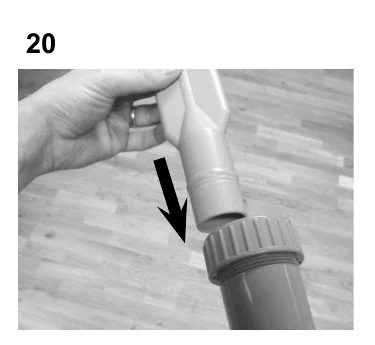
A hand pushes a narrow tool onto the wand end with a downward arrow showing the direction
20
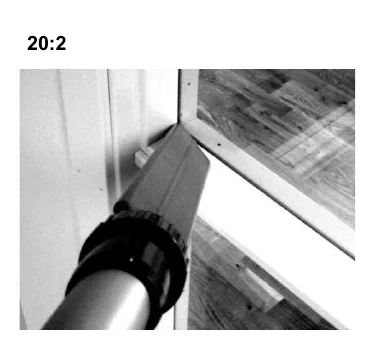
The narrow crevice tool fitted on the wand, used in a corner by a window frame
20:2
Source: Advance Adgility 6XP / 10XP Operator Manual 823 0100 040 Rev. P00 (2008-02), page 12, used with permission. SES ref PF-SGA7-UNZZ‌‌​⁠⁠⁠⁠⁠‌⁠‌‌⁠⁠‌⁠‌‌‌‌​​​​​​⁠​​​​‌​⁠​​⁠⁠⁠⁠⁠‌‍‍‍‌‍​‌⁠‌‍‌‌⁠‍‍‌‍⁠
Adgility 6XP / 10XP 823 0100 040 (P00 (2008-02))Page 12 of 24
BACK COVER

READ THIS BOOK

READ THIS BOOK
LEA ESTE LIBRO
LISEZ CE MANUEL‌‌​⁠⁠⁠⁠⁠‌⁠‌‌⁠⁠‌⁠‌‌‌‌​​​​​​⁠‌​​​‌​⁠​​‌​‌⁠‍​⁠​​⁠‌⁠‍⁠​‌‍‍‌‌⁠​​‍

USA

Nilfisk-Advance Inc.
14600 21st Avenue North
Plymouth, MN 55447-3408
Tel.: (763) 745 3500
Fax :(763) 745 3718

Canada

Nilfisk-Advance Canada Company
396 Watline Avenue
Mississauga
Ontario, L4Z 1X2
Tel.: 905-712-3260
Fax: 905-712-3255

www.mn.nilfisk-advance.com

© 2008 Nilfisk-Advance Group
Read this book symbol: an open book above a warning triangle with an exclamation mark, next to the text READ THIS BOOK, LEA ESTE LIBRO, LISEZ CE MANUEL
Source: Advance Adgility 6XP / 10XP Operator Manual 823 0100 040 Rev. P00 (2008-02), page 13, used with permission. SES ref PF-SR5C-WE2D‌‌​⁠⁠⁠⁠⁠‌⁠‌‌⁠⁠‌⁠‌‌‌‌​​​​​​⁠‌​​​‌​⁠​​‌​‌⁠‍​⁠​​⁠‌⁠‍⁠​‌‍‍‌‌⁠​​‍
Adgility 6XP / 10XP 823 0100 040 (P00 (2008-02))Page 13 of 24
IMPORTANT SAFETY INSTRUCTIONS

IMPORTANT SAFETY INSTRUCTIONS

In short These are the basic safety precautions to follow when using this electrical vacuum cleaner. Read all instructions before use, and connect the machine only to a properly grounded outlet.‌‌​⁠⁠⁠⁠⁠‌⁠‌‌⁠⁠‌⁠‌‌‌‌​​​​​​⁠‍​​​‌​⁠​​‌⁠‌⁠‌​‌‌​⁠⁠⁠⁠‌‌​‌⁠⁠‍​⁠‌​

When using an electrical appliance, basic precautions should always be followed, including the following:‌‌​⁠⁠⁠⁠⁠‌⁠‌‌⁠⁠‌⁠‌‌‌‌​​​​​​⁠‍​​​‌​⁠​​‌⁠‌⁠‌​‌‌​⁠⁠⁠⁠‌‌​‌⁠⁠‍​⁠‌​

READ ALL INSTRUCTIONS
BEFORE USING THE VACUUM CLEANER!

WARNING! To reduce the risk of fire, electric shock, or injury:
  • Do not leave appliance when plugged in. Unplug from outlet when not in use and before servicing.
  • To reduce the risk of electric shock - do not use outdoor or on wet surfaces.
  • Connect to a proper grounded outlet only. See grounding instructions.
  • Do not allow to be used as a toy. Close attention is necessary when used near children.
  • Use only as described in this manual. Use only the manufacturer’s recommended attachments.
  • Do not use with damaged cord or plug. If appliance is not working as it should, has been dropped, damaged, left outdoors or dropped into water, return it to a service center.
  • Do not pull or carry by the cord, use cord as a handle, close a door on cord, or pull cord around sharp edges or corners. Do not put the appliance over cord. Keep cord away from heated surfaces.
  • Do not unplug by pulling on cord. To unplug, grasp the plug, not the cord.
  • Do not handle plug, cord or appliance with wet hands.
  • Do not put any object into openings. Do not use with any opening blocked; keep free of dust, lint, hair, and anything that may reduce air flow.
  • Keep hair, loose clothing, fingers, and all parts of body away from openings and moving parts.
  • Turn off all controls before unplugging.
  • Use extra care when cleaning on stairs.
  • Do not use to pick up flammable or combustible liquids such as gasoline or use in areas where they may be present.
  • Do not pick up anything that is burning or smoking, such as cigarettes, matches, or hot ashes.
  • This machine is not suitable for picking up health endangering dust, unless all special authorized local/state federal precautions are complied with.
  • Do not use without dust bag and filters in place.
  • Always turn off the vacuum cleaner before connecting or disconnecting motorized nozzle.
  • Do not use outdoor or on wet surfaces. Do not expose to rain. Store indoors between max. 60°C (degrees centigrade), and min. 0°C (degrees centigrade), or 140°Fahrenheit / 32°Fahrenheit.
  • Do not pick up water or other liquids.

SAVE THESE INSTRUCTIONS

(Only for grounded appliances):

GROUNDING INSTRUCTIONS

This appliance must be grounded. If it should malfunction or breakdown, grounding provides a path of least resistance for electric current to reduce the risk of electric shock. This appliance is equipped with a cord having an equipment-grounding conductor and grounding plug.

The plug must be inserted into an appropriate outlet that is properly installed and grounded in accordance with all local codes and ordinances.

WARNING! Only motorized nozzle is double insulated. To reduce risk of electrick shock - connect this vacuum cleaner to a properly grounded outlet.
WARNING! Improper connection of the equipment-grounding conductor can result in a risk of electric shock. Check with a qualified electrician or service person if you are in doubt as to whether the outlet is properly grounded. Do not modify the plug provided with the appliance - if it will not fit the outlet, have a proper outlet installed by a qualified electrician.

This appliance is for use on a nominal 120-volt circuit and has a grounding attachment plug that looks like the plug illustrated in figure A below. Make sure that the appliance is connected to an outlet having the same configuration as the plug.

No adapter should be used with this appliance.
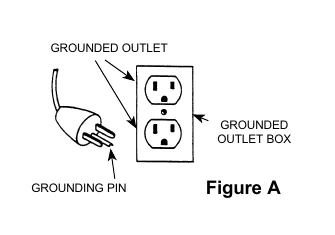
Grounded plug with its grounding pin pointing toward a grounded outlet in a grounded outlet box; labels read GROUNDED OUTLET, GROUNDED OUTLET BOX and GROUNDING PIN
Figure A
Source: Advance Adgility 6XP / 10XP Operator Manual 823 0100 040 Rev. P00 (2008-02), page 14, used with permission. SES ref PF-JSV5-5NMV‌‌​⁠⁠⁠⁠⁠‌⁠‌‌⁠⁠‌⁠‌‌‌‌​​​​​​⁠‍​​​‌​⁠​​‌⁠‌⁠‌​‌‌​⁠⁠⁠⁠‌‌​‌⁠⁠‍​⁠‌​
Adgility 6XP / 10XP 823 0100 040 (P00 (2008-02))Page 14 of 24
SAFETY AND MAINTENANCE

(Only for double-insulated, cord-connected appliances):‌‌​⁠⁠⁠⁠⁠‌⁠‌‌⁠⁠‌⁠‌‌‌‌​​​​​​⁠⁠​​​‌​⁠​​⁠‍⁠‌⁠⁠‌​‌‍‍‌⁠‍⁠‌​‍‌⁠​⁠‌‌

SERVICING OF DOUBLE-INSULATED APPLIANCES

In short A double-insulated appliance has two insulation systems instead of grounding, and must not be given a grounding means. Servicing it must be done by qualified service personnel using identical replacement parts.‌‌​⁠⁠⁠⁠⁠‌⁠‌‌⁠⁠‌⁠‌‌‌‌​​​​​​⁠⁠​​​‌​⁠​​⁠‍⁠‌⁠⁠‌​‌‍‍‌⁠‍⁠‌​‍‌⁠​⁠‌‌

A double insulated appliance is marked with one of the following: The words “DOUBLE INSULATION” or “DOUBLE INSULATED” or the double insulation symbol (square within a square).

In a double-insulated appliance, two systems of insulation are provided instead of grounding. No grounding means is provided on a double-insulated appliance, nor should a means for grounding be added to the appliance. Servicing a double-insulated appliance requires extreme care and knowledge of the system, and should be done by qualified service personnel. Replacement parts for a double-insulated appliance must be identical to the parts they replace.

WARNING! Only motorized nozzle is double insulated. To reduce risk of electrick shock - connect vacuum cleaner to a properly grounded outlet.

MAINTENANCE

In short Keep the cleaner in a dry place, replace the dust filters and the dust bag as needed, and leave other servicing to an authorized service representative. Never pull or carry the machine by the cord, and let the thermal cut-out reset before checking for blockages.

Always keep the vacuum cleaner in a dry place. The cleaner is designed for continuous heavy work. Depending on the number of running hours – the dust filters should be replaced. The dust bag must be replaced at the same time the Main filter (sack filter) is replaced/cleaned. Keep the container clean with a dry cloth, and a small amount of spray polish. Any other servicing should be performed by an authorized service representative.

Do not use with damaged cord or plug. If appliance is not working as it should, has been dropped, damaged, left outdoors or dropped into water, return it to a service center.

While the machine is in use do not pull or carry by the cord, use cord as a handle, close a door on cord, or pull cord around sharp edges or corners. Keep cord away from heated surfaces.

The size and quality of the dust bag and filters affect the machine efficiency. Use of non original dust bags or non original filters can cause restricted air flow which may lead to machine overload.

This machine is equipped with a thermal cut-out to protect the motor and other vital machine parts from overheating. Should the machine cut out, you will have to wait at least 5-10 minutes for it to automatically reset. While you are waiting, switch the machine off and unplug it, then check the hose, dust bag and filters to be sure that nothing is blocking the flow of air through the machine.

When cleaning is performed roll up the extension cord starting at the machine end and store it at the machine belt by snapping the nylon tie around the cord.

IMPORTANT WARNINGS

In short These rules cover where and how the machine may be used: dry use only, no liquids, no hot, combustible or explosive material, and no use with a damaged cord, plug or safety device. Always unplug properly and before any servicing.
  1. This machine is also suitable for commercial use, for example in hotels, schools, hospitals, factories, shops and offices and for normal housekeeping purposes.
  2. This machine is not suitable for picking up health endangering dust, unless all special authorised local/state federal precautions are complied with.
  3. This machine is for dry use only and shall not be used or stored outdoors in wet conditions. Store indoors between max. 60°C (degrees centigrade) and min. 0°C (degrees centigrade) 140°Fahrenheit / 32°Fahrenheit..
  4. The machine must not be used for the suction of water or other liquids.
  5. Live conductors must not be vacuum cleaned by the machine for dry dust before their current has been switched off. This is to avoid creating a shortcircuit through the dust remaining in the nozzles and tubes.
  6. The machine must not be used for picking up combustible or explosive materials, nor should it be used in an explosive atmosphere.
  7. Under no circumstances should the machine be used for picking up hot material. In particular the machine must not be used for cleaning open and closed fireplaces, ovens or similar objects that contain warm or glowing ashes.
  8. The machine must not be used if the electrical cord or plug shows any sign of damage. Regularly inspect the cord and plug for damage, in particular if it has been crushed, shut in a door or run over.
  9. The machine must not be used if it is faulty.
  10. Do not unplug by pulling on cord. To unplug, grasp the plug, not the cord.
  11. Always turn off this vacuum cleaner before connecting or disconnecting motorized nozzle.
  12. When repairing or replacing the cord, the same type of cord as originally supplied with the machine must be used. This cord can be supplied by the manufacturer.
  13. 12b. If the fixed supply cord is damaged, it must be replaced by the manufacturer or its service agent or a similarly qualified person in order to avoid a hazard.
  14. The plug must always be removed from the socket outlet before starting any maintenance of the machine or the cord.
  15. Disconnect vacuum cleaner before servicing and when not in use. Do not leave unattended vacuum cleaner plugged in.
  16. No changes or modifications to the mechanical or electrical safety devices should be made.

INSTRUCTIONS FOR USE

In short Before using the vacuum cleaner, check that the voltage on its rating plate matches the main voltage. Illustrated accessories may differ by model.

Before using the vacuum cleaner make sure that the voltage shown on the rating plate on the vacuum cleaner corresponds with the main voltage.

Accessories shown in the illustrations may vary from model to model.

Source: Advance Adgility 6XP / 10XP Operator Manual 823 0100 040 Rev. P00 (2008-02), page 15, used with permission. SES ref PF-VX45-GAQR‌‌​⁠⁠⁠⁠⁠‌⁠‌‌⁠⁠‌⁠‌‌‌‌​​​​​​⁠⁠​​​‌​⁠​​⁠‍⁠‌⁠⁠‌​‌‍‍‌⁠‍⁠‌​‍‌⁠​⁠‌‌
Adgility 6XP / 10XP 823 0100 040 (P00 (2008-02))Page 15 of 24
GENERAL INSTRUCTION FOR USE

GENERAL INSTRUCTION FOR USE

In short These numbered sections explain how to set up, wear and use the vacuum cleaner and its accessories, and match the numbered photos on pages 4-12. They cover connecting the hose and cord, adjusting the harness, and replacing the dust bag and filters.‌‌​⁠⁠⁠⁠⁠‌⁠‌‌⁠⁠‌⁠‌‌‌‌​​​​​‌​​​​​‌​⁠​​​‌‍‌‍‍‌‌‍‌⁠​‍‍‌⁠​⁠⁠​‍​⁠​

Numbered sections below correspond to numbered photos on pages 4-12‌‌​⁠⁠⁠⁠⁠‌⁠‌‌⁠⁠‌⁠‌‌‌‌​​​​​‌​​​​​‌​⁠​​​‌‍‌‍‍‌‌‍‌⁠​‍‍‌⁠​⁠⁠​‍​⁠​

1. General overview of equipment:

Accessories shown in the illustrations may vary from model to model.

2. Hose connection:

Fit the hose inlet sleeve into the opening on the upper lid. Apply soft pressure and turn the inlet sleeve approximately half a turn to ensure it is firmly secured. Turn clockwise to lock, counterclockwise to release.

3. Adjustment of strap position on support plate:

On the primary strap, the position of the strap can be adjusted for your individual comfort by moving the adjustment plate to the inner or outer position.

4. Adjustment of tension ties on the strap’s support plate:

You can adjust the tension ties for your individual comfort. Form a loop with your finger, then move the tie through the clip forwards or backwards to the required length. Remove your finger. Tension the tie.

5. Adjusting the vacuum cleaner to sit comfortably on your back:

Pick up the vacuum cleaner. Put your arms through the shoulder straps. Snap the waistbelt clip shut. Adjust the length. Snap the chest clip shut. Adjust the straps vertically by pulling down on both ties as shown in the picture.

6. Tension tie clip:

Snap the two halves of the clip together. Make sure they are securely fastened. To unlock, press both sides of the clip simultaneously.

7. Cord set:

This vacuum cleaner is equipped with a 50 ft extension power cord, of type 3x16AWG, 125V, SJT, SJO, that must be connected to the cord set from the machine. Always use and connect such an extension cord to this vacuum cleaner. Place the end of the extension cord in to the snap hook from the vacuum cleaner in order to create a cord relieve by the hook. When cleaning is performed roll up the extension cord starting at the machine end and store it at the machine belt by snapping the nylon strap around the cord.

8. Cord Relief:

Connect the extension cord to the outlet from the cleaner. Place the end of the extension cord in to the snap hook that is placed at the vacuum cleaner in order to create a Cord Relief by the hook. Make sure the cord is properly secured in the hook.

9. On/Off:

The on/off switch is located in a separate housing attached to the right side of the waistbelt. Tilt the switch for ON or OFF function.

10. Dust bag:

If the suction power diminishes, it may be time to replace the dust bag. Check the bag frequently to make sure that you don’t overfill. Release the latches on the upper lid. Lift up the lid from the container. Grasp at the cardboard part of the dust bag and carefully lift the bag out of the container. Some types of dust bag can be sealed to prevent any dust/rubbish from being released.
In that case, peel off the protective paper and fold the cardboard collar to seal the bag.

11. Main filter:

When you replace the dustbag also replace or clean the Main filter. This can be done after you have lifted out the dust bag. Clean the filter by shaking it well. Reinstall the filter into the machine or replace it with a new one if it can not be cleaned. Replace the dust bag and slide it in place to the main filter. Then put back the lid and close the latches.

12. HEPA filter:

HEPA filters cannot be cleaned or washed. Once they have become dirty, they must be replaced. Check and change the HEPA filter frequently. When handling a new HEPA filter, avoid touching the surface of the filter. Take hold of the plastic framework instead to insure the HEPA filter functions properly. To replace the HEPA filter: Unlock the lower set of latches that secure the motor base to container. Lift off the container and lid assembly. Turn the HEPA filter counterclockwise and lift filter directly upward to remove. Repeat in reverse order to install new HEPA filter.

13. Pre-filter:

Check the pre-filter frequently. Never run the vacuum cleaner without the pre-filter in place. Once the HEPA filter is removed (see Section 12 above) it is possible to inspect and replace the pre-filter if needed. Release the two latches on the motor top. Remove the container and the upper lid. Place the pre-filter in the center of the motor top. Lock both latches down.

14. Exhaust filter:

This filter is used to clean the exhaust air coming from the motor. To replace exhaust filter: press down on the center tab of the exhaust cover and pull outward to remove the cover from machine. Place a new exhaust filter into the cover and replace the cover onto the machine.

15. Power Nozzle:

Always turn off the vacuum cleaner before connecting or disconnecting motorized nozzle. Plug the cord of the nozzle into the socket outlet on the side of the machine. The power outlet for the Power Nozzle is only available on some models.

16. Connection of bent end and handle grip:

Push the handle grip into the bent end.

17. Extension tubes:

The tubes is adjustable. The length can be adjusted by holding in the button and simultaneously pulling or pushing the tube components.

18. Connection of hose sleeve outer and bent end:

Connect the hose sleeve outer and bent end by pushing the bent end into the hose sleeve outer.

19. Round brush nozzle:

Useful tool for cleaning home furnishings etc.

20. Combi nozzle:

One setting with brush (hard floors) and one without brush for rugs (soft floors).

21. Crevice nozzle:

For cleaning tight spaces such as furniture, radiators, corners and joints.

Source: Advance Adgility 6XP / 10XP Operator Manual 823 0100 040 Rev. P00 (2008-02), page 16, used with permission. SES ref PF-WC2U-BQO3‌‌​⁠⁠⁠⁠⁠‌⁠‌‌⁠⁠‌⁠‌‌‌‌​​​​​‌​​​​​‌​⁠​​​‌‍‌‍‍‌‌‍‌⁠​‍‍‌⁠​⁠⁠​‍​⁠​
Adgility 6XP / 10XP 823 0100 040 (P00 (2008-02))Page 16 of 24
DATA SPECIFICATION

DATA SPECIFICATION

In short This section lists the technical specifications of the Adgility 6 XP and 10 XP side by side, including power, airflow, capacities, dimensions and weight. Specifications may change without prior notice.‌‌​⁠⁠⁠⁠⁠‌⁠‌‌⁠⁠‌⁠‌‌‌‌​​​​​‌‌⁠​​​‌​⁠​​​‍‌​‌‌⁠‌⁠⁠⁠​‍​⁠‌​‌⁠⁠‍‌‌‍
SPECIFICATIONAdgility 6 XPAdgility 10 XP
Voltage @ 60Hz, volts120120
Type of Power no. of phases11
Power, max watts13001300
Current Draw, max (Amps)12 with power outlet12 with power outlet
Current Draw, (Amps)1010
Protection grade (dust, moist) –IP 20IP 20
Protection class (electrical) GroundedII
Waterlift, max. inches H2O9999
Airflow, max (cfm)144144
Filter Area, main filter (Sq. in.)217311
Main Filter Filter Efficiency, DIN 44956-298.2%98.2%
Dust bag capacity (Gallon)1.01.8
Tank Capacity (Gallons)1.52.6
Machine Inlet, (in/mm)1.5 / 381.5 / 38
Sound pressure level, BS 5415 dB(A)6262
Dimensions l x w x h, (in)8.2 x 14.8 x 22.310.1 x 14.8 x 23
Weight, cleaner only (lbs.)9.310.8
Cord Length (ft.)5050

Specifications and details are subject to change without prior notice.‌‌​⁠⁠⁠⁠⁠‌⁠‌‌⁠⁠‌⁠‌‌‌‌​​​​​‌‌⁠​​​‌​⁠​​​‍‌​‌‌⁠‌⁠⁠⁠​‍​⁠‌​‌⁠⁠‍‌‌‍

SERVICE

In short This section gives the service contact details for Nilfisk-Advance in the USA and Canada.

USA
Nilfisk-Advance Inc.
14600 21st Avenue North
Plymouth, MN 55447-3408
Tel.: (763) 745 3500
Fax :(763) 745 3718

Canada
Nilfisk-Advance Canada Company
396 Watline Avenue
Mississauga
Ontario, L4Z 1X2
Tel.: 905-712-3260
Fax: 905-712-3255

Source: Advance Adgility 6XP / 10XP Operator Manual 823 0100 040 Rev. P00 (2008-02), page 23, used with permission. SES ref PF-6TW6-P6I5‌‌​⁠⁠⁠⁠⁠‌⁠‌‌⁠⁠‌⁠‌‌‌‌​​​​​‌‌⁠​​​‌​⁠​​​‍‌​‌‌⁠‌⁠⁠⁠​‍​⁠‌​‌⁠⁠‍‌‌‍
Adgility 6XP / 10XP 823 0100 040 (P00 (2008-02))Page 23 of 24

Advance and Adgility are trademarks of Nilfisk, Inc. Southeastern Equipment & Supply is an independent dealer.


Not Sure Which Machine Fits Your Floors?

Talk to a real SES tech about new, demo or certified reconditioned options, parts and service.

© 2026 Southeastern Equipment and Supply, Inc. All Rights Reserved.

Visa Discover AMEX Mastercard