
FaST is discontinued. FaST cartridges and FaST parts are no longer available from Tennant.
Speed Scrub walk-behind scrubber, operator manual
Nobles Speed Scrub walk-behind scrubber. Operator manual 9002370, Rev. 08 (10-2015). English.
The cover shows the ec-H2O NanoClean and FaST (Foam Scrubbing Technology) logos, "The Safe Scrubbing Alternative", Quick-Train controls, TennantTrue parts and IRIS, a Tennant technology.
For the latest parts manuals and other language operator manuals, visit www.nobles.com/manuals.
Introduction
This manual is furnished with each new model. It provides necessary operation and maintenance instructions. Read this manual completely and understand the machine before operating or servicing it.
This machine will provide excellent service. However, the best results will be obtained at minimum costs if:
- The machine is operated with reasonable care.
- The machine is maintained regularly - per the machine maintenance instructions provided.
- The machine is maintained with manufacturer supplied or equivalent parts.
To view, print or download manuals online visit www.nobles.com/manuals
Protect the environment
Please dispose of packaging materials, old machine components such as batteries, hazardous fluids, including anti-freeze and oil, in an environmentally safe way according to local waste disposal regulations.
Always remember to recycle.
Intended use
The Speed Scrub walk-behind scrubber is designed to scrub hard surfaces (concrete, asphalt, stone, synthetic, etc) in an indoor environment. Typical applications include hotels, schools, hospitals, factories, shops, offices, and rental businesses. Do not use this machine on carpeted surfaces. Use only recommended pads and commercially available floor cleaners intended for machine application. Do not use this machine other than described in this Operator Manual.
Machine data
IMPORTANT: To ensure full warranty protection, fill out the attached MACHINE INSTALLATION / WARRANTY REPORT REPLY CARD and return to Tennant within 30 days of purchase.
Please fill out at time of installation for future reference.
Model No. -
Serial No. -
Installation Date -
TENNANT Company
PO Box 1452
Minneapolis, MN 55440
Phone: (800) 553-8033 or (763) 513-2850
www.nobles.com
FaST-PAK and Insta-Fit are US registered and unregistered trademarks of Tennant Company.
Specifications and parts are subject to change without notice.
Copyright © 2006-2015 TENNANT COMPANY, Printed in U.S.A. All rights reserved.
Contents
- Important safety instructions (page 4)
- Safety labels (page 6)
- Machine components (page 7)
- Control panel components (page 8)
- Machine installation (page 9)
- Uncrating machine (page 9)
- Installing batteries (page 10)
- How the machine works (page 10)
- Brush and pad information (page 10)
- Machine setup (page 10)
- Attaching squeegee assembly (page 10)
- Installing brushes/pads (page 11)
- ec-H2O NanoClean water conditioning cartridge (ec-H2O NanoClean model) (page 12)
- Installing FaST-PAK carton (FaST model) (page 13)
- Filling solution tank (page 13)
- Adjusting control console height (page 13)
- Machine operation (page 14)
- Pre-operation checks (page 14)
- Starting the machine (page 14)
- Emergency stopping (page 16)
- While operating machine (page 16)
- Battery meter (page 17)
- Hour meter (page 17)
- Circuit breakers / fuses (page 17)
- Off-aisle wand (page 18)
- Draining and cleaning tanks (page 19)
- Draining recovery tank (page 19)
- Draining solution tank (page 19)
- Charging batteries (page 20)
- Battery charger specifications (page 20)
- On-board battery charger settings (page 20)
- Using the on-board battery charger (page 21)
- On-board battery charger error codes (page 22)
- Using an off-board battery charger (page 23)
- Adjusting scrub head brushes (page 23)
- Disk model (page 23)
- Cylindrical brush model (page 24)
- Machine maintenance (page 25)
- Daily maintenance (page 25)
- Monthly maintenance (page 27)
- Battery maintenance (page 29)
- Squeegee blades (page 30)
- Motor maintenance (page 30)
- FaST system maintenance (page 31)
- ec-H2O NanoClean water conditioning cartridge replacement (page 31)
- ec-H2O module flush procedure (page 32)
- Jacking up machine (page 33)
- Transporting machine (page 33)
- Storing machine (page 33)
- Freeze protection (page 34)
- Troubleshooting (page 36)
- Battery meter LED fault codes (page 38)
- Machine specifications (page 39)
- Machine dimensions (page 40)
Important safety instructions: save these instructions
The following warning precautions are used throughout this manual as indicated in their description:
The following information signals potentially dangerous conditions to the operator. Know when these conditions can exist. Locate all safety devices on the machine. Report machine damage or faulty operation immediately.
- Never Use Flammable Liquids Or Operate Machine In Or Near Flammable Liquids, Vapors Or Combustible Dusts.
This machine is not equipped with explosion proof motors. The electric motors will spark upon start up and during operation which could cause a flash fire or explosion if machine is used in an area where flammable vapors/liquids or combustible dusts are present.
- Do Not Pick Up Flammable Materials Or Reactive Metals.
- Batteries Emit Hydrogen Gas. Keep Sparks And Open Flame Away. Keep Battery Compartment Open When Charging.
- Disconnect Battery Cables and Charger Plug Before Servicing Machine.
- Do Not Charge Batteries with Damaged Power Supply Cord. Do Not Modify Plug.
If the charger supply cord is damaged or broken, it must be replaced by the manufacturer or its service agent or a similarly qualified person in order to avoid a hazard.
This machine may be equipped with technology that automatically communicates over the cellular network. If the machine will be operated where cell phone use is restricted because of concerns related to equipment interference, please contact a Tennant representative for information on how to disable the cellular communication functionality.
- Do not operate machine:
- Unless trained and authorized.
- Unless operator manual is read and understood.
- Under the influence of alcohol or drugs.
- While using cell phone or other electronic devices.
- Unless mentally and physically capable of following machine instructions.
- If not in proper operating condition.
- In areas where flammable vapors/liquids or combustible dusts are present.
- In areas that are too dark to safely see the controls or operate the machine.
- In areas with possible falling objects.
- With pads or accessories not supplied or approved by Tennant. The use of other pads may impair safety.
- In outdoors areas. This machine is for indoor use only.
- Before starting machine:
- Check machine for fluid leaks.
- Make sure all safety devices are in place and operate properly.
- When using machine:
- Use only as described in this manual.
- Go slowly on inclines and slippery surfaces.
- Wear closed-toe non-slip shoes.
- Reduce speed when turning.
- Use care when reversing machine.
- Do not carry passengers on machine.
- Keep children and unauthorized persons away from machine.
- Do not allow machine to be used as a toy.
- Always follow safety and traffic rules.
- Report machine damage or faulty operation immediately.
- Follow mixing and handling instructions on chemical containers.
- Follow site safety guidelines concerning wet floors.
- Do not scrub on inclines that exceed 5% grade or transport on inclines that exceed 8%.
Important safety instructions (continued)
- Before leaving or servicing machine:
- Stop on level surface.
- Set parking brake, if equipped.
- Turn off machine and remove key.
- When servicing machine:
- All work must be done with sufficient lighting and visibility.
- Keep work area well ventilated.
- Avoid moving parts. Do not wear loose clothing, jewelry and secure long hair.
- Block machine tires before jacking machine up.
- Jack machine up at designed locations only. Support machine with jack stands.
- Use hoist or jack that will support the weight of the machine.
- Do not power spray or hose off machine.
- Disconnect battery connections and battery charger before working on machine.
- Keep all metal objects off batteries.
- The use of incompatible battery chargers may damage battery packs and potentially cause a fire hazard.
- Inspect charger cord regularly for damage.
- Do not disconnect the charger DC cord from the machine receptacle when charger is operating. Arcing may result. If the charger must be interrupted during charging, disconnect the AC power supply cord first.
- Avoid contact with battery acid.
- Use a hoist or adequate assistance when lifting batteries.
- All repairs must be performed by trained personnel.
- Do not modify the machine from its original design.
- Use Tennant supplied or approved replacement parts.
- Wear personal protective equipment as needed and where recommended in this manual.
- When loading/unloading machine onto/off truck or trailer:
- Drain tanks before loading machine.
- Lower scrub head and squeegee before tying down machine.
- Turn off machine and remove key.
- Use a ramp, truck or trailer that will support the weight of the machine and operator.
- Use a winch if ramp incline exceeds a 19.5% grade level.
- Set parking brake, if equipped.
- Block machine wheels.
- Use tie-down straps to secure machine.
- All repairs must be performed by a qualified service person.
- Do not modify the machine from its original design.
- When loading/unloading machine onto/off truck or trailer:
- Drain tanks before loading.
- Use a ramp that can support the machine weight and person loading it. Do not exceed a 19.5% ramp incline at a ramp length of 12 ft (3.7 m).
- Turn machine off.
- Put scrub head in the lowered position.
- Block machine wheels.
- Use tie-down straps to secure machine.
- Set parking brake, if equipped.
Safety labels
The safety labels appear on the machine in the locations indicated. Replace labels if they are missing or become damaged or illegible.
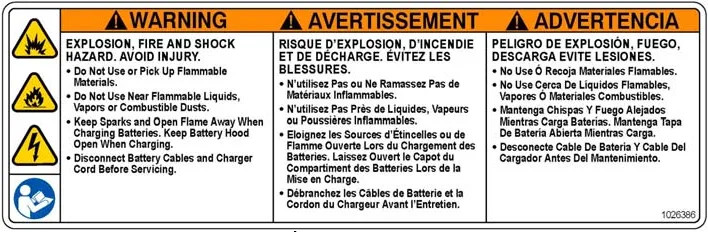
Warning label
Located on recovery tank cover.
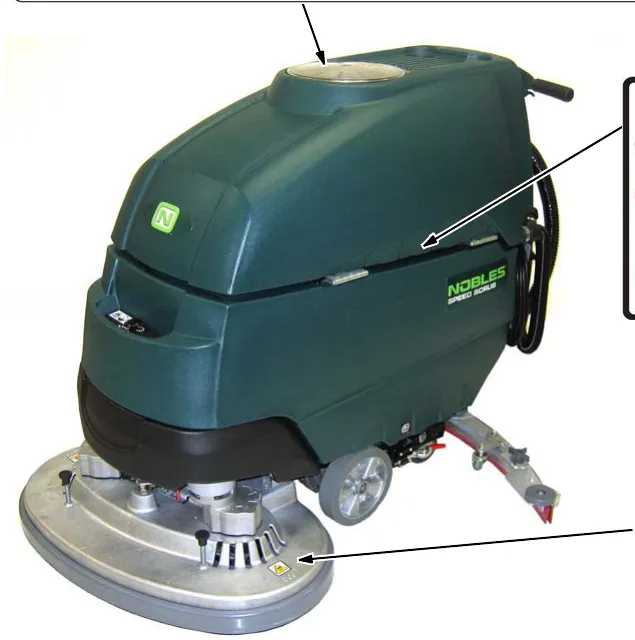
Battery charge label
Located on bottom side of recovery tank.
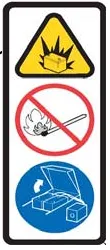
Spinning brush label
Located on scrub head

Machine components
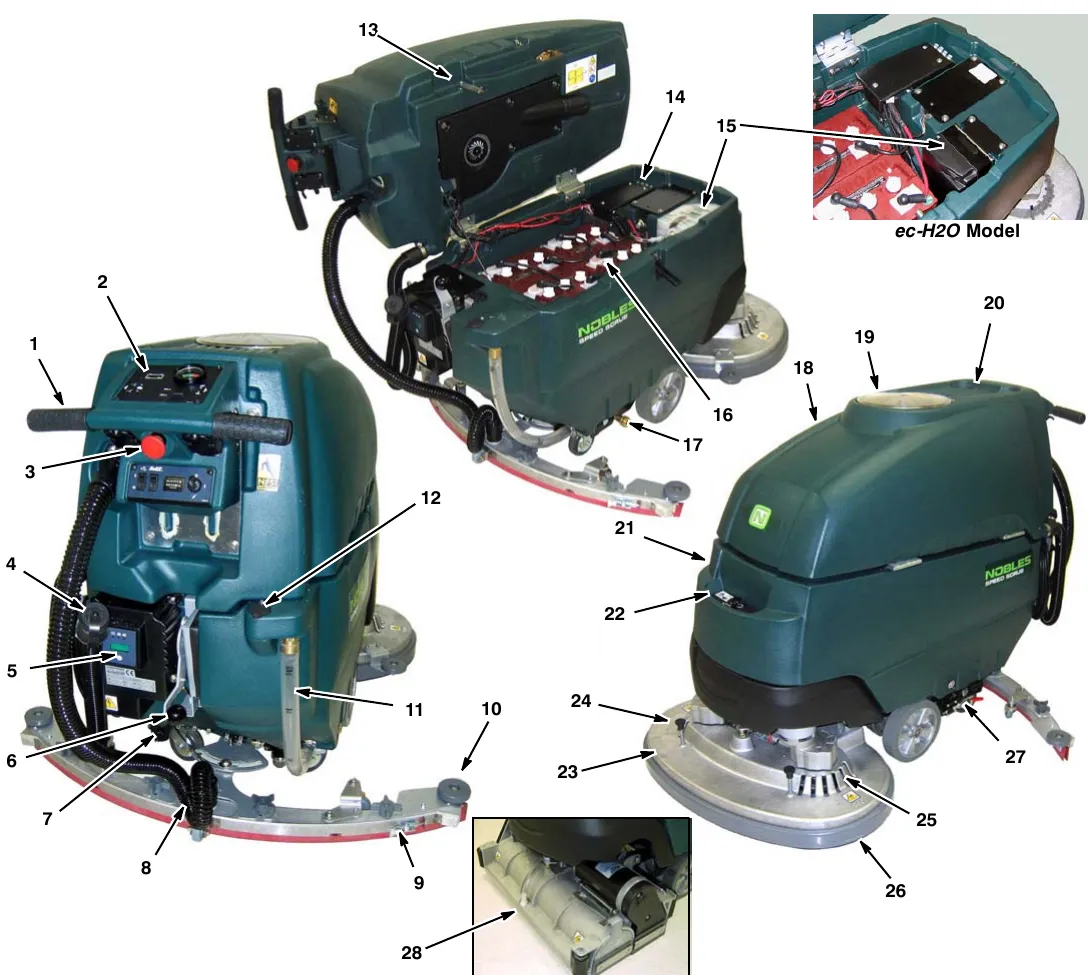
- Adjustable Control Console
- Control Panel
- Emergency Stop Button (option)
- Recovery Tank Drain Hose
- On-board Battery Charger
- Squeegee Lift Lever
- Solution Flow Control Knob
- Squeegee Vacuum Hose
- Squeegee Assembly
- Wall Rollers
- Solution Tank Level/Drain Hose
- Rear Fill Port
- Recovery Tank Support Stand
- Circuit Breaker Panel
- FaST-PAK Carton Compartment (FaST Model)
ec-H2O System Module (ec-H2O Model) - Batteries
- Off-Aisle Wand Solution Hose Coupler
- Recovery Tank
- Recovery Tank Cover
- Cup Holders
- Solution Tank
- Front Fill Port
- Disk Scrub Head
- Pad Release Plunger
- Pad Driver Window
- Scrub Head Skirt
- Parking Brake (option)
- Cylindrical Brush Scrub Head
Control panel components
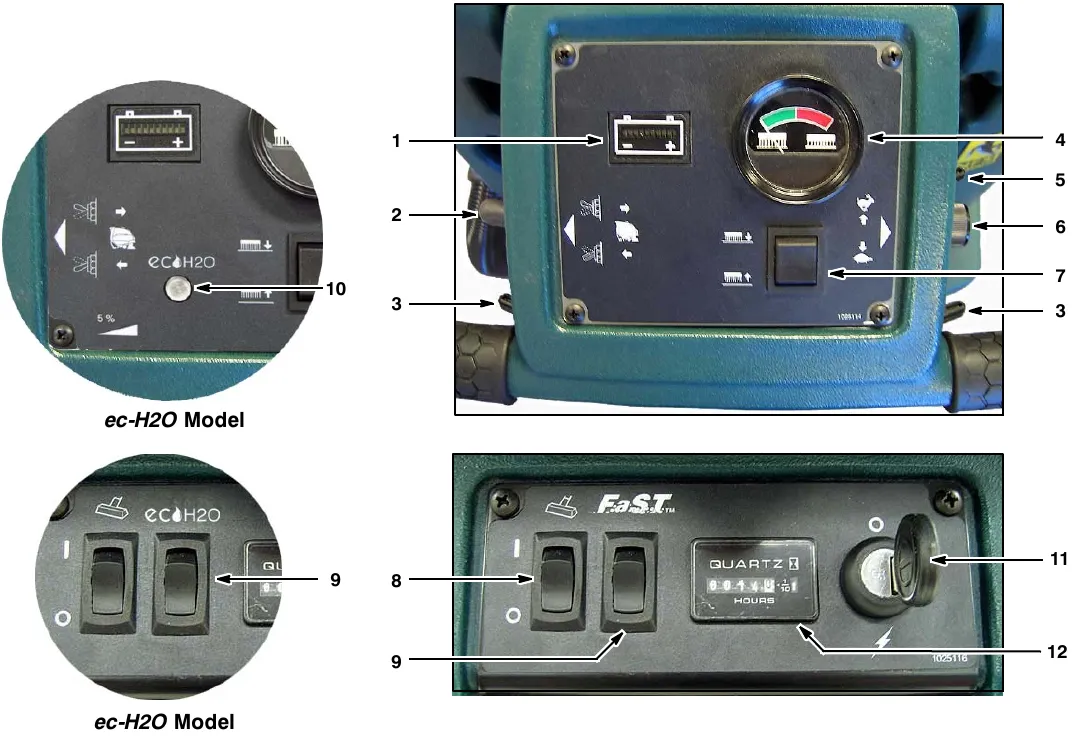
- Battery Meter
- Reverse Trigger
- Start Triggers
- Brush Pressure Meter
- Control Console Height Adjustment Lever
- Speed Control Knob
- Brush Pressure Switch
- Off-Aisle Wand on/off Switch (option)
- FaST System on/off Switch (FaST Model)
ec-H2O system on/off switch (ec-H2O Model) - ec-H2O system indicator light (ec-H2O Model)
- Main Power on/off Key Switch
- Hour Meter
Machine installation
Uncrating machine
- Carefully check the shipping crate for signs of damage. Report damage at once to carrier.
- Check the contents list. Contact distributor for missing items.
Contents:- 4-6 V Batteries-Optional
- 3-Battery Cable Jumpers
- Battery Tray
- 1-FaST-PAK 365 Concentrate-(FaST model)
- Squeegee Assembly
- 2-Pad drivers (Disk Model)
- 2-Brushes (Cylindrical Brush Model)
- To uncrate your machine, remove the shipping hardware and straps that secure the machine to the pallet. Carefully back machine down ramp.
Installing batteries
Battery specifications:
Four 6 volt, 235A/20h deep cycle batteries. Maximum battery dimensions:
7.5 in (190 mm) W x 10.8 in (275 mm) L x 11.2 in (284 mm) H.
- Park the machine on a level surface, remove the key and set the parking brake, if equipped.
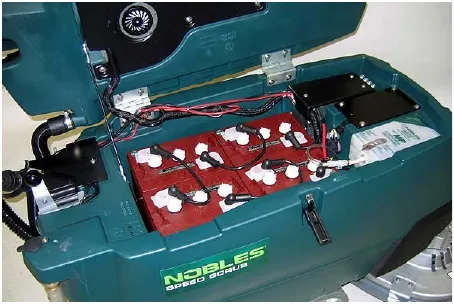
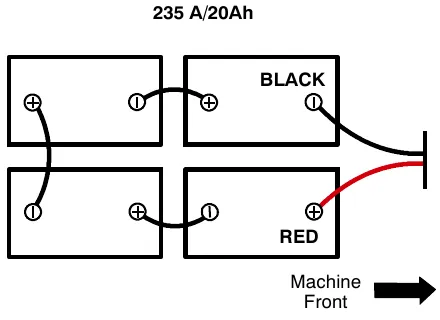
- Carefully install the batteries into the battery compartment tray (Figure 1). Arrange the battery posts as shown (Figure 2).
- Connect the battery cables to the battery posts as shown (Figure 2), RED TO POSITIVE (+) and BLACK TO NEGATIVE (-).
How the machine works
Conventional scrubbing
Water and detergent from the solution tank flow to the floor through a solution valve. The brushes use the detergent and water to scrub the floor clean. As the machine moves forward, the squeegee wipes the dirty solution from the floor into the recovery tank.
ec-H2O NanoClean scrubbing (ec-H2O model)
When using the ec-H2O NanoClean technology, normal water passes through a module where it is electrically converted into a cleaning solution. The electrically converted water attacks the dirt, allowing the machine to easily scrub away the suspended soil. The converted water then returns to normal water in the recovery tank.
Foam scrubbing (FaST model)
(FaST-Foam activated Scrubbing Technology)
Unlike conventional scrubbing, the FaST system injects the FaST-PAK concentrate formula with a small amount of water and air onto the floor. The mixture creates a large volume of expanded wet foam for the brush to scrub the floor clean. As the machine moves forward, the foam collapses and the squeegee recovers the dirty solution into the recovery tank leaving the floor clean, dry and slip free.
Brush and pad information
For best cleaning results use the appropriate brush type for your cleaning application. Refer to the Parts manual for part number information.
Polypropylene Bristle Scrub Brush (Black) - This general purpose polypropylene bristle scrub brush is used for scrubbing lightly compacted soilage. This brush works well for maintaining concrete, wood and grouted tile floors.
Soft Nylon Bristle Scrub Brush (White) - Recommended for cleaning coated floors without removing finish. Cleans without scuffing.
Super Abrasive Bristle Scrub Brush (Gray) - Nylon fiber impregnated with abrasive grit to remove stains and soilage. Strong action on any surface. Performs well on buildup, grease, or tire marks.
Polishing Pad (White) - Used to maintain highly polished or burnished floors.
Buffing Pad (Red) - Used for light duty scrubbing without removing floor finish.
Scrubbing Pad (Blue) - Used for medium to heavy-duty scrubbing. Removes dirt, spills, and scuffs and leaves surface clean and ready for recoating.
Stripping Pad (Brown) - Used for stripping of floor finish to prepare the floor for recoating.
Heavy Duty Stripping Pad (Black) - Used for aggressive stripping of heavy finishes/sealers, or very heavy duty scrubbing.
Machine setup
Attaching squeegee assembly
- Park the machine on a level surface, remove the key and set the parking brake if equipped.
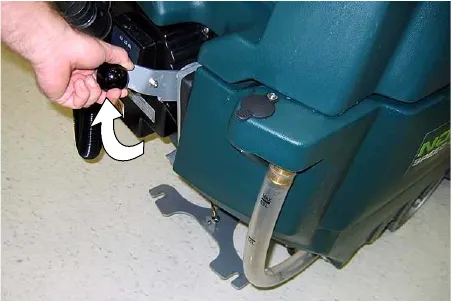
- Lift the squeegee lift lever to the upward position (Figure 3).
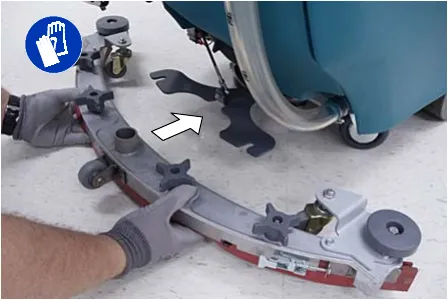
- Mount the squeegee assembly to the squeegee pivot bracket and secure with knobs (Figure 4).
Attaching squeegee assembly (continued)
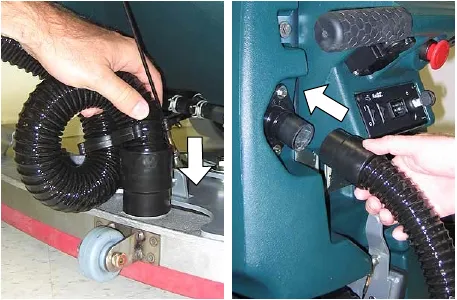
- Connect the vacuum hose to the squeegee assembly. Loop the hose as shown using the hose clip provided (Figure 5).
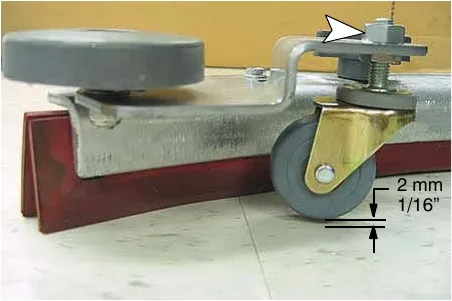
- Check the squeegee blades for proper deflection. The blades should deflect as shown (Figure 6).
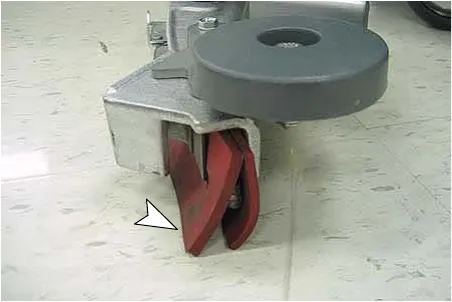
- To adjust the blade deflection, place the squeegee assembly on a level surface and adjust the casters as shown (Figure 7).
Installing brushes/pads
Disk model
- Raise scrub head off the floor and remove key.
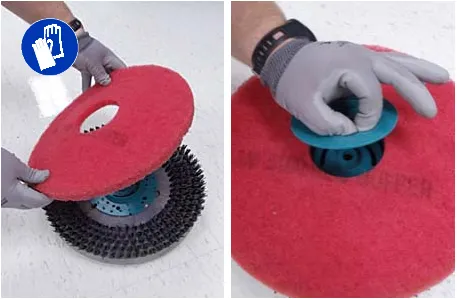
- Attach the pad to the pad driver before installing the driver. Secure pad with centerlock (Figure 8).
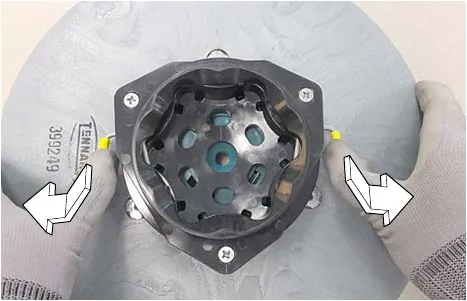
- Set the yellow spring clips to the open position to make brush installation easier. Press clips down and outward to set (Figure 9).
- Align the pad driver or brush under the motor hub and push it upward to engage hub (Figure 10).
Installing brushes/pads (continued)
Disk model (continued)
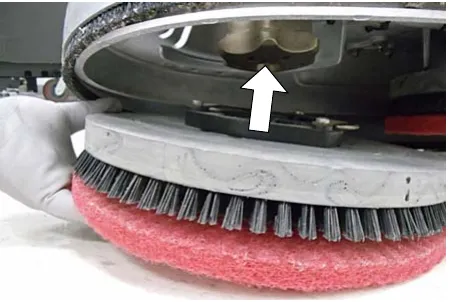
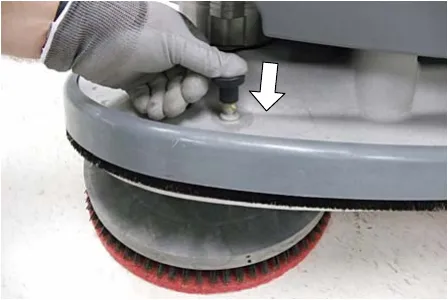
- To remove the pad driver or brush, raise the scrub head and push the pad release plunger downward (Figure 11).
- Check the scrub head to ensure that it is properly adjusted (See ADJUSTING SCRUB HEAD BRUSHES).
Cylindrical brush model
- Raise scrub head off the floor and remove key.
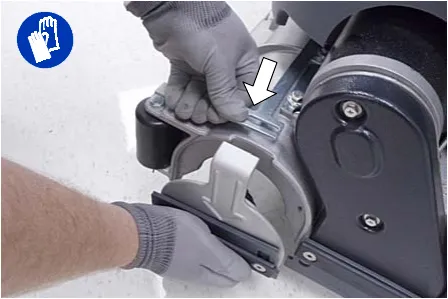
- Remove idler plate from scrub head by pressing the spring tab downward (Figure 12).
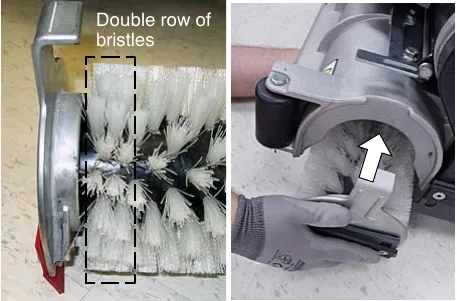
- Attach idler plate to the brush end that has the double row of bristles (Figure 13). Install brush.
- Check the brushes to ensure they are properly adjusted (See ADJUSTING SCRUB HEAD BRUSHES).
ec-H2O NanoClean water conditioning cartridge (ec-H2O NanoClean model)
(ec-H2O models labeled ec-H2O NanoClean)
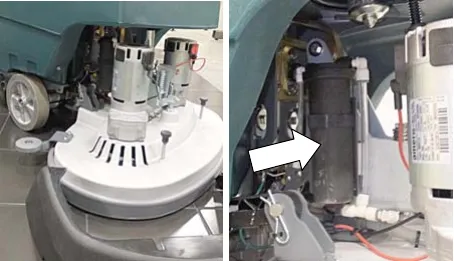
The ec-H2O system is equipped with a water conditioning cartridge. The cartridge is designed to protect the machine's plumbing system from potential scaling. The cartridge is located behind the right side brush motor (Figure 14).
The cartridge is required to be replaced when it reaches its maximum water usage or expiration time of when the cartridge was activated, which ever comes first.
Depending on machine usage a new cartridge can last anywhere from 12 to 24 months.
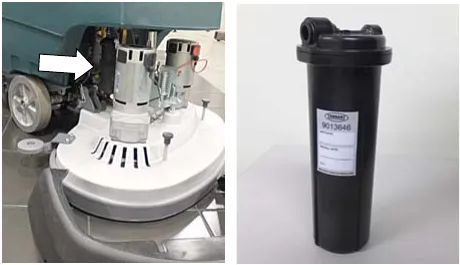
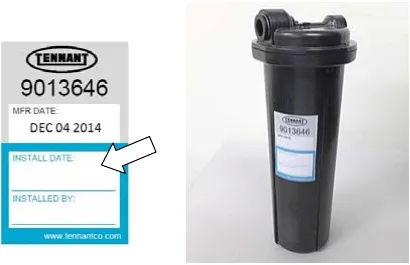
All cartridges are labeled with a manufacture date. The shelf-life of an un-installed cartridge is one year from manufacture date. For new cartridge replacement, the ecH2O module timer must be reset. See ec-H2O NanoClean WATER CONDITIONING CARTRIDGE REPLACEMENT.
The ec-H2O system indicator light will blink green/red when it's time to replace cartridge (Figure 15).
Installing FaST-PAK carton (FaST model)
- Pull out the hose connector from the FaST-PAK carton and remove cap (Figure 16).
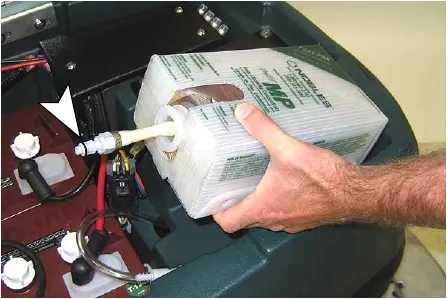
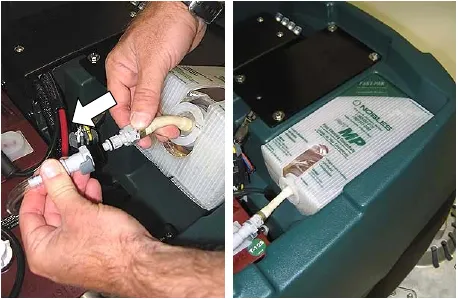
- Open the battery compartment. Connect the FaST-PAK carton to the supply hose and place carton in compartment (Figure 17). Make sure the hose does not get pinched.
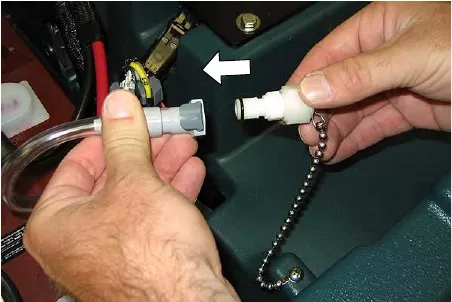
- When the supply hose is not in use, connect the storage plug to prevent the FaST system from drying out and clogging up the hose. (Figure 18).
Filling solution tank
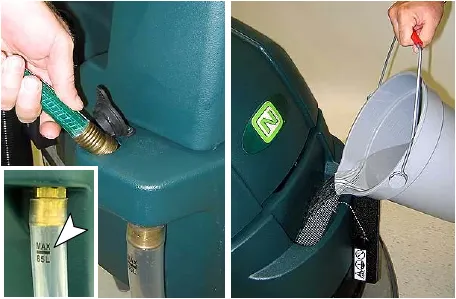
Using a hose or bucket, fill the solution tank to the "MAX 85L" mark (Figure 19).
For Conventional Scrubbing: Use hot water (140°F (60°C) maximum). Pour a recommended cleaning detergent into the solution tank according to mixing instructions on the container.
For FaST or ec-H2O Scrubbing: Use cool clean water only (less than 70°F (21°C)). Do not add any conventional floor cleaning detergents, system failure may result.
Adjusting control console height
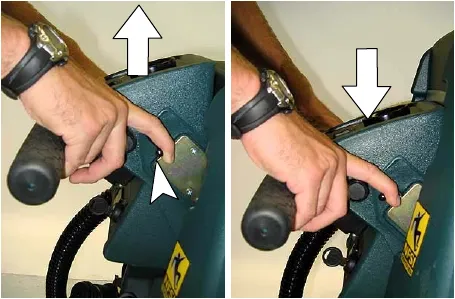
Pull the control console height adjustment lever and lift or lower the console to a comfortable operating height. Release lever to lock in position (Figure 20).
Machine operation
Pre-operation checks
- Sweep area.
- Check the battery meter.
- Check the brushes/pads for wear.
- Check the squeegee blades for wear and proper adjustment.
- Make sure the recovery tank is empty and the float shut-off screen is installed and clean.
- Check the scrub head skirt for wear.
- For FaST Scrubbing: Check the FaST-PAK concentrate level.
- For FaST or ec-H2O Scrubbing: Make sure the solution tank is filled with cool clean water only.
- For FaST or ec-H2O Scrubbing: Ensure that all conventional cleaning agents are drained and rinsed from solution tank.
Starting the machine
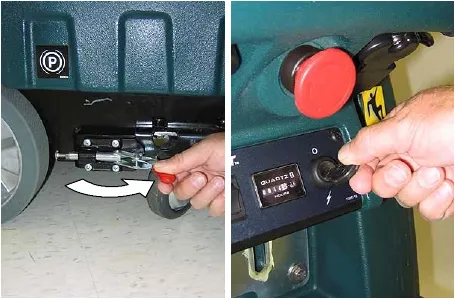
- Release the parking brake if equipped (Figure 21).
- Turn the key to the on ( I ) position (Figure 21).
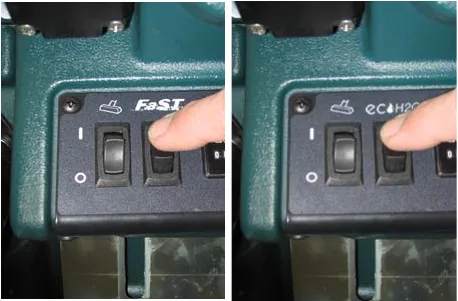
- FaST model: press the FaST system switch to the on ( I ) position (Figure 22).
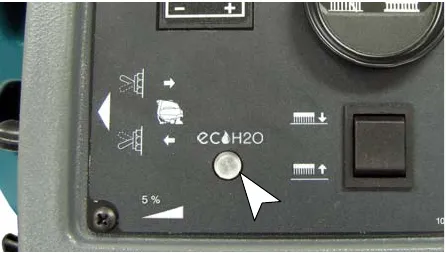
ec-H2O model: press the ec-H2O system switch to the on ( I ) position (Figure 22). The ec-H2O system indicator light will not turn on until the machine starts scrubbing.
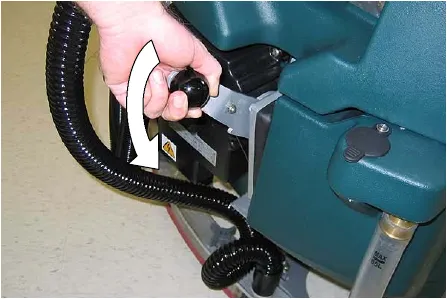
- Lower the squeegee assembly to the floor by lowering the squeegee lift lever (Figure 23).
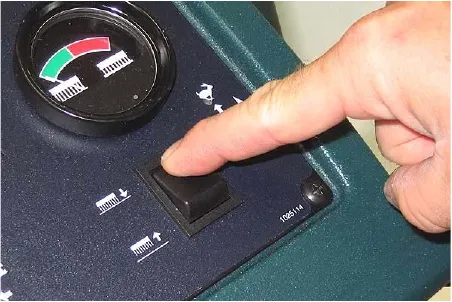
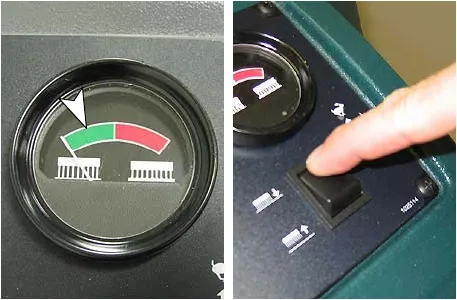
- Lower the scrub head to the floor by pressing the brush pressure button (Figure 24).
Starting the machine (continued)
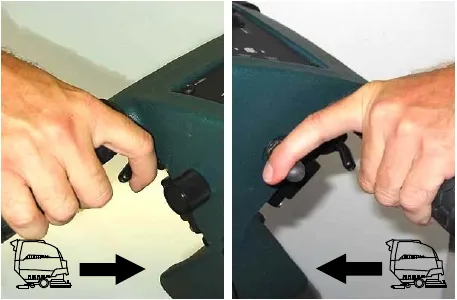
- Pull the triggers to begin scrubbing (Figure 25). To reverse the machine, simply pull the reverse trigger. Raise squeegee when reversing machine.
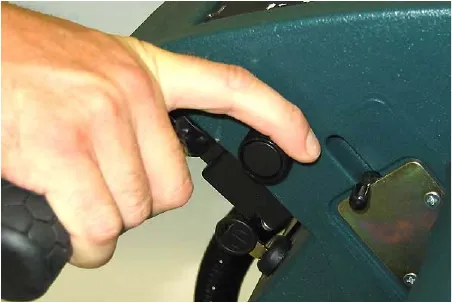
- Adjust the speed control knob to a desired scrubbing speed (Figure 26).
NOTE: 148-197 feet (45-60 meters) per minute is the recommended scrubbing speed.
- Check the brush pressure meter reading and adjust the pressure if needed (Figure 27). Do not operate the machine in the red zone, floor damage or brush motor overload may result.
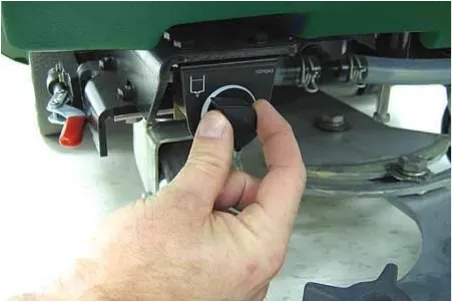
- For conventional scrubbing, adjust the solution flow control knob to a desired flow rate (Figure 28).
NOTE: The solution flow cannot be adjusted when the machine is set for FaST scrubbing or for ec-H2O scrubbing on ec-H2O models manufactured before ec-H2O NanoClean models.
ec-H2O NanoClean models
(ec-H2O models labeled ec-H2O NanoClean)
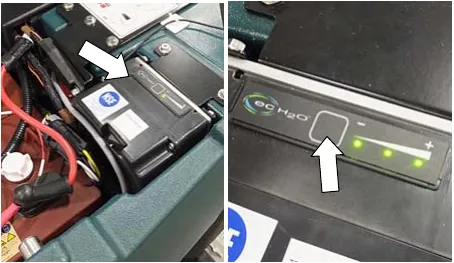
To adjust the solution flow rate when ec-H2O scrubbing, press the solution flow button located on the ec-H2O module (Figure 29). One LED = low, two LEDs = medium, and three LEDs = high (Figure 29). The ec-H2O module is located under the recovery tank. Drain recovery tank before lifting tank.
- To stop scrubbing, release the triggers, raise the scrub head and squeegee and turn the key to the off position.
Emergency stopping
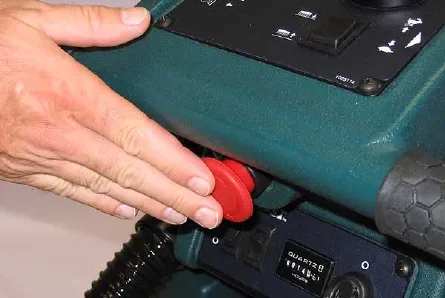
Strike the emergency stop button, if equipped, in the event of an emergency (Figure 30). This button shuts off all power to machine. To regain power, turn the button clockwise.
While operating machine
- Overlap each scrub path by 2 in (5 cm).
- Keep the machine moving to prevent damage to floor finish.
- Do not operate the machine on inclines that exceed 5%.
- Conventional scrubbing: Pour a commercially approved foam control solution into the recovery tank if excessive foam appears.
- For heavily soiled areas, use the double scrubbing method. First scrub the area with the squeegee up, let solution set for 3-5 minutes, then scrub the area a second time with squeegee down.
- When leaving the machine unattended, remove the key and set the parking brake, if equipped.
- If the machine detects a fault, the battery meter will blink a fault code (See BATTERY METER LED FAULT CODES).
- ec-H2O NanoClean Models (ec-H2O models labeled ec-H2O NanoClean)
If the ec-H2O system indicator light begins to blink green/red, the water conditioning cartridge needs to be replaced (Figure 31). See ec-H2O NanoClean WATER CONDITIONING CARTRIDGE REPLACEMENT.
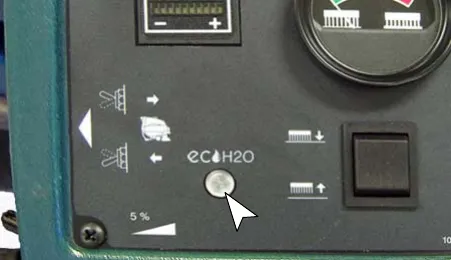
| ec-H2O system indicator light code | Condition |
|---|---|
| Solid green | Normal operation |
| Blinking green/red | Water conditioning cartridge expired. Replace cartridge. |
| Solid or blinking* red | Contact Service Center |
*Verify if cleaning detergent was added to solution tank. If ec-H2O system was operated with cleaning detergent, drain solution tank, add clear water and operate the ec-H2O system until the indicator light code clears.
ec-H2O models
(ec-H2O models manufactured before ec-H2O NanoClean models)
If an alarm sounds and the ec-H2O system indicator light begins to blink red, the ec-H2O module must be flushed to resume ec-H2O operation (See ec-H2O MODULE FLUSH PROCEDURE) (Figure 31).
NOTE: When the alarm sounds and the light blinks red, the machine will bypass the ec-H2O system. To continue scrubbing, turn the ec-H2O switch off and change over to conventional scrubbing.
| ec-H2O system indicator light code | Condition |
|---|---|
| Solid green | Normal operation |
| Blinking red | Flush ec-H2O module |
| Solid red | Contact Service Center |
Battery meter
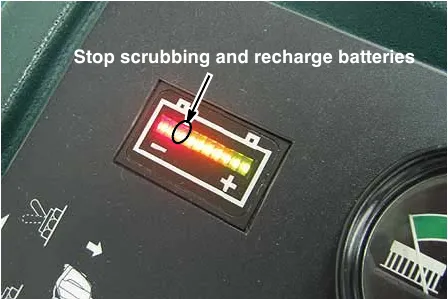
The battery meter displays the charge level of the batteries (Figure 32). When the batteries are fully charged, all indicator lights will glow. As the batteries discharge, the indicator lights will begin to go out from right to left.
When the discharge level reaches the first red light (Figure 32), stop scrubbing and recharge the batteries. If you continue to operate the machine beyond the first red light, the scrubbing function will automatically shut off when the last red light begins to blink. This protects the batteries from total discharge. Drive the machine to the charging area and recharge the batteries immediately.
NOTE: The battery meter will also display machine fault codes. If a fault is detected the LED bars will flash specific fault codes (See BATTERY METER LED FAULT CODES).
Hour meter
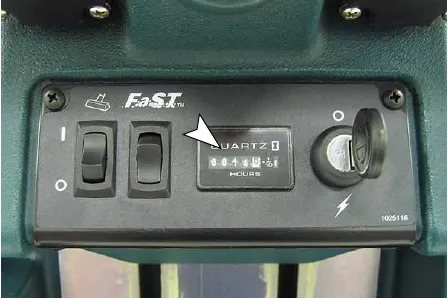
The hour meter records the number of total hours the brush motors have been powered on. Use the hour meter to determine when to perform recommended maintenance procedures and to record service history (Figure 33). See MACHINE MAINTENANCE.
Circuit breakers / fuses
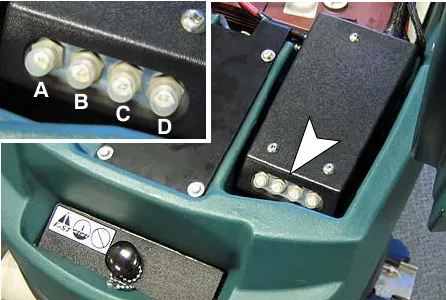
The machine is equipped with four resettable circuit breakers and four fuses to protect the machine from damage. If a breaker should trip, determine the cause, allow the motor to cool then manually reset the circuit breaker button. The circuit breaker panel is located near the battery compartment (Figure 34). The fuses are located inside the circuit breaker box. When replacing a fuse never substitute a higher Amp rated fuse than specified.
Circuit breakers:
10 A - Main (A)
25 A - Vacuum motor (B)
25 A - Left brush motor (C)
25 A - Right brush motor (D)
Fuses:
100 A - Main
30 A - Propel motor
7.5 A - FaST system
7.5 A - Off-aisle wand pump (located in control console)
Corrected an obvious misprint: the hour meter paragraph printed "(Figure 34)" (now Figure 33, as labeled on the hour meter photo).
Off-aisle wand
If your machine is equipped with the off-aisle wand option, this allows you to scrub areas where the machine is unable to reach.
Preparing machine for off-aisle wand scrubbing
- Park the machine on a level surface, turn key off and set parking brake if equipped.
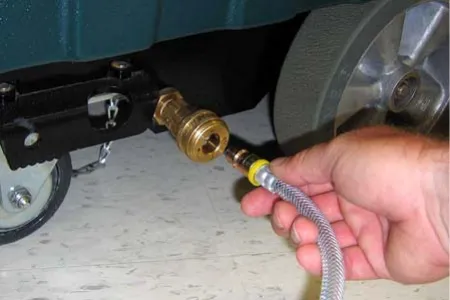
- Connect the solution hose to the coupler at the lower right side of machine (Figure 35).
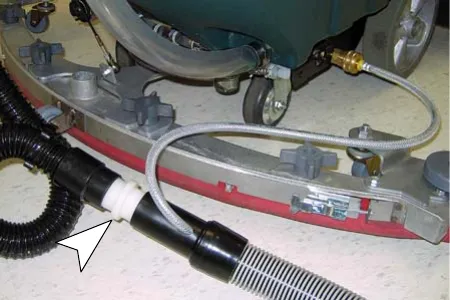
- Using the hose adapter, connect the squeegee hose to the wand hose (Figure 36).
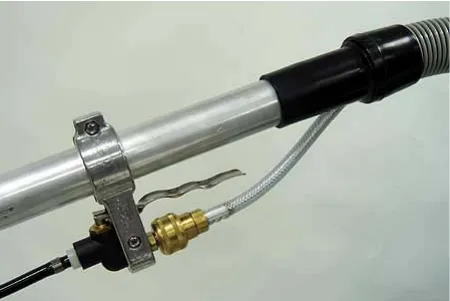
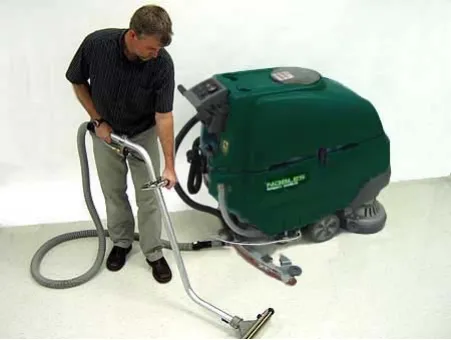
- Attach the off-aisle wand to the hoses (Figure 37).
Operating the off-aisle wand
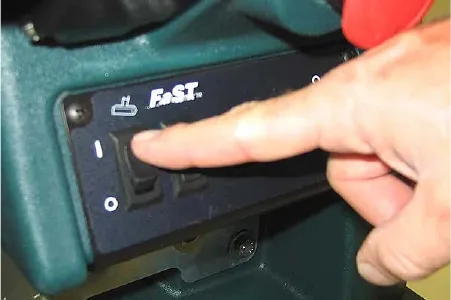
- Turn the key and wand switch to the on ( I ) position (Figure 38). The FaST/ec-H2O system switch is disabled when operating the wand.
- Lower the squeegee to activate the vacuum motor (Figure 39).
- Squeeze trigger to activate solution. Use brush for scrubbing and squeegee for pickup (Figure 40).
- After scrubbing, turn off the wand switch and squeeze the trigger for five seconds to relieve the water pressure before disconnecting the solution hose.
Draining and cleaning tanks
After each use, the tanks should be drained and cleaned.
Draining recovery tank
- Transport machine to disposal area and turn key switch off.
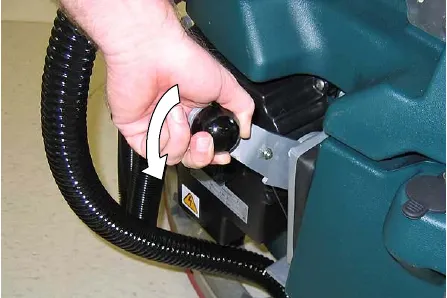
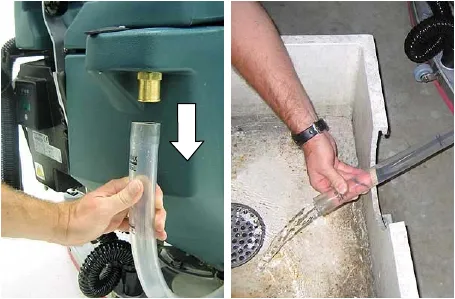
- While holding the drain hose upward, remove the cap and lower hose to drain (Figure 41).
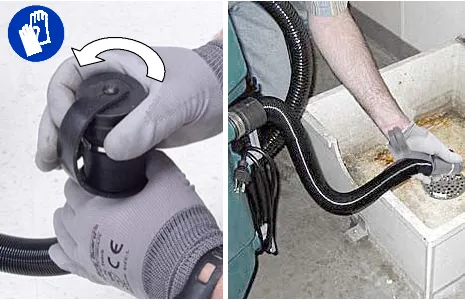
- Remove the recovery tank cover and rinse out the tank. Clean the float shut-off screen located inside the recovery tank (Figure 42).
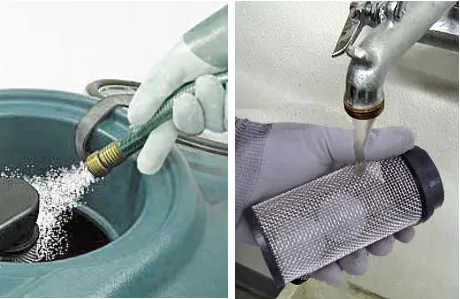
Draining solution tank
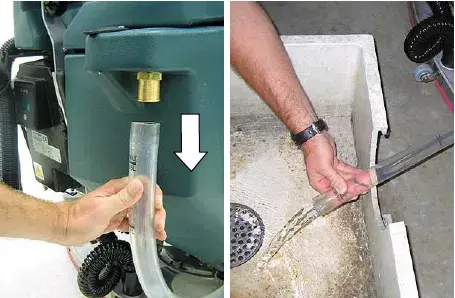
- To drain remaining water from the solution tank, pull the solution tank level hose off the hose fitting (Figure 43).
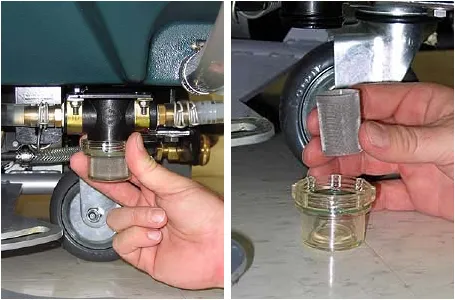
- On a monthly basis, remove the solution tank filter from underneath the machine and rinse out the screen (Figure 44). Make sure the solution tank is empty before removing filter.
Charging batteries
The lifetime of the batteries depends on their proper maintenance. To get the most life from the batteries:
- Do not charge the batteries more than once a day and only after running the machine for a minimum of 15 minutes.
- Do not leave the batteries partially discharged for long period of time.
- Only charge the batteries in a well-ventilated area to prevent gas build up. Charge batteries in areas with ambient temperatures 80°F (27°C) or less.
- Allow the charger to complete charging the batteries before re-using the machine.
- Maintain the proper electrolyte levels of flooded (wet) batteries by checking levels weekly (See BATTERY MAINTENANCE).
Battery charger specifications
- CHARGER TYPE:
- FOR SEALED (Gel) BATTERIES
- FOR WET (Lead acid) BATTERIES - OUTPUT VOLTAGE - 24 VOLTS
- OUTPUT CURRENT - 20 AMPS
- AUTOMATIC SHUTOFF CIRCUIT
- FOR DEEP CYCLE BATTERY CHARGING
On-board battery charger settings
If your machine is equipped with the on-board charger, the charger settings must be set for your battery type before charging. Failure to properly set will result in battery damage.
To determine your battery type, see battery label. Contact your battery supplier if not specified.
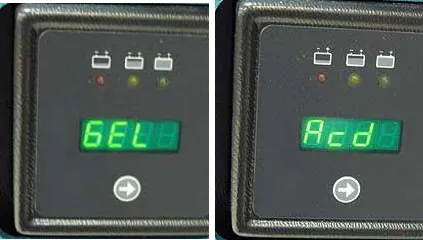
To verify the setting of the charger, connect the charger cord into an electrical receptacle. The charger will display a sequence of codes. One of the codes will either read "GEL" or "Acd" (Figure 45).
GEL = Set for sealed/maintenance free batteries
Acd = Set for wet/lead acid batteries
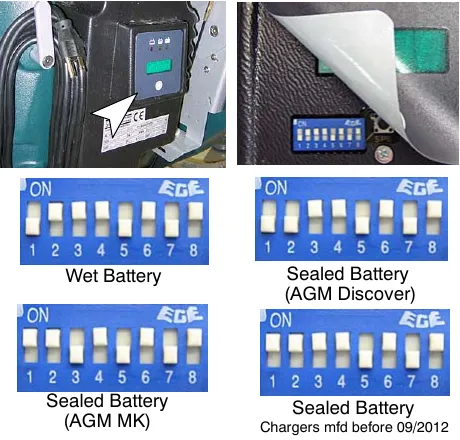
To change the setting, unplug the charger, peel up the corner of the display label and set the switches accordingly (Fig. 46). The charger cord must be unplugged when resetting.
Using the on-board battery charger
- Transport the machine to a well-ventilated area.
- Park the machine on a flat, dry surface. Turn the key off and set the parking brake, if equipped.
- If charging wet (lead acid) batteries check the fluid level before charging (See BATTERY MAINTENANCE).
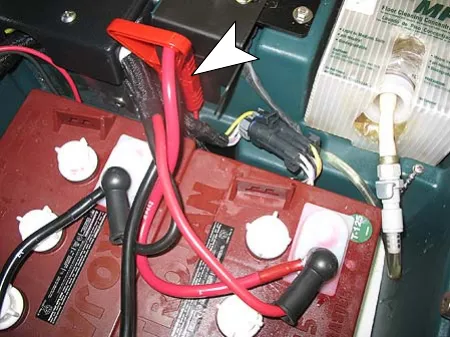
- Open the battery compartment and attach the red handle battery connector harness to the battery charger connector as shown (Figure 47).
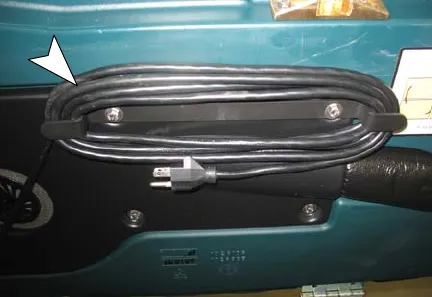
- Unwrap the battery charger's AC power cord from storage hooks located on the underside of the recovery tank (Figure 48).
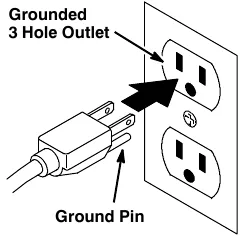
- Connect the charger's AC power supply cord into a properly grounded receptacle (Figure 49).
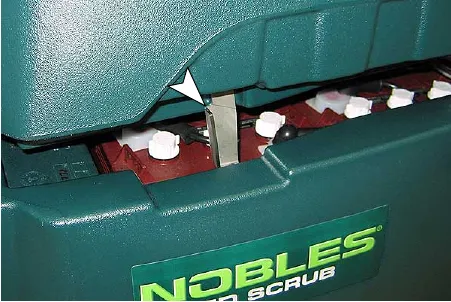
- Using the support stand, prop up the recovery tank to allow for proper ventilation when charging batteries (Figure 50).
Using the on-board battery charger (continued)
NOTE: The machine will not operate when charging.
- At start up, the charger will display a sequence of codes (Figure 51).
Three-digits + the following code:
A = Charging current
U = Battery voltage
h = Charging time
C = Charging ampere-hours [Ah]
E = Energy used [Kwh]
"GEL" or "Acd" = Battery type the charger is currently set for. Before charging make sure your battery type matches the display: GEL=Sealed, Acd=Wet (lead acid). To change setting, see ON-BOARD CHARGER SETTINGS.
Press the arrow button to review the codes.
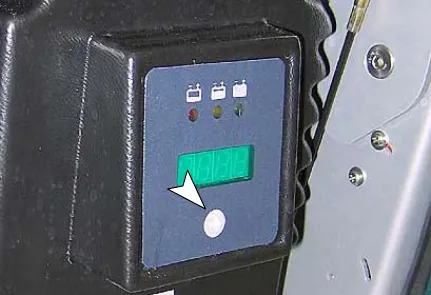
- When the charging cycle begins, the indicator lights will progress from red, yellow to green. When the green indicator light comes on, the charging cycle is done.
If the charger detects a problem, the charger will display an error code (See ON-BOARD BATTERY CHARGER ERROR CODES).
- When the charge cycle is complete, unplug the AC cord and return cord to storage hooks then disconnect the red handle battery connector (Figure 52).
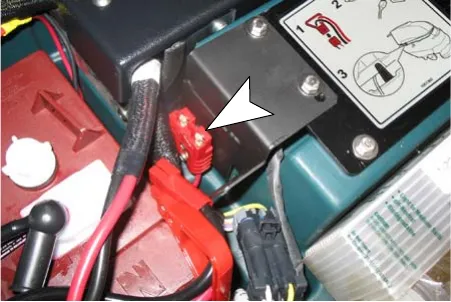
On-board battery charger error codes
| Display code | Fault | Solution |
|---|---|---|
| bat# | Loose or damaged battery cable | Check battery cable connections. |
| Battery exceeded maximum voltage level. | No action necessary. | |
| E01# | Exceeded maximum battery voltage allowed. | No action necessary. |
| E02# | Safety thermostat exceeded maximum internal temperature. | Check if the charger vents are obstructed. |
| E03# | Exceeded maximum time for charging phase leaving the batteries undercharged due to a sulfated or faulty battery. | Repeat the charging cycle and if the error code E03 reappears check battery or replace it. |
| SCt# | Safety timer exceeded maximum charging time. Interrupts charging cycle. | Replace battery. |
| Srt# | Possible internal short circuit. | Contact Service Center. |
Using an off-board battery charger
- Transport the machine to a well-ventilated area.
- Park the machine on a flat, dry surface. Turn the key off and set the parking brake, if equipped.
- If charging wet (lead acid) batteries, check the fluid level before charging (See BATTERY MAINTENANCE).
- Prop up the recovery tank for ventilation (Figure 53).
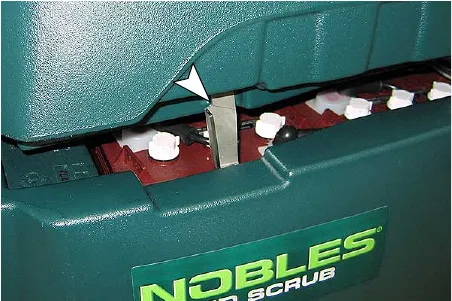
- Connect the charger's AC power supply cord into a properly grounded receptacle.
- Connect the charger's DC cord into the machine's battery receptacle (Figure 54).
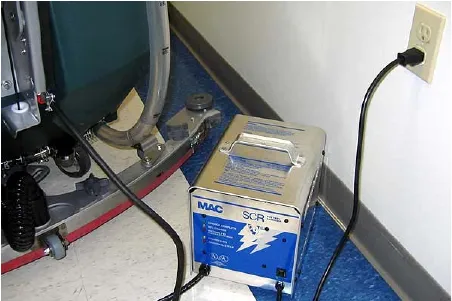
- The supplied charger will automatically begin charging and shut off when fully charged.
NOTE: The machine will not operate when charging.
Adjusting scrub head brushes
To ensure optimum scrubbing performance periodically check the scrub head for proper adjustment.
Disk model
Tools required: Measuring device, 1-1/16 in (27 mm) wrench and 15/16 in (24 mm) wrench
- With brushes installed, lower the scrub head and apply medium brush pressure.
- Turn machine off and remove key.
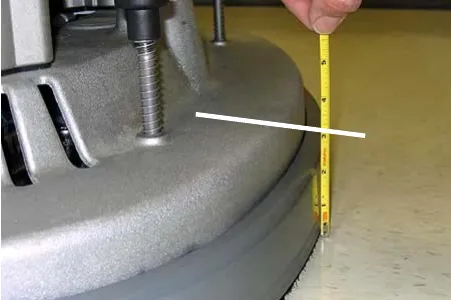
- From the center front and back of scrub head, measure the distance from the top edge of scrub head to the floor (Figure 55).
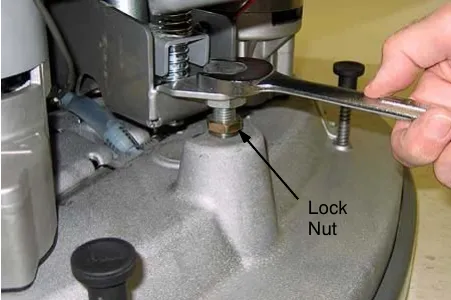
- If scrub head is not level, loosen the lock nut and turn the scrub head leveling screw to level. Tighten down the lock nut once head is level (Figure 56).
Cylindrical brush model
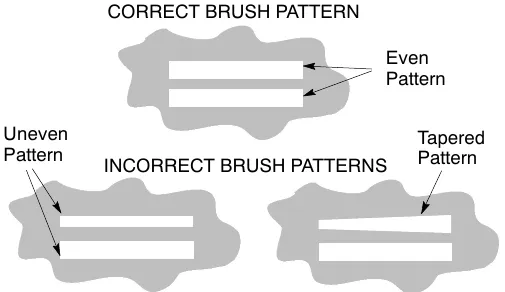
After installing a new set of cylindrical brushes check the brush pattern to ensure proper brush adjustment. Brushes that are not properly adjusted will result in premature wear and poor scrubbing performance (Figure 57).
To inspect the brush pattern
- Position the machine on a dry dusty floor or apply a powdered substance, such as chalk.
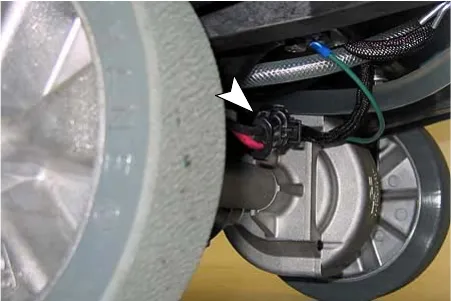
- Disconnect the drive motor wire connector to keep machine from moving forward (Figure 58).
- Lower the scrub head to the floor and apply maximum brush pressure.
- Shut off the solution flow.
- Pull the triggers to create a brush pattern on the floor.
- Raise the scrub head and pull the machine away.
- Observe the brush pattern on floor. If the brush pattern is uneven or tapered, adjustment is required.
- Reconnect drive motor wire.
To adjust an uneven brush pattern
Tools required: Measuring device, 1-1/16 in (27 mm) wrench and 15/16 in (24 mm) wrench
- Measure the distance from the front edge of the scrub head to the floor and from the back edge of the scrub head to the floor (Figure 59). The measurements should be the same.
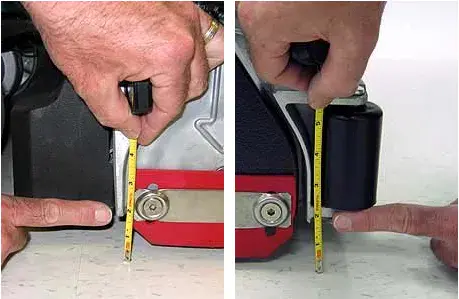
- To level the scrub head, loosen the lock nut and turn the leveling screw clockwise to lower the rear of the scrub head or counter-clockwise to lower the front (Figure 60).
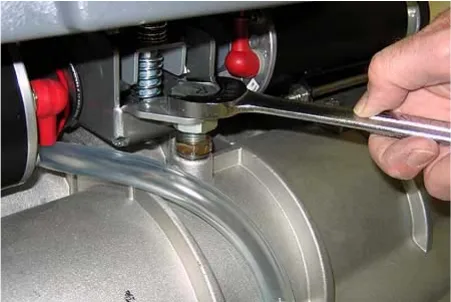
- Recheck brush pattern.
NOTE: Replace brush when bristles are worn to 5/8 in (15 mm).
To adjust a tapered brush pattern
Tools required: 3/8 in (10 mm) wrench and 6 mm hex wrench
- Raise the scrub head off floor and remove key.
- Remove the idler plate from the brush (Figure 61).
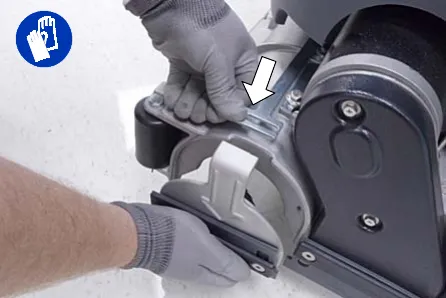
- Hold the brush plug shaft with a wrench and loosen the 6 mm hex screw (Figure 62).
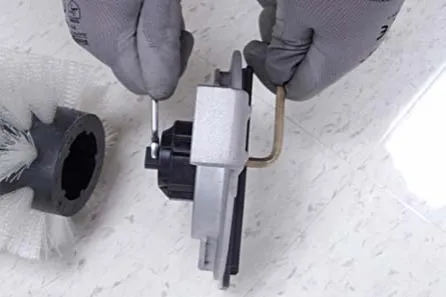
- To lower the brush end, turn the shaft clockwise for the front brush and counter-clockwise for the rear brush. Retighten hex screw (Figure 63).
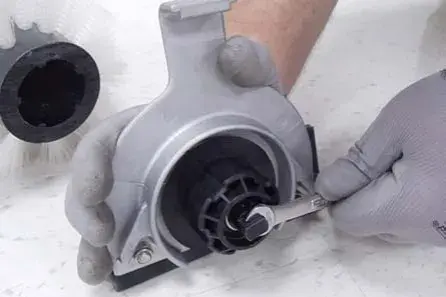
- Recheck brush pattern.
NOTE: Replace brushes when bristles are worn to 5/8 in (15 mm).
Machine maintenance
To keep the machine in good working condition, it's important that the following maintenance procedures are performed on a routine basis.
Daily maintenance (after every use)
- Drain the recovery tank (Figure 64).
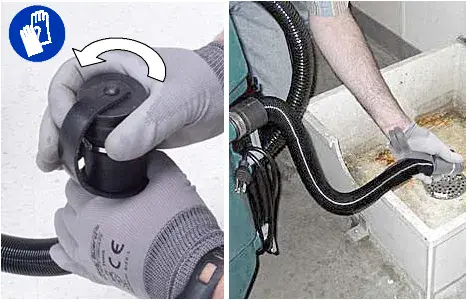
- Rinse out the recovery tank. Remove the recovery tank float shut-off screen and clean (Figure 65).
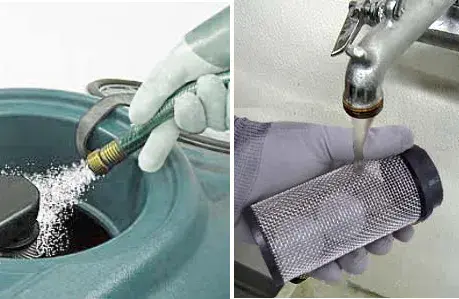
- Drain the solution tank (Figure 66).
Daily maintenance (continued)
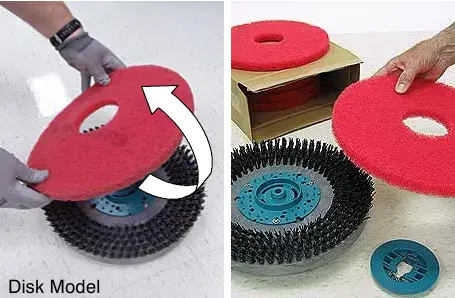
- Rotate pad or replace when worn (Figure 67).
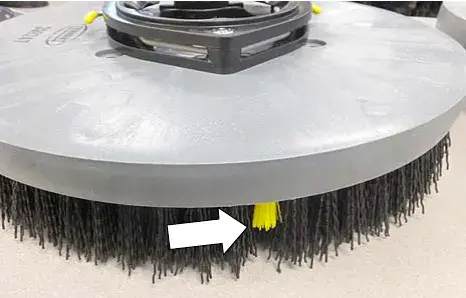
- Replace brushes when they no longer clean effectively or when the bristles are worn to the yellow indicator (Figure 68).
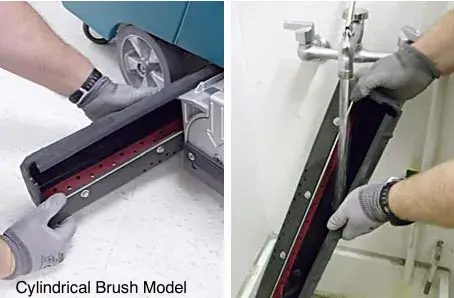
- Empty and rinse out the debris trough (Figure 69).
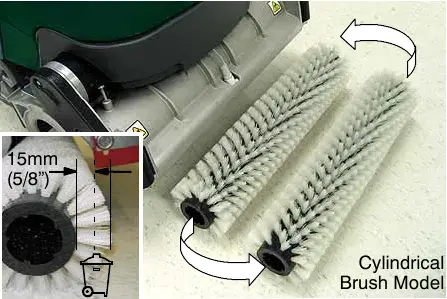
- Inspect the cylindrical brushes for wear. Rotate brushes from front-to-rear every 50 hours (Figure 70). Replace when worn to a length of 5/8 in (15 mm).
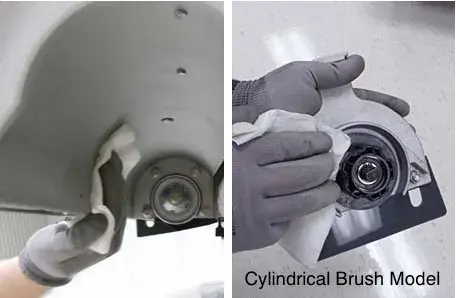
- Remove debris buildup from the underside of the cylindrical brush scrub head, including the idler plates and drive hubs (Figure 71).
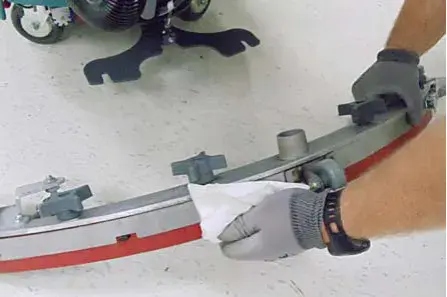
- Wipe the squeegee blades clean (Figure 72). Store the squeegee assembly in the raised position to prevent blade damage.
Daily maintenance (continued)
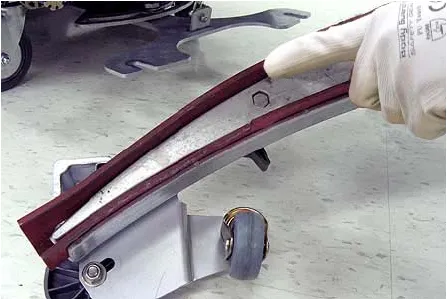
- Check the condition of the squeegee blade wiping edge (Figure 73). Rotate blade if worn (See SQUEEGEE BLADES).
- Clean the machine with an all purpose cleaner and damp cloth (Figure 74).
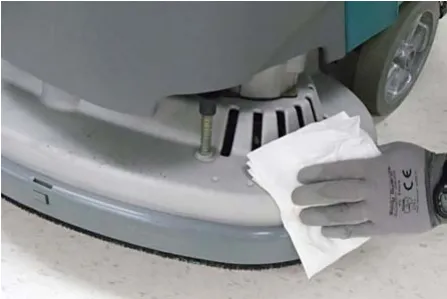
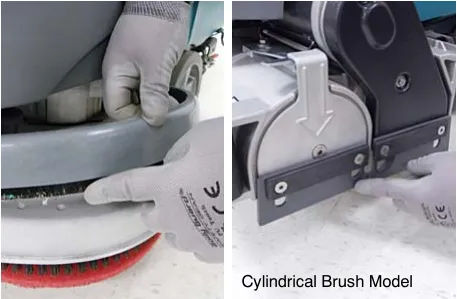
- Inspect the condition of the scrub head skirt, replace if worn or damaged (Figure 75).
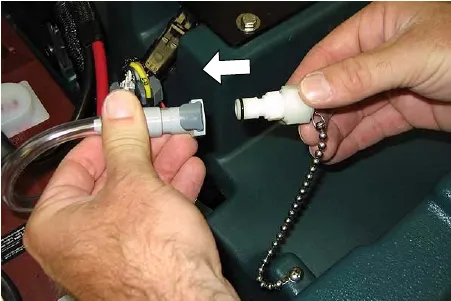
- FaST Model: Connect the FaST-PAK supply hose to the storage plug when not in use (Figure 76). Remove any dried concentrate from the hose connector by soaking it in warm water.
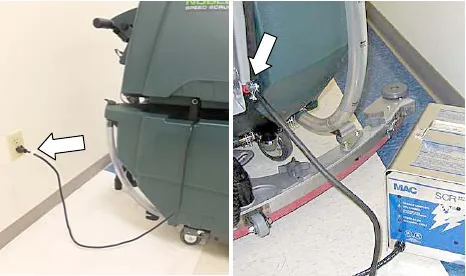
- Recharge the batteries (Figure 77). See CHARGING BATTERIES.
- Check the battery electrolyte level weekly (See BATTERY MAINTENANCE).
- Clean wet/lead acid batteries to prevent corrosion and check for loose battery cable connections (See BATTERY MAINTENANCE).
Monthly maintenance
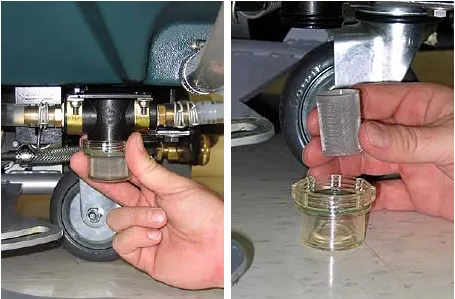
- Remove the solution tank filter from underneath the machine and rinse out the screen (Figure 78). Make sure the solution tank is empty before removing filter.
Monthly maintenance (continued)
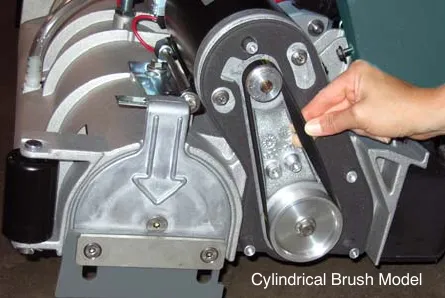
- Periodically check the belt tension on the two brush motors. Tighten the belt if you're able to twist it beyond 90° at midpoint (Figure 79).
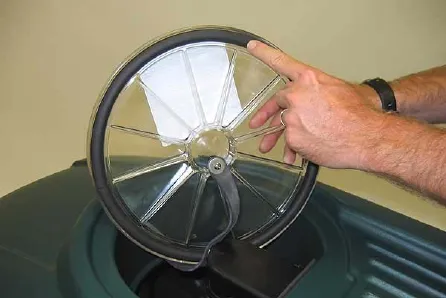
- Inspect and clean the recovery tank cover seal (Figure 80). Replace if damaged.
- Lubricate all pivot points and rollers with a water resistant grease.
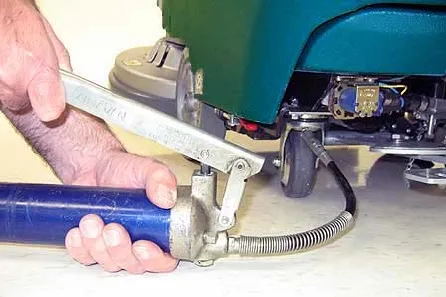
- Lubricate the casters with a water resistant grease (Figure 81).
- Clean the parking brake clamp with a cleaning solvent.
- Check the machine for loose nuts and bolts.
- Check the machine for leaks.
Battery maintenance
Maintenance-free batteries
Maintenance-free (Sealed AGM) batteries do not require watering. Cleaning and other routine maintenance is still required.
Flooded (wet) lead-acid batteries
The flooded (wet) lead-acid batteries require routine watering as described below. Check the battery electrolyte level weekly.
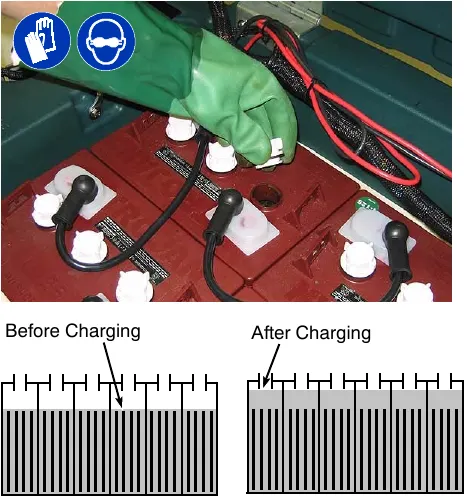
The electrolyte level should be slightly above the battery plates as shown before charging (Figure 82). Add distilled water if low. DO NOT OVERFILL. The electrolyte will expand and may overflow when charging. After charging, distilled water can be added up to about 0.12 in (3 mm) below the sight tubes.
NOTE: Make sure the battery caps are in place while charging. There may be a sulfur smell after charging batteries. This is normal.
Checking connections / cleaning
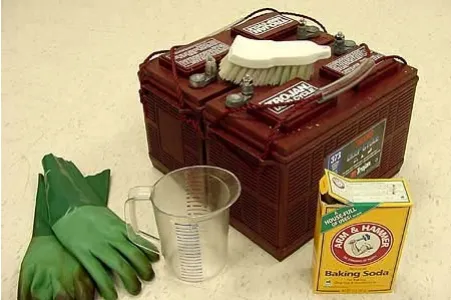
After every 200 hours of use, check for loose battery connections and clean the surface of the batteries, including terminals and cable clamps to prevent battery corrosion. Use a scrub brush with a strong mixture of baking soda and water (Figure 83). Do not remove battery caps when cleaning batteries.
Squeegee blades
When the blades become worn, simply rotate the blades end-for-end or top-to-bottom to a new wiping edge. Replace blades when all edges are worn.
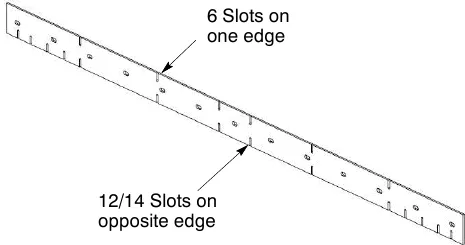
The front blades on the 28 in (700 mm) and 32 in (800 mm) squeegee assemblies have 12/14 slots on one edge and 6 slots on the opposite edge (Figure 84). If making sharp turns with the cylindrical brush models use the 12/14 slotted edge for maximum water pickup.
Replacing squeegee blades
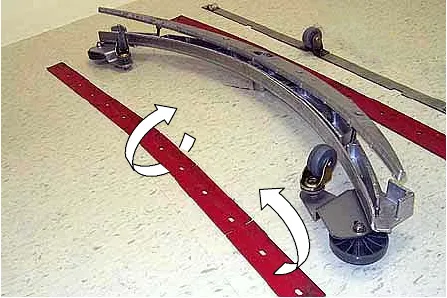
- Loosen the band clamp and remove the band from the squeegee assembly (Figure 85).
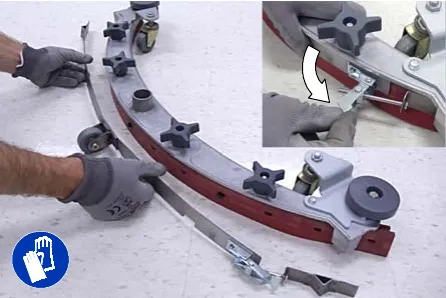
- Replace or rotate the rear blade to a new wiping edge and replace band (Figure 86).
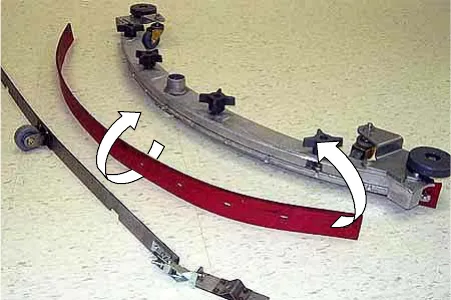
- To change the front blade, remove the band and loosen the four knobs. Replace or rotate the front blade to a new wiping edge (Figure 87)
Motor maintenance
| Carbon brush replacement | Hours |
|---|---|
| Drive Transaxle Motor | 750 |
| Vacuum Motor | |
| Disk Brush Motors | |
| Cylindrical Brush Motors | 1000 |
FaST system maintenance
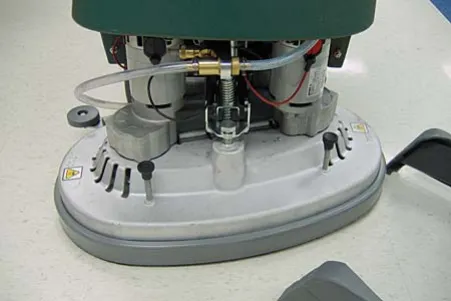
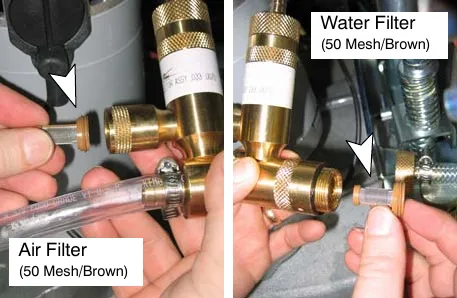
Every 1000 hours replace the water filter and air filter located in the FaST detergent injector.
- To access the detergent injector assembly, lower the scrub head and remove the front shroud (Figure 88)
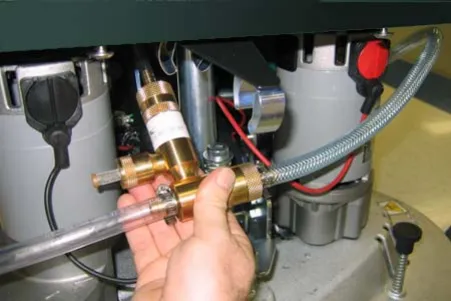
- Remove the injector assembly from clamps (Figure 89).
- Replace the water and air filter. An 8 mm hex wrench required to install new water filter (Figure 90).
ec-H2O NanoClean water conditioning cartridge replacement
(ec-H2O models labeled ec-H2O NanoClean)
The water conditioning cartridge is required to be replaced when it reaches its maximum water usage or expiration time of when the cartridge was activated, which ever comes first. The ec-H2O system indicator light will blink green/red when it's time to replace cartridge.
Depending on machine usage, on average, a new cartridge can last anywhere from 12 months for heavy machine usage to 24 months for light machine usage.
- Park the machine on a level surface, lower scrub head and remove the key. Set parking brake, if equipped.
- Remove front shroud to access cartridge. The cartridge is located behind the right side brush motor (Figure 91). Unfasten strap around cartridge and remove cartridge from holder.
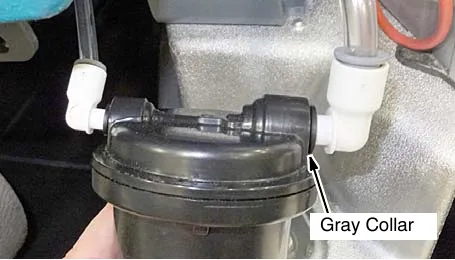
- Disconnect the two hose connectors from cartridge by pressing the gray collars inward and pulling the connectors outward (Figure 92).
ec-H2O NanoClean water conditioning cartridge replacement (continued)
- Fill in the installation date on the new cartridge label (Figure 93).
- Reconnect the two hoses to new cartridge and re-strap cartridge to holder. Make sure the hose connectors are fully inserted into new cartridge.
- Reset timer for new cartridge.
Carefully read and understand all steps first before performing procedure.
- Turn key on.
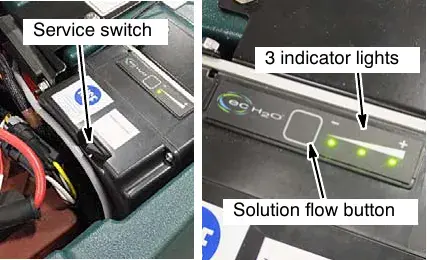
- Press and hold the service switch, located on the ec-H2O module, for 10 seconds. After releasing service switch, the three solution flow indicator lights will begin to (ripple) move back and forth (Figure 94).
- Within 5 seconds after releasing the service switch, while the three indicator lights are moving back and forth, press and quickly release the solution flow button located on ec-H2O module (Figure 94).
The three indicator lights will then blink three times to indicate timer has been reset.
Repeat process if the three indicator lights do not blink three times.
ec-H2O module flush procedure
(ec-H2O models manufactured before ec-H2O NanoClean models)
This procedure is only required when an alarm sounds and the ec-H2O system indicator light begins to blink red.
- Drain the solution tank and recovery tank of all water.
- Pour 1 gallon (4 liters) of white or rice vinegar into the solution tank at full strength. Do not dilute.
NOTE: Use white or rice vinegar only. The acidity level should be between 4-8%. Do not use other acids for this procedure.
- Disconnect the black connector fitting at the scrub head and place the hose into a bucket (Figure 95). To access the connector fitting, you may have to remove the front cover from the machine.
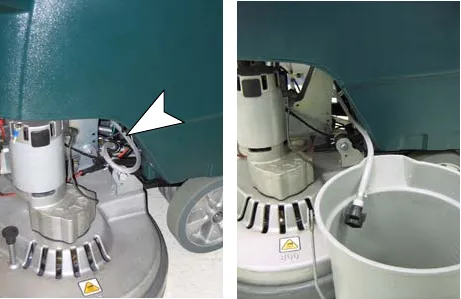
- Turn the key to the on ( I ) position.
- Press and release the ec-H2O module flush switch to start the flush cycle (Figure 96). The module is located under the recover tank.
NOTE: The module will automatically shut off when the flush cycle is complete (approx. 7 minutes). The module must run the full 7 minute cycle in order to reset the system indicator light and alarm.
Repeat flush procedure if the ec-H2O module does not reset. If module fails to reset, contact an Authorized Service Center.
Jacking up machine
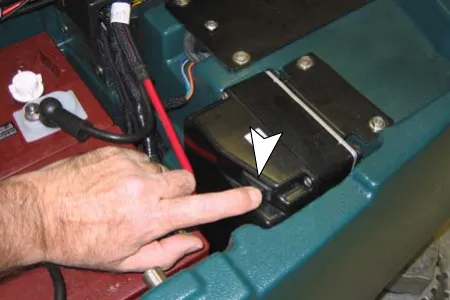
Use the designated locations to jack up the machine for service (Figure 97). Empty the recovery and solution tank and position the machine on a level before jacking.
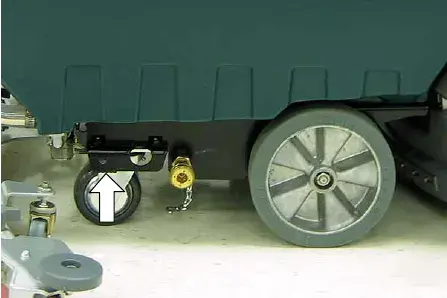
Transporting machine
When transporting the machine by trailer or truck, be certain to follow the transporting procedure below:
- Drain machine tanks.
- Load the machine using a ramp that can support the machine weight and person loading it. The maximum ramp incline should not exceed 19.5% at a ramp length of 12 ft (3.7 m).
- Position the front of machine up against the front of the trailer or truck. Lower the scrub head and squeegee.
- Set the parking brake, if equipped, and place a block behind each wheel to prevent the machine from rolling.
- Secure with tie-down straps as shown (Figure 98). It may be necessary to install tie-down brackets to trailer or truck.
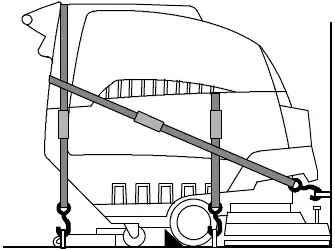
Storing machine
- Charge the batteries before storing machine to prolong the life of the batteries. Recharge batteries once a month.
- Disconnect batteries before storing.
- Drain and rinse the tanks thoroughly.
- Store the machine in a dry area with the squeegee and scrub head in the up position.
- Open the recovery tank cover to promote air circulation.
- If storing machine in freezing temperatures, follow the FREEZE PROTECTION instructions below.
Freeze protection
- Drain the solution tank and recovery tank of all water.
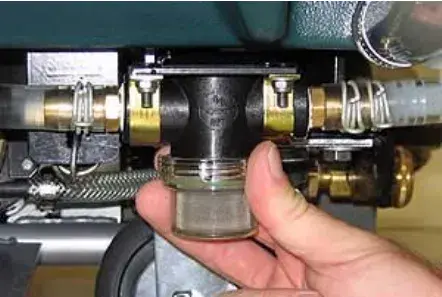
- Empty the solution tank filter located under the machine (Figure 99).
- Pour 1 gallon (4 liters) of recreational vehicle (RV) antifreeze into the solution tank at full strength. Do not dilute.
- Turn the machine power on and operate the solution flow system. Turn the machine off when the red RV antifreeze is visible.
If your machine is equipped with the off-aisle wand option, operate the the off-aisle wand for a few seconds to protect the pump.
Continue with the freeze protection procedure if machine is equipped with the FaST or ec-H2O system.
ec-H2O NanoClean models
(ec-H2O models labeled ec-H2O NanoClean)
Operate machine in the ec-H2O mode to cycle antifreeze through ec-H2O system.
After storing machine in freezing temperatures, drain any remaining antifreeze from the solution tank. Add clean water to solution tank and operate the machine to flush system.
ec-H2O models
(ec-H2O models manufactured before ec-H2O NanoClean models)
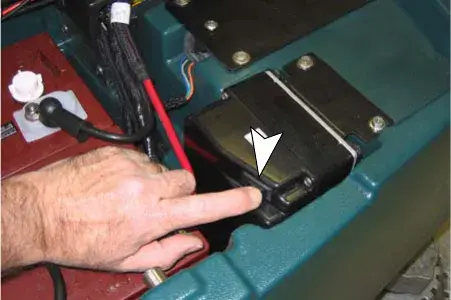
Press and release the flush switch on the ec-H2O module to cycle the antifreeze through ec-H2O system (Figure 100). When the antifreeze is visible, press the switch again to turn off the module.
If the antifreeze is not properly flushed from the ec-H2O system, the ec-H2O module may detect an error and not function (ec-H2O switch indicator light will turn red). If this occurs, reset key and repeat the flush procedure as described below.
Flushing antifreeze from ec-H2O module
(ec-H2O models manufactured before ec-H2O NanoClean models)
- Drain the antifreeze from the solution tank into a bucket.
- Fill the solution tank with cool water until full (See FILLING SOLUTION TANK).
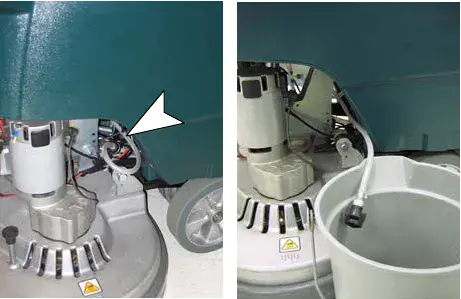
- Disconnect the black connector fitting at the scrub head and place the hose into a bucket (Figure 101). To access the connector fitting, you may have to remove the front cover from the machine.
- Press and release the ec-H2O module switch to flush the antifreeze from the ec-H2O system (Figure 100). The module is located under the recovery tank.
When the water turns clear, press the module switch again to stop the flush cycle.
Dispose the antifreeze in an environmentally safe way according to local waste disposal regulations.
- The machine is now ready for scrubbing.
Freeze protection: FaST model
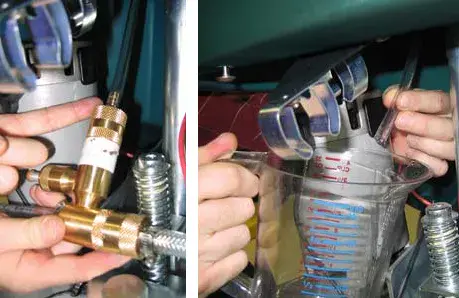
The following items are required: valve coupling #1002856 and 6 in (15 cm) hose #63182.
- Remove the FaST-PAK carton and connect the valve coupling and 6 in (15 cm) hose to the FaST detergent supply hose (Figure 102).
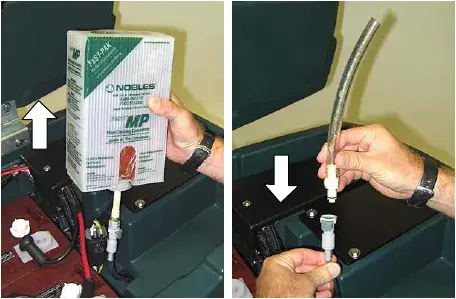
- Disconnect the opposite end of the FaST supply hose from the injector assembly and drain the detergent from the hose (Figure 103). Reconnect the hose after draining. To access the injector assembly remove the front shroud.
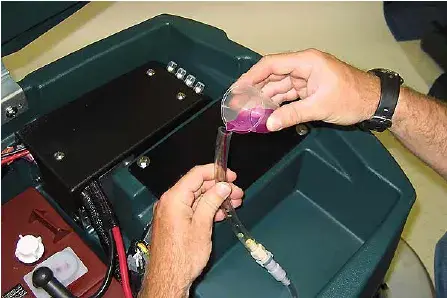
- Pour the recreational vehicle (RV) antifreeze into the supply hose until full (Figure 104).
- Keep the hose upright to prevent the antifreeze from spilling and lower the recovery tank.
- Operate the FaST system until the foaming stops. This step could take anywhere from 5 to 10 minutes.
- When finished, connect the supply hose to the storage plug (Figure 105).
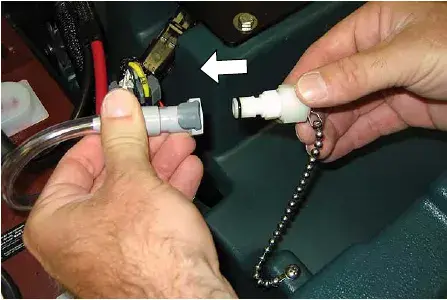
- To drain the antifreeze from the FaST supply hose, repeat steps 1 and 2.
Troubleshooting
| Problem | Cause | Solution |
|---|---|---|
| Machine will not operate | Discharged batteries | Charge batteries |
| Emergency-stop button activated | Turn button clockwise to reset | |
| Faulty battery(s) | Replace battery(s) Parts › | |
| Loose battery cable | Tighten loose cable | |
| Tripped main circuit breaker | Reset 10A main circuit breaker | |
| Main fuse blown | Replace 100A main fuse Parts › | |
| Faulty key switch | Contact Service Center | |
| Machine fault detected. | See Battery Meter LED Fault Codes | |
| On-board battery charger will not operate | Plug not connected to power supply | Check plug connection |
| Faulty charger fuse | Replace charger fuse Parts › | |
| Faulty power supply cord | Replace cord | |
| Error detected. | See On-board Battery Charger Error Codes | |
| Brush motor(s) will not operate | Scrub head is raised off floor | Lower scrub head |
| Battery meter lockout activated | Recharge batteries | |
| Discharged batteries | Charge batteries | |
| Tripped brush motor circuit breaker | Reset 25A circuit breaker button | |
| Faulty scrub head (up/down) switch | Contact Service Center | |
| Faulty trigger switch(es) | Contact Service Center | |
| Faulty brush motor or wiring | Contact Service Center | |
| Worn carbon brushes | Contact Service Center | |
| Broken or loose belt (cylindrical brush model) | Replace or tighten belt Parts › | |
| Faulty relay switch | Contact Service Center | |
| Machine will not propel | Parking brake is set | Release parking brake lever |
| Machine fault detected | See Battery Meter LED Fault Codes | |
| Propel motor fuse blown | Replace 30A fuse Parts › | |
| Faulty transaxle motor or wiring | Contact Service Center | |
| Worn carbon brushes | Contact Service Center | |
| Exceeded maximum incline | Avoid steep inclines and reset key | |
| Vacuum motor will not operate | Squeegee is raised off floor | Lower squeegee |
| Discharged batteries | Charge batteries | |
| Tripped vacuum motor circuit breaker | Reset 25A circuit breaker button | |
| Faulty vacuum motor or wiring | Contact Service Center | |
| Worn carbon brushes | Contact Service Center | |
| Little or no solution flow | Solution tank is empty | Fill solution tank |
| Clogged solution tank filter | Clean solution tank filter | |
| Discharged batteries | Charge batteries | |
| Clogged solution valve | Remove valve and clean | |
| Solution flow control knob set too low | Adjust solution control flow knob | |
| Loose screw on control knob | Calibrate knob and retighten screw. |
Troubleshooting (continued)
| Problem | Cause | Solution |
|---|---|---|
| Poor water pickup | Recovery tank is full or excessive foam buildup | Drain recovery tank |
| Loose drain hose cap | Tighten cap | |
| Clogged float shut-off screen located in recovery tank | Clean screen | |
| Clogged squeegee assembly | Clean squeegee assembly | |
| Worn squeegee blades | Replace or rotate squeegee blades Parts › | |
| Incorrect Squeegee blade deflection | Adjust Squeegee blade height | |
| Loose vacuum hose connections | Secure hose connections | |
| Clogged vacuum hose | Remove clogged debris | |
| Damaged vacuum hose | Replace vacuum hose Parts › | |
| Recovery tank cover not in place | Properly position cover | |
| Damaged recovery tank cover seal | Replace seal Parts › | |
| Faulty vacuum motor | Contact Service Center | |
| Low battery charge | Recharge batteries | |
| Poor scrubbing performance | Debris caught in brush | Remove debris |
| Worn brushes/pads | Replace brushes/pads Parts › | |
| Incorrect brush pressure setting | Adjust pressure setting | |
| Wrong brush/pad type. | Use correct brush/pad | |
| Reduced run time | Batteries not fully charged | Fully recharge batteries |
| Defective batteries | Replace battery Parts › | |
| Batteries need maintenance | See BATTERY MAINTENANCE | |
| Faulty battery charger | Repair or replace battery charger | |
| FaST Model: FaST System does not operate or operate correctly | FaST system switch is not turned on | Turn on FaST system switch |
| FaST-PAK supply hose not connected | Connect supply hose | |
| Clogged FaST-PAK supply hose or connectors | Soak in warm water to unclog | |
| Empty FaST-PAK carton | Replace FaST-PAK carton Parts › | |
| Kink in FaST-PAK supply hose | Undo hose kink | |
| Clogged FaST solution system | Contact Service Center | |
| Faulty FaST system on/off switch | Contact Service Center | |
| Faulty pump | Contact Service Center | |
| Clogged solution tank filter | Drain solution tank. Remove solution tank filter, clean and reinstall | |
| Clogged detergent orifice/filter screen | Replace orifice/filter screen (See FaST SYSTEM MAINTENANCE) Parts › | |
| Clogged FaST solution inlet filter | Contact Service Center | |
| FaST Pump fuse blown | Replace 7.5A fuse Parts › |
Troubleshooting (continued)
ec-H2O NanoClean models
(ec-H2O models labeled ec-H2O NanoClean)
| Problem | Cause | Solution |
|---|---|---|
| ec-H2O system indicator light blinking green/red | Water conditioning cartridge has expired | Replace cartridge (See ec-H2O NanoClean WATER CONDITIONING CARTRIDGE REPLACEMENT) Parts › |
| ec-H2O system indicator light is red or blinking* red | ec-H2O system fault has been detected | Contact Service Center |
*Verify if cleaning detergent was added to solution tank. If ec-H2O system was operated with cleaning detergent, drain solution tank, add clear water and operate the ec-H2O system until the indicator light code clears.
ec-H2O models
(ec-H2O models manufactured before ec-H2O NanoClean models)
| Problem | Cause | Solution |
|---|---|---|
| ec-H2O system indicator light blinking red | Mineral deposit build-up in module | Flush module (See ec-H2O MODULE FLUSH PROCEDURE) |
| Alarm sounds | ||
| ec-H2O system indicator light solid red | The freeze protection antifreeze was not removed prior to using machine | Flush antifreeze from module. See FIRST TIME USE for flushing instructions. |
| Defective module | Contact Service Center | |
| ec-H2O system indicator light does not turn on | Defective light or module | Contact Service Center |
| No water flow | Clogged module | Contact Service Center |
| Defective solution pump | Contact Service Center |
Battery meter LED fault codes
Code (flashing LED bars):
| Code (flashing LED bars) | Fault | Solution |
|---|---|---|
| One# | Low voltage shut-off. Scrubbing function stops. | Recharge batteries. |
| Check battery connection. | ||
| Two# | Battery charge level getting low. | Recharge batteries. |
| Three# | Drive motor tripped. | Remove overload condition and reset key. |
| Short circuit to drive motor. | Contact Service Center. | |
| Four# | Battery lockout. | Recharge batteries immediately. |
| Eight# | Controller tripped. | Contact Service Center. |
| Ten# | High battery voltage reading. | Check battery connections. |
| No Bars# | Sleep mode. | Turn key to restore. |
| Bars Rippling# | Throttle engaged at start up. | Release triggers. |
Machine specifications
| Model | Disk, 24 in (600 mm) | Disk, 28 in (700 mm) | Disk, 32 in (800 mm) | Cylindrical, 26 in (650 mm) | Cylindrical, 32 in (800 mm) |
|---|---|---|---|---|---|
| Length | 53.4 in (1,357 mm) | 55.5 in (1,408 mm) | 58 in (1,471 mm) | 55 in (1,399 mm) | 55 in (1,399 mm) |
| Width | 25.4 in (645 mm) | 29 in (737 mm) | 33 in (838 mm) | 28 in (711 mm) | 34 in (864 mm) |
| Height | 44 in (1,120 mm) | ||||
| Minimum aisle turn | 53 in (1,346 mm) | 59 in (1,499 mm) | 64 in (1,626 mm) | 62 in (1,575 mm) | 64.5 in (1,638 mm) |
| Weight | 293 lb (133 kg) | 320 lb (145 kg) | 332 lb (151 kg) | 332 lb (151 kg) | 342 lb (155 kg) |
| Weight with batteries | 569 lb (258 kg) | 593 lb (269 kg) | 606 lb (275 kg) | 606 lb (275 kg) | 615 lb (279 kg) |
| Recovery tank capacity | 27 gal (105 L) | ||||
| Solution tank capacity | 22.5 gal (85 L) | ||||
| Drive system | Transaxle, 24 V, 0.25 hp (0.19 kW) | ||||
| Travel speed, maximum | Cleaning: 220 ft (67 m) per min. Transporting: 235 ft (72 m) per min. | ||||
| Productivity rate, theoretical | 26,400 ft²/h (2,450 m²/h) | 30,800 ft²/h (2,860 m²/h) | 35,200 ft²/h (3,270 m²/h) | 28,600 ft²/h (2,660 m²/h) | 35,200 ft²/h (3,270 m²/h) |
| Productivity rate, estimated actual | 17,875 ft²/h (1,660 m²/h) | 20,800 ft²/h (1,930 m²/h) | 24,000 ft²/h (2,230 m²/h) | 19,200 ft²/h (1,785 m²/h) | 24,000 ft²/h (2,230 m²/h) |
| Cleaning path width | 24 in (600 mm) | 28 in (700 mm) | 32 in (800 mm) | 26 in (650 mm) | 32 in (800 mm) |
| Brush diameter | 11.9 in (302 mm) | 13.9 in (353 mm) | 15.9 in (404 mm) | 5.9 in (151 mm) | 5.9 in (151 mm) |
| Brush pressure | up to 120 lb (54 kg) | ||||
| Solution flow rate | 0.5 gpm (1.89 L/min) | 0.50 gpm (1.89 L/min) | 0.6 gpm (2.27 L/min) | 0.6 gpm (2.27 L/min) | |
| Squeegee width, standard | 35.7 in (908 mm) | 41.3 in (1,051 mm) | 46.6 in (1,185 mm) | 41.3 in (1,051 mm) | 46.6 in (1,185 mm) |
| Squeegee width, narrow aisle | 31.5 in (800 mm) | 35.7 in (908 mm) | 41.3 in (1,051 mm) | 35.7 in (908 mm) | 41.3 in (1,051 mm) |
| Brush motor | Qty 2, 0.75 hp (0.55 kW), 220 rpm, 24 V, 29 A | Qty 2, 0.63 hp (0.47 kW), 1500 rpm, 24 V, 23 A | |||
| Vacuum motor | 0.85 hp (0.63 kW), 640 W, 3-stage 5.7, 24 V, 26 A | ||||
| Water lift - air flow | 62 in (55 mm) - 69 ft³ (32.4 L³/m) | ||||
| Batteries | Qty 4, 6 V | ||||
| Battery capacity | WET (lead Acid) = 235 Ah @ 20 h rate. Sealed (Gel) = 200 Ah @ 20 h rate. | ||||
| Run time per charge* | WET = Up to 5.0 hours. Gel = Up to 4.0 hours. | ||||
| On-board charger | 120 VAC, 10 A, 50/60 Hz, 24 VDC, 20 A output | ||||
| Total power consumption | 50 A nominal | ||||
| Voltage DC | 24 VDC | ||||
| Protection grade | IPX3 | ||||
| Decibel rating at operator’s ear, indoors.** | 67 dBA | 68 dBA | |||
| Vibration at controls | <0.39 ft/s² (<0.1188 m/s²) | <0.34 ft/s² (<0.103 m/s²) | |||
| Acceleration rate on operator, max. | 0.56 ft (0.179 m) /s² | ||||
| Grade level, max. | Scrubbing 5%, Transporting 8%, Ramping 19.5% | ||||
* Run times are based on Continuous Scrubbing Run Times.
** Sound levels (ISO 11201) as recommended by the American Association of Cleaning Equipment Manufacturers (AACEM) and OSHA.
FaST system and ec-H2O system specifications
| FaST system | Disk, 24 in (600 mm) | Disk, 28 in (700 mm) | Disk, 32 in (800 mm) | Cylindrical, 26 in (650 mm) | Cylindrical, 32 in (800 mm) |
|---|---|---|---|---|---|
| Productivity rate, estimated actual | 20,075 ft²/h (1,865 m²/h) | 22,750 ft²/h (2,115 m²/h) | 26,250 ft²/h (2,440 m²/h) | 21,000 ft²/h (1,950 m²/h) | 26,250 ft²/h (2,440 m²/h) |
| Solution pump | 24 Volt DC, 3.5 A, 1.5 gpm (5.6 L/min) open flow, 60 psi (4.13 Bar) bypass setting | ||||
| Solution flow rate | 0.15 gpm (0.57 L/min) | 0.22 gpm (0.83 L/min) | 0.15 gpm (0.57 L/min) | 0.22 gpm (0.83 L/min) | |
| Concentrate flow rate | 0.0193 oz (0.57 CC) /min | 0.028 oz (0.83 CC) /min | 0.0193 oz (0.57 CC) /min | 0.028 oz (0.83 CC) /min | |
| Concentrate to water dilution ratio | 1:1000 | ||||
| ec-H2O system | Disk, 24 in (600 mm) | Disk, 28 in (700 mm) | Disk, 32 in (800 mm) | Cylindrical, 26 in (650 mm) | Cylindrical, 32 in (800 mm) |
|---|---|---|---|---|---|
| Productivity rate, estimated actual | 20,075 ft²/h (1,865 m²/h) | 22,750 ft²/h (2,115 m²/h) | 26,250 ft²/h (2,440 m²/h) | 21,000 ft²/h (1,950 m²/h) | 26,250 ft²/h (2,440 m²/h) |
| Solution pump | 24 Volt DC, 3.5 A, 1.5 gpm (5.6 L/min) open flow, 60 psi (4.13 Bar) bypass setting | ||||
| Solution flow rate * | 0.15 gpm (0.57 L/min) (standard) | 0.22 gpm (0.83 L/min) (standard) | 0.22 gpm (0.83 L/min) (standard) | 0.33 gpm (1.25 L/min) (standard) | |
| 0.22 gpm (0.83 L/min) (optional) | 0.33 gpm (1.25 L/min) (optional) | 0.30 gpm (1.10 L/min) (optional) | 0.44 gpm (1.66 L/min) (optional) | ||
| 0.30 gpm (1.10 L/min) (optional) | 0.44 gpm (1.66 L/min) (optional) | ||||
* ec-H2O models manufactured before ec-H2O NanoClean Models - If the optional solution flow rates are required, contact an Authorized Service Center.
Machine dimensions
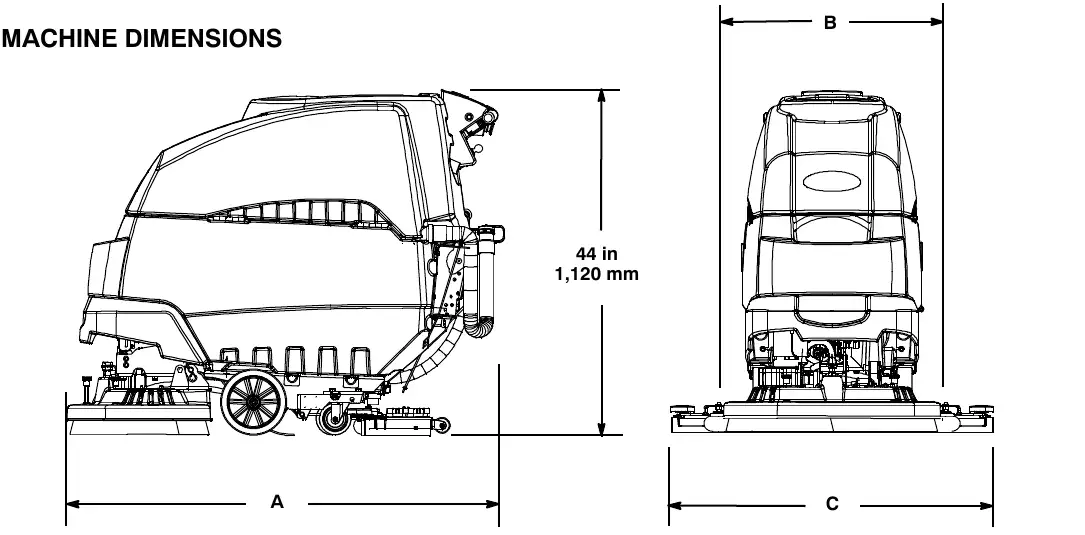
| Models | 24 in (600 mm) Disk | 28 in (700 mm) Disk | 32 in (800 mm) Disk | 26 in (650 mm) Cylindrical | 32 in (800 mm) Cylindrical |
|---|---|---|---|---|---|
| A = | 53.4 in (1,357 mm) | 55.5 in (1,408 mm) | 58 in (1,471 mm) | 55 in (1,399 mm) | 55 in (1,399 mm) |
| B = | 25.4 in (645 mm) | 29 in (737 mm) | 33 in (838 mm) | 28 in (711 mm) | 34 in (864 mm) |
| C = | 35.7 in (908 mm) | 41.3 in (1,051 mm) | 46.6 in (1,185 mm) | 41.3 in (1,051 mm) | 46.6 in (1,185 mm) |
Corrected an obvious misprint: the last model column of the dimensions table printed "28 in / 800 mm Cylindrical" (now 32 in (800 mm), as on page 39).
Tennant and Nobles are trademarks of Tennant Company. Southeastern Equipment & Supply is an independent dealer.