Kaivac Original S/N 1-8434 / Original S/N 8435-8601 Operator Manual
Warranty Registration Form
Free gift with completion of form
To be completed and mailed or faxed by the customer purchasing equipment.
Return this warranty card within ten days of purchase.
Purchased By:
Name ____ Title ____
Company ____
Street Address ____
City ____ State ____ Zip Code ____
Phone Number ____ Fax ____
Date Purchased ____ Name of Distributor ____
☐ KaiVac® ☐ KaiZen™
Serial Number ____
Does your system include a KaiTutor™? ☐ Yes ☐ No
Type of Business
- ☐ School/University
- ☐ Hospital/Health Care
- ☐ Contract Cleaner
- ☐ Industrial
- ☐ Office
- ☐ Other ____
Intended Uses (check all that apply):
- ☐ Restroom Cleaning
- ☐ Floor Stripping
- ☐ Kitchen Cleaning
- ☐ Carpet Extraction
- ☐ Cleaning Around Machinery
- ☐ Stairwell Cleaning
- ☐ Locker and Shower Room
- ☐ Hallway Cleaning
- ☐ Classroom Cleaning
- ☐ Other ____
Thank you very much for the information you have filled out for our records. As our way of saying thank you, we'd like to send you a free Microfiber KaiTowel.
Kaivac, Inc. · 401 South Third St. · Hamilton, Ohio 45011
Phone (513) 887-4600 · Fax (513) 887-4601 · Toll Free (800) 287-1136 · www.kaivac.com
© 2005 Kaivac, Inc. All Rights Reserved
MANUAL - VAC Rev. 04/7/05
Certificate of Conformity
We Kaivac, Inc.
401 S. Third Street
Hamilton, OH 45011 USA
Declare and Certify that the following product
| Machine | |
|---|---|
| Type/Model | |
| Serial Number | |
| Date of Manufacture |
Has been manufactured using the following standards and specifications;
And has been inspected and tested at our works in accordance with the relative specifications and drawings with which they comply in all respects;
And has been affixed with the CE Mark in Compliance with the following standards and specifications:
- BS EN 292-1:1991 Safety of Machinery - Basic concepts, general principles for design. Part 1: Basic terminology, methodology.
- BS EN 292-2:1991 Safety of Machinery - Basic concepts, general principles of design - Part 2: Technical principles and specifications.
- BS EN 614-1:1995 Safety of Machinery - Ergonomic design principles - Part 1: Terminology and general principles.
- BS EN 1050:1996 Safety of Machinery - Principles for risk assessment
- BS EN 60204-1:1993 Safety of Machinery - Electrical equipment of machines - Part 1: Specification for general requirements.
and complies with the requirements of:
- European Machinery directive 98/37/EC
- UK Regulation 1992 no. 3073 - Supply of Machinery (Safety) Regulations 1992, and as amended.
- European Low Voltage Directive 73/23/EC and as amended by 93/68/EC.
- UK Regulation 1994 no.3260 - Electrical Equipment (Safety) Regulations 1994.
| Place of Issue | 401 S. Third Street, Hamilton, OH 45011 USA |
|---|---|
| Date of Issue | |
| Signature | |
| Printed Name | |
| Position | Quality Manager |
Filter Screen Cleaning Procedure
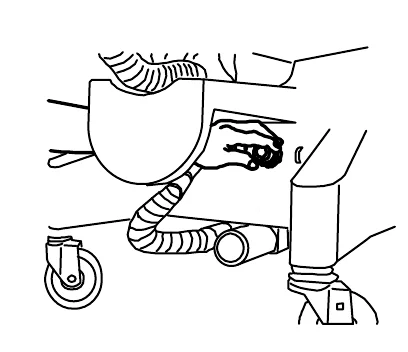
KaiVac filter is located on the base below the vac hose wrap on front of machine.
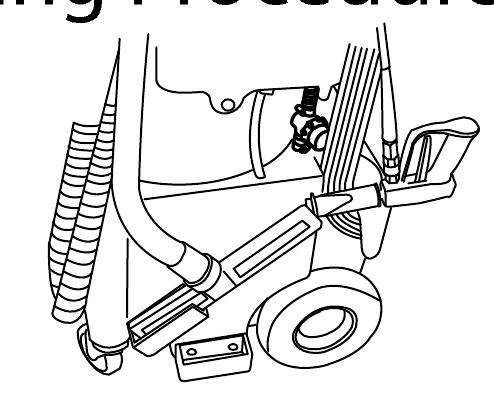
KaiZen filter is located on the left side of machine between water supply tank and the hood assembly.
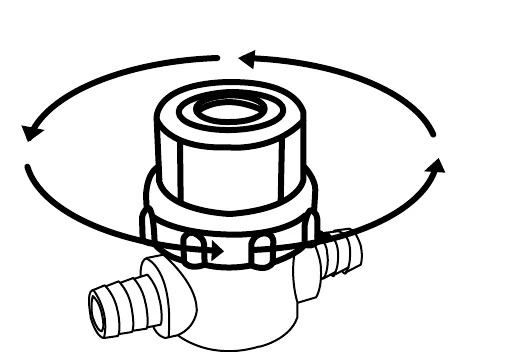
Rotate bowl cover counterclockwise to remove.
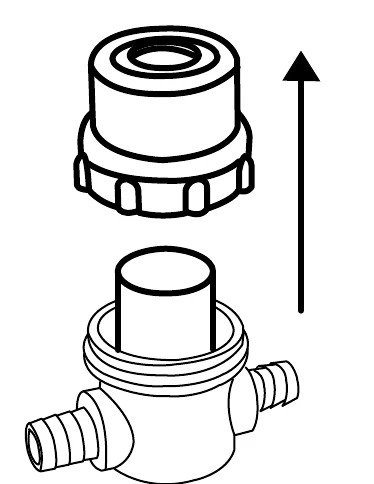
Lift bowl cover up and remove.
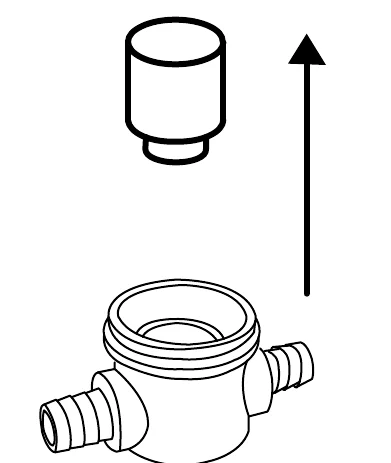
Pull filter up and out.
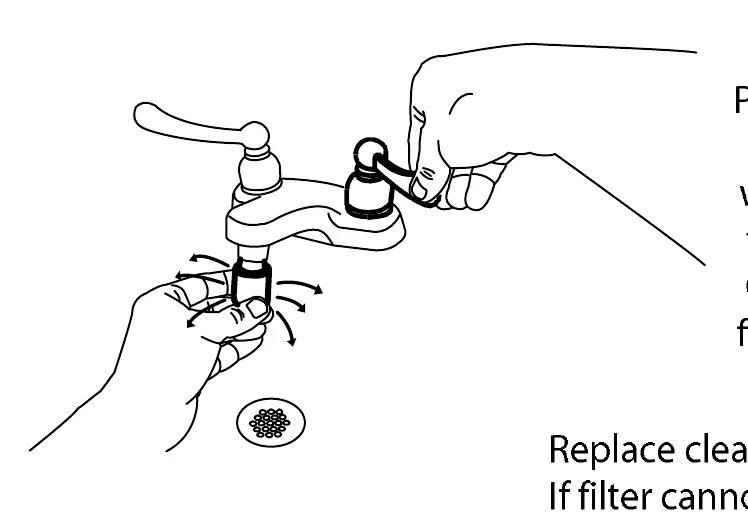
Place filter screen with the open end up against spout of sink fixture or water source and turn on the water flushing debris from the inside out. Continue flushing until water flows freely thru filter. Filter is clean if one can blow freely thru it.
Replace cleaned filter reversing the procedure above. If filter cannot be cleaned replace with new one.
Winterize your Kaivac Equipment
Your Kaivac machinery should be winterized between uses if it is to be exposed to freezing temperatures. To winterize your machine, pour 1/2 gallon of windshield wiper fluid into the empty water tank. Aim the spray gun into the water tank. Run the pump and spray the gun until the fluid begins running through.
KaiVac Operator's Manual
Serial Number:
Date of Purchase:
Source of Purchase (Distributor):
KaiVac Incorporated
401 South Third Street
Hamilton, Ohio 45011
phone: 800-287-1136
fax: 513-887-4601
kaivac.com
READ THIS MANUAL CAREFULLY BEFORE OPERATING THE KAIVAC CLEANING SYSTEM
© 2005 Kaivac, Inc. All Rights Reserved
MANUAL - VAC Rev. 04/7/05
TABLE OF CONTENTS
SECTION 1
| Page | Topic |
|---|---|
| 1 | Introduction |
| 2-3 | Safety Precautions |
| 4 | Limited Warranty Protection Plan |
| 5-16 | S.I.M.P.L.E Operation |
| 17 | Optional Uses |
| 18 | Chemical Injection Chart |
| 19 | Routine Maintenance |
| 20-22 | Trouble Shooting Guide |
| 24 | Water Airflow Schematic |
| 25 | Wiring Diagram |
SECTION 2
| Page | Topic |
|---|---|
| 1-2-3-4-5 | Parts list |
| 6 | External View |
| 7 | Internal View |
| 8 | CVS12 Squeegee Tool SUBEB2001 Electrical Box |
| 9 | SUBGA Gun Assem. SUBFL Float Shutoff |
| 10 | SUBSP Standpipe Water Filters |
| 11 | SUBIQD Chemical Injector SUBWHR Water return / T Connect |
| 12 | SUBPA Pump Motor Assem Unloader Check Valve |
| 13 | SUBCE Carpet Extractor KAIMOP |
| 14 | Upholstery Tool Muffler |
SECTION 1
Introduction
INSPECTION
Carefully unpack and inspect your new KaiVac cleaning machine for shipping damage. Each unit is tested and thoroughly inspected before shipping. For instructions regarding any shipping damage, contact KaiVac immediately. All returns must have a Return Authorization Number (RAN).
WARNINGS
- DO NOT operate with a frayed, worn or damaged cord.
- DO NOT use to pick up flammable or combustible materials.
- DO NOT run the pump without water in the water tank.
- DO NOT use hot water.
GROUNDING INSTRUCTIONS
THE KAIVAC MUST BE GROUNDED. If it should malfunction or stop working, grounding provides a path of least resistance for electrical current, thereby reducing the risk of electrical shock. The KaiVac is also supplied with a ground fault circuit interruptor (GFCI) to reduce danger of electric shock. It must be maintained and tested regularly. This unit is equipped with a cord that has an equipment grounding conductor and a grounding plug. The plug must be inserted in an appropriate outlet that is properly installed and grounded in accordance with all local codes and ordinances. Cutting off the ground wire or using a cord that is not equipped with a ground plug will void the warranty on the unit, and KaiVac will accept NO responsibility associated with the unit.
Improper connection of the equipment grounding connector conductor can result in a risk of electrical shock. Check with a qualified electrician or service person if you doubt the outlet is properly grounded. Do not modify the plug provided with the KaiVac. If it will not fit the outlet, have a proper outlet installed by a qualified electrician.
Safety Precautions
Equipment Warning
- Read all instructions to ensure safe operation of the KaiVac.
Training
- Proper training is required before using the KaiVac. Contact your authorized KaiVac distributor for training information.
- Instruction placards are attached to each KaiVac and should not be removed. These placards show proper cleaning procedures and safety precautions.
Equipment Use
- Do not use the equipment in a manner that it was not intended for by the manufacturer.
- See S-I-M-P-L-E Operation section for proper use of the equipment.
Spray Gun
- Never point the spray gun at people.
Prevention of Electrocution –
- Use the ground fault circuit interruptor (GFCI) with the KaiVac at all times.
- Test the GFCI before each use.
- Do not spray liquid from the KaiVac onto electrical outlets or on any electrical devices.
Personal Protection –
- Wear gloves, eye protection and ear protection when operating the KaiVac.
Prevention of Water Damage to Buildings
- The KaiVac is to be used on water-resistant building surfaces only. These include concrete, terrazzo, ceramic tile and quarry tile.
- The KaiVac may be used for stripping on vinyl-composite tile floors, but daily cleaning of resilient flooring using the KaiVac is not recommended.
- Never overflow the water tank or the vacuum recovery tank.
- Discontinue use if any leaks occur in the KaiVac.
Chemical Use
- Only use chemicals approved for use with the KaiVac. Use of non-Kaivac Will reduce warranty and may cause machine damage.
- Turn Chemical line off when not in use.
- Keep the appropriate chemical MSDS sheets on hand at all times.
- Cleaning chemicals should not be put in the water tank (with the exception of KaiDri in small amounts). Cleaning chemicals in the water tank can cause operator harm and machine damage because of the following:
- Chemicals in the water tank must pass through the pump which may cause premature pump failure. Use of chemicals in the water tank voids the warranty.
- Chemicals in the water tank will be aerosolized and may harm the operator.
Electrical
- Do not pull the KaiVac by the cord or use the cord as a handle. Do not close a door on the cord or pull the cord around sharp edges or corners. Do not run over the cord. Keep the cord away from heated surfaces.
- DO NOT pull on the cord to unplug. Grasp the plug at the outlet and pull.
- Turn off the unit before unplugging.
- Connect to a properly grounded outlet only.
Machine Integrity
- Do not run the pump dry. This will void the machine warranty.
- Do not run hot water through the pump. This can cause pump cavitation and will void the warranty.
- Always be sure the water tank and water line filters are clear of debris. Running the pump with clogged filters can cause pump damage.
- Replace any damaged cords before use.
- Replace any damaged hoses before use.
Limited Warranty Protection Plan
The KaiVac has been engineered and tested to provide long lasting performance. This warranty covers defects in workmanship or materials under normal use and service from the date of purchase.
Kaivac warranties the following components to be free from defects in materials and workmanship for these time periods:
- KaiChem Warranty for end users who use only Kaivac chemicals for the life of the machine.
- 5 years on rotationally molded parts.
- 3 years on other parts (excluding wear items)
- 1 year on labor
- Standard Warranty (When Kaivac chemicals not used)
- 1 year parts and labor
All Kaivac replacement parts are guaranteed for 90 days from the date of installation. Normal wear items such as wheels, hoses, seals, gaskets, cords, casters, squeegees and GFCI are excluded from warranty coverage.
All warranty claims must be accompanied by a Return Authorization Number (R.A.N.), which is available by calling the Kaivac Customer Service Department. No returns will be accepted without a R.A.N.
This warranty does not apply to return freight costs, damage or defect caused by accident, negligence, misuse, fire or repair done by anyone other than a Kaivac authorized repair center. In no event shall Kaivac, Incorporated be liable for incidental or consequential damages, or any damages to persons or property.
Please Note: Some states do not allow the exclusion or limitation of incidental or consequential damages. This warranty is in lieu of any other warranty expressed or implied, including any implied or merchantability for a particular purpose otherwise. Under no circumstances will the seller be liable for any loss, damage, expenses or consequential damages arising in connection with the use or inability to use seller’s product. Kaivac, Incorporated reserves the right to make changes or improvements to its equipment without notice.
S.I.M.P.L.E. No-Touch Cleaning Method
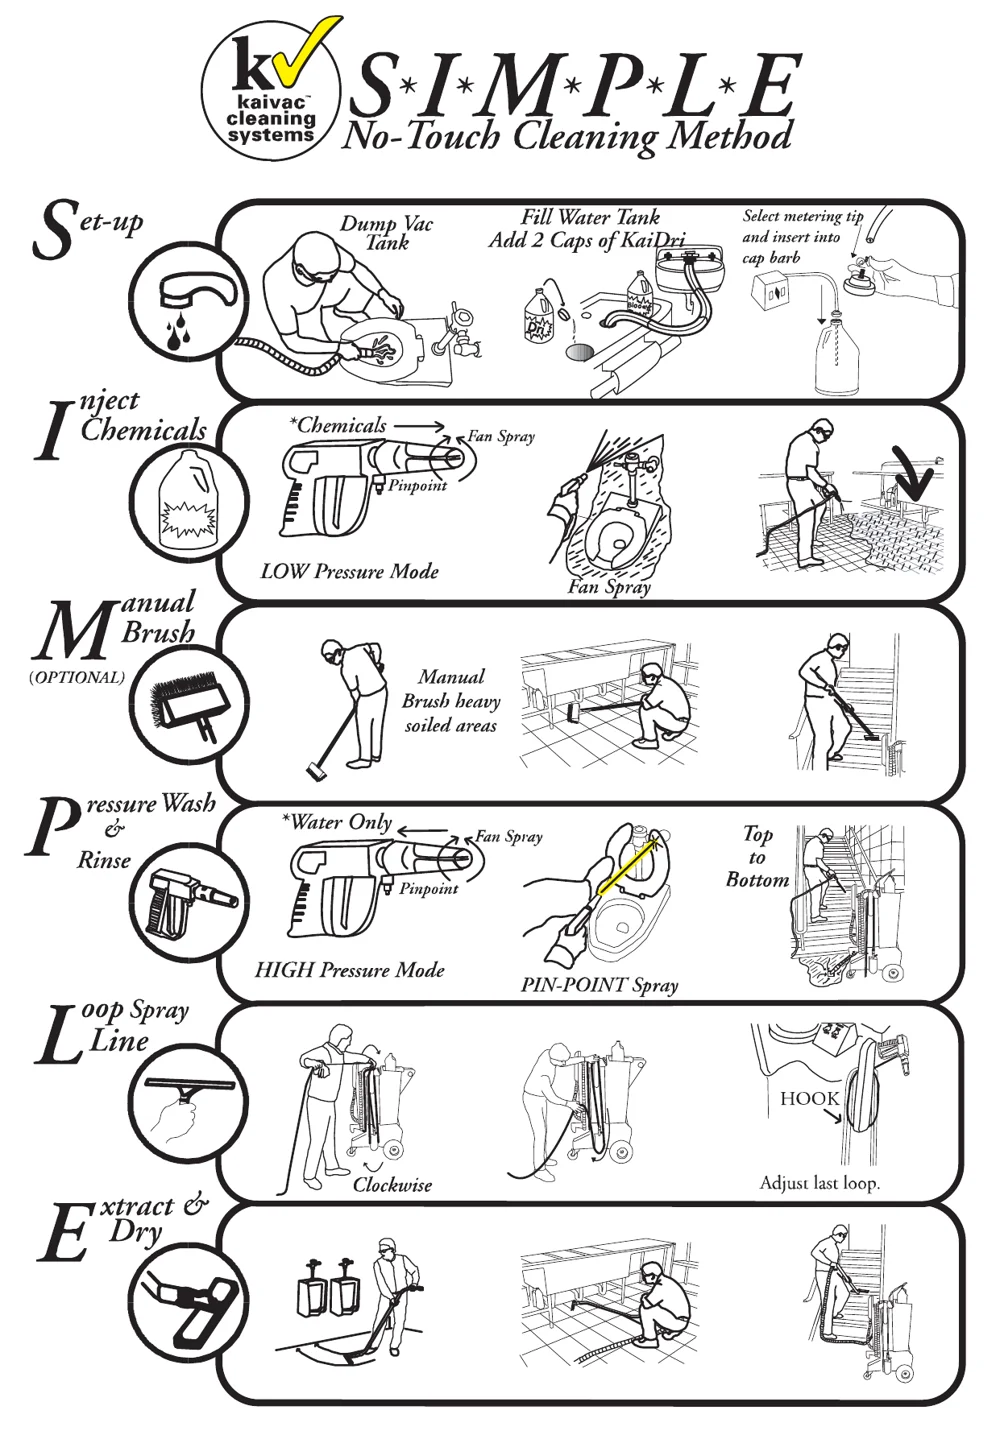
No-Touch Restroom Cleaning
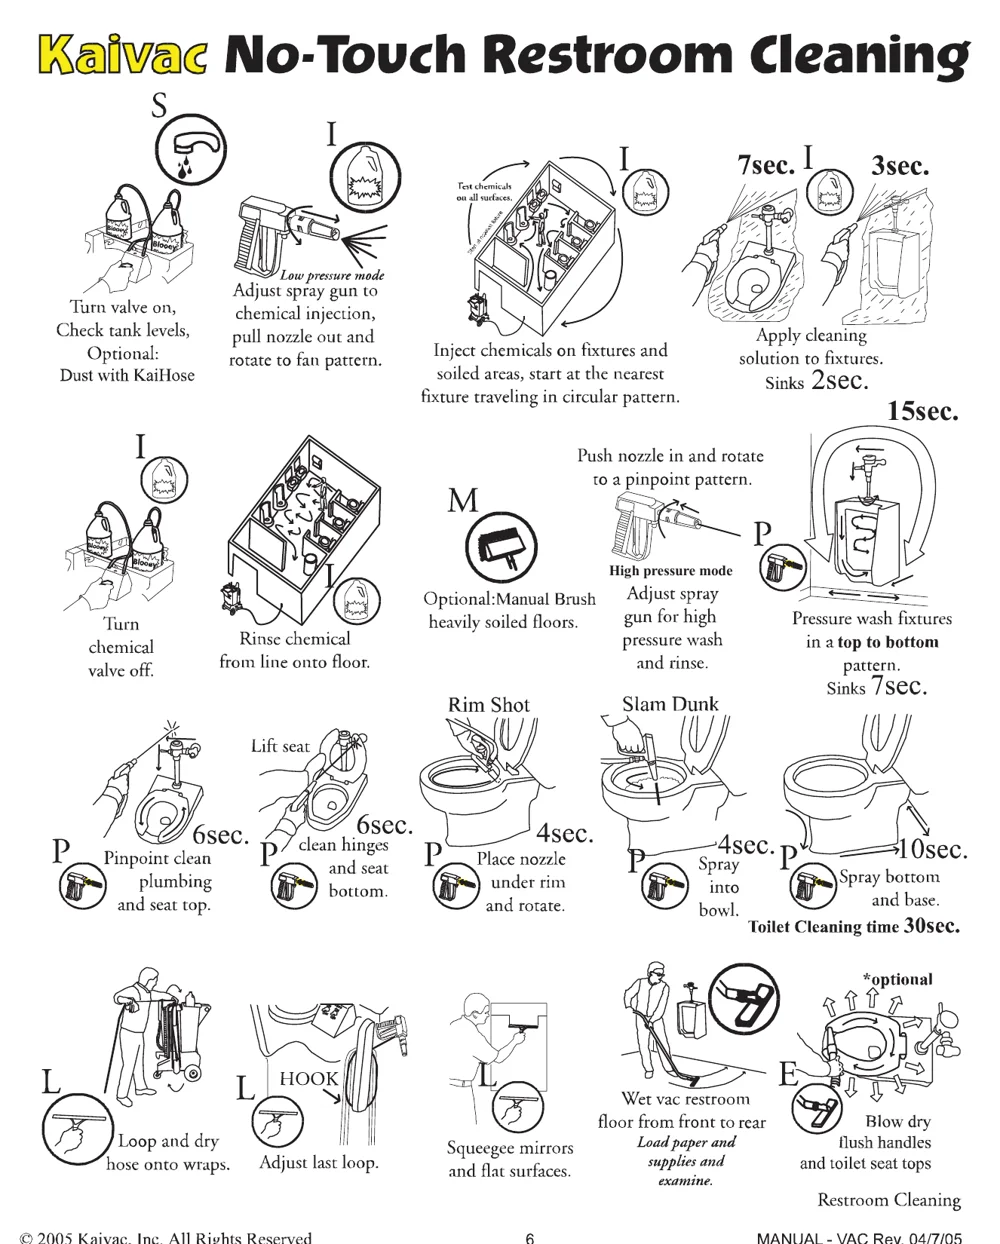
- S: Turn valve on, Check tank levels, Optional: Dust with KaiHose
- I: Adjust spray gun to chemical injection, pull nozzle out and rotate to fan pattern. (Low pressure mode)
- I: Inject chemicals on fixtures and soiled areas, start at the nearest fixture traveling in circular pattern. Test chemicals on all surfaces.
- I: Apply cleaning solution to fixtures. 7sec. 3sec. Sinks 2sec.
- I: Turn chemical valve off.
- I: Rinse chemical from line onto floor.
- M: Optional: Manual Brush heavily soiled floors.
- P: Adjust spray gun for high pressure wash and rinse. Push nozzle in and rotate to a pinpoint pattern. (High pressure mode)
- P: Pressure wash fixtures in a top to bottom pattern. 15sec. Sinks 7sec.
- P: Pinpoint clean plumbing and seat top. 6sec.
- P: Lift seat, clean hinges and seat bottom. 6sec.
- P: Rim Shot: Place nozzle under rim and rotate. 4sec.
- P: Slam Dunk: Spray into bowl. 4sec.
- P: Spray bottom and base. 10sec.
Toilet Cleaning time 30sec.
- L: Loop and dry hose onto wraps.
- L: Adjust last loop. (HOOK)
- L: Squeegee mirrors and flat surfaces.
- Wet vac restroom floor from front to rear. Load paper and supplies and examine.
- E: *optional Blow dry flush handles and toilet seat tops.
Restroom Cleaning
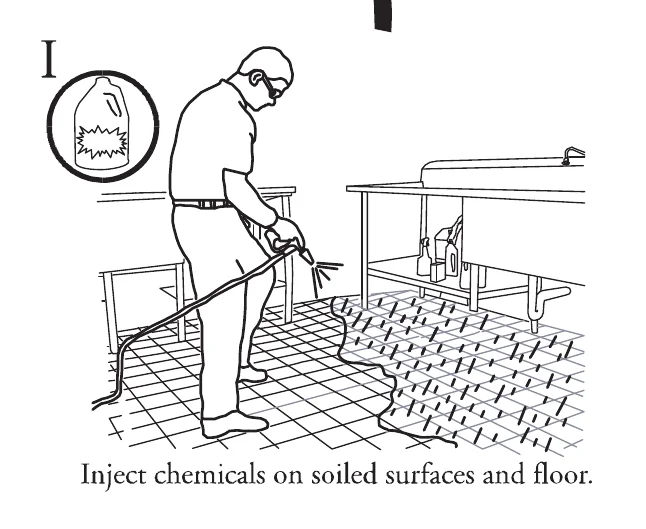
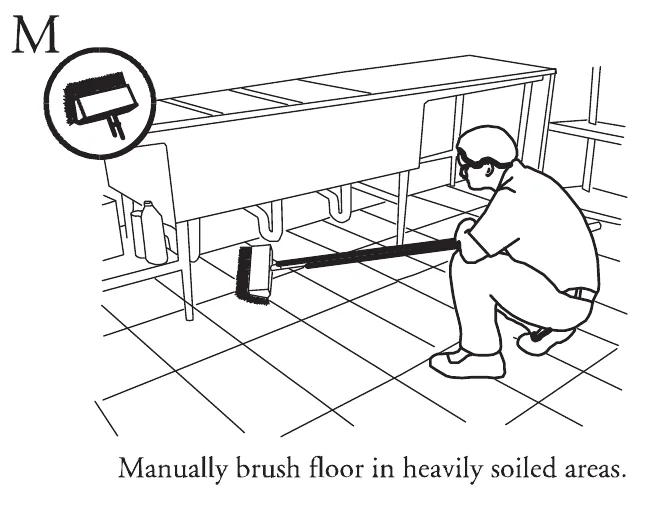
Kitchen Cleaning
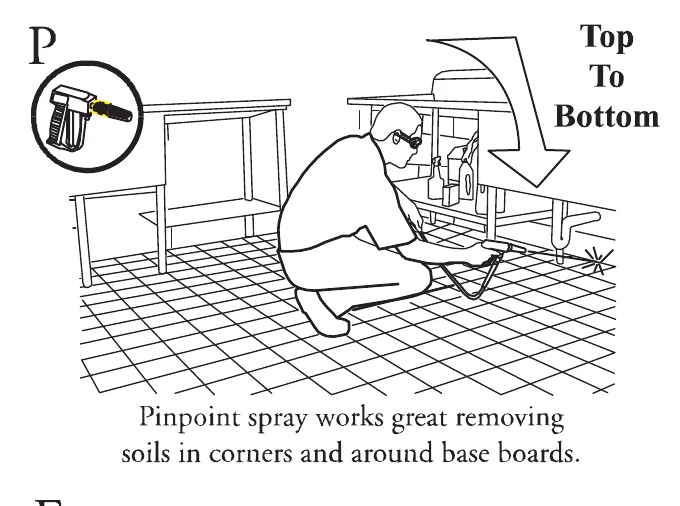
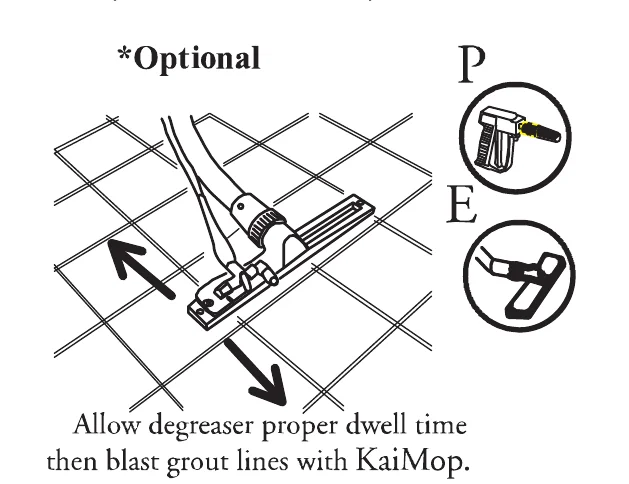
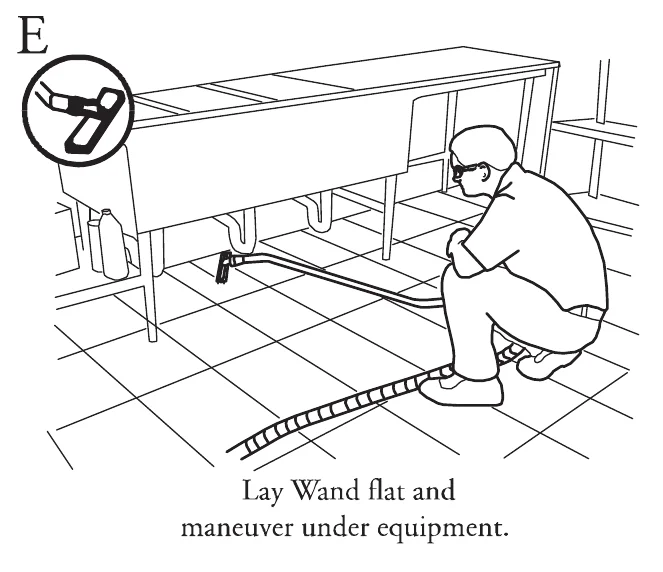
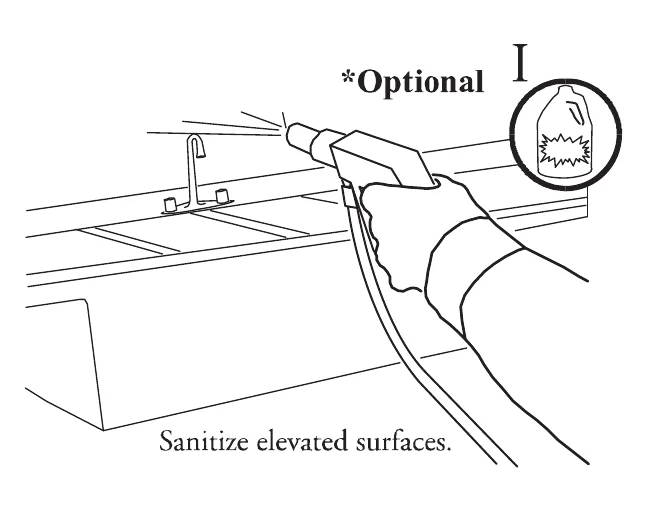
Stairwell Cleaning
S
High dust cobwebs from hard to reach areas using the KaiBlower and squeegee wand
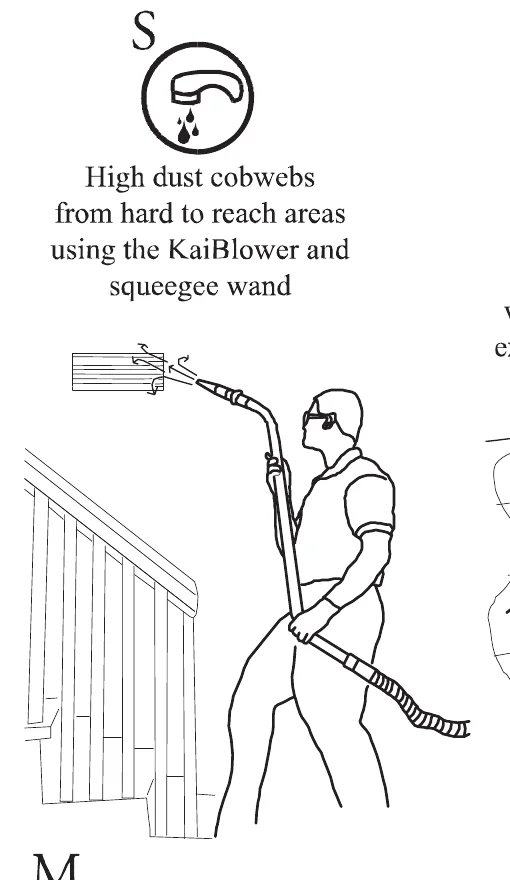
S
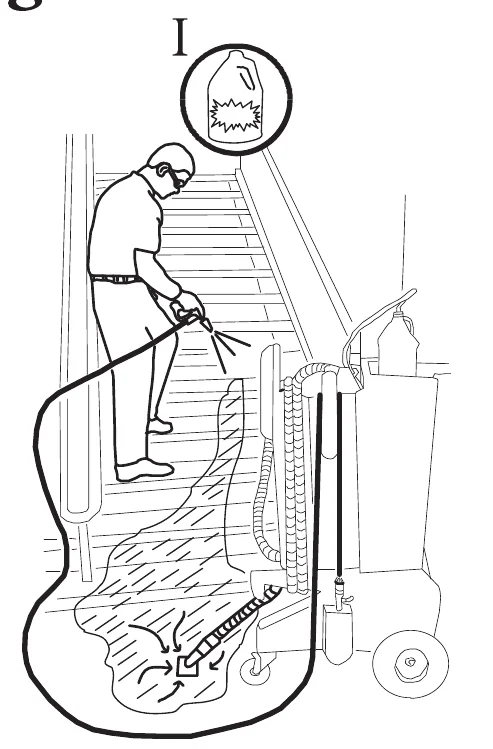
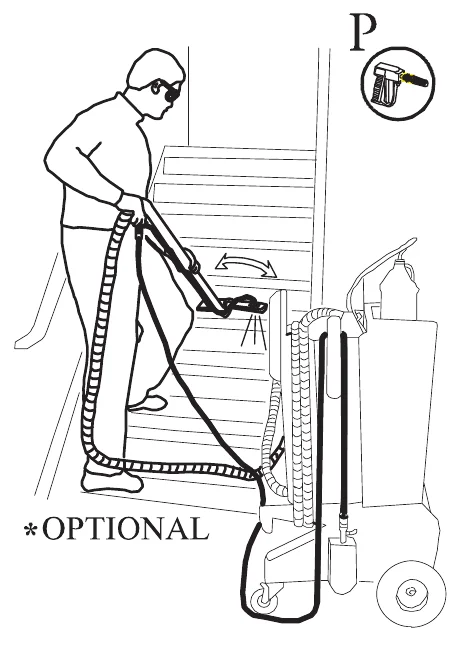
Position KaiVac at bottom of stairs with KaiDrain in position to suction excess moisture. Inject chemicals and apply to walls & stairs
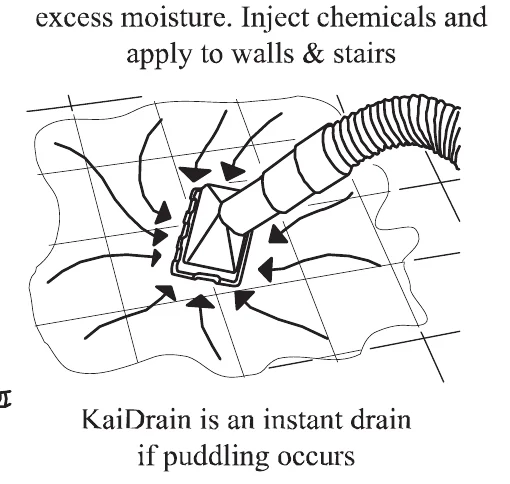
KaiDrain is an instant drain if puddling occurs
I
M
*OPTIONAL
KaiBrush walls & stairs for heavy soils.
P
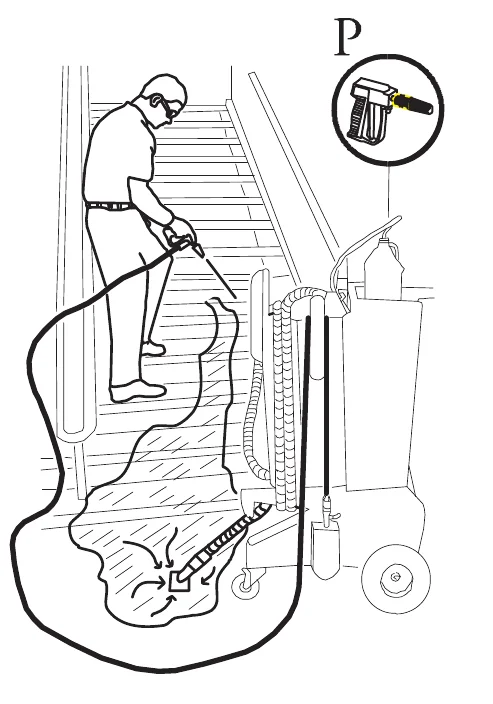
Use the KaiGrouter or KaiMop (if available) to better control water
*OPTIONAL
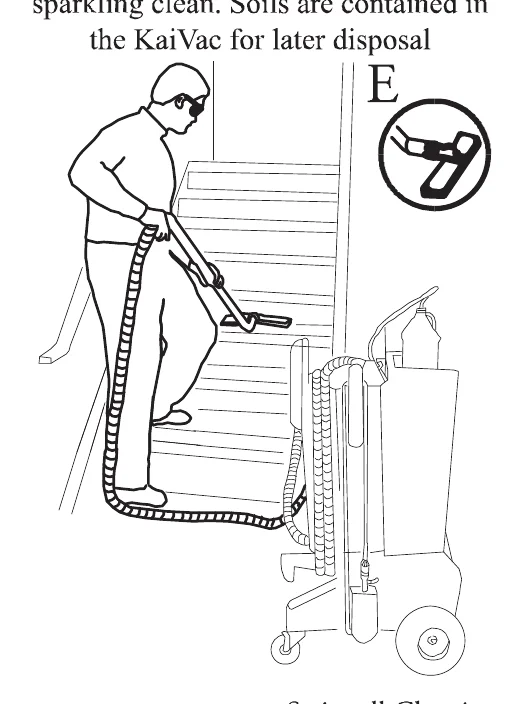
E
The floor squeegee tool sucks away soils and solution leaving stairway sparkling clean. Soils are contained in the KaiVac for later disposal
KaiTricks Power Prime 2001 Model
(SERIAL NUMBER 3000 AND HIGHER)
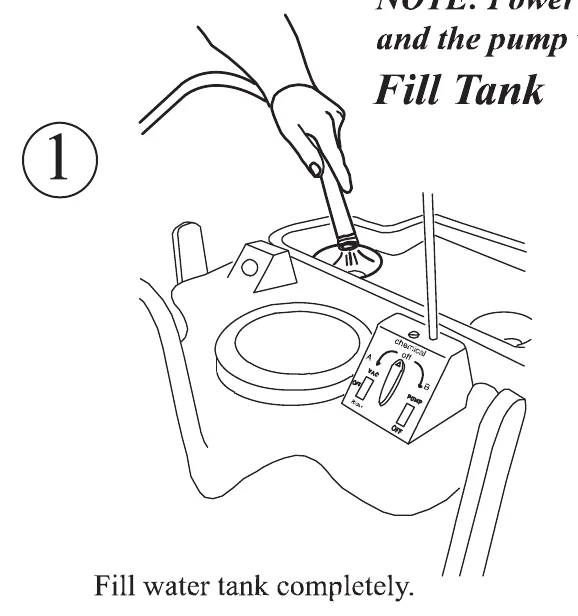
1. Fill Tank
Fill water tank completely.
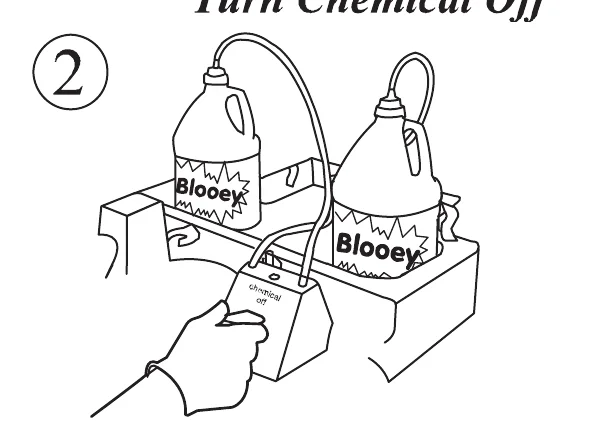
2. Turn Chemical Off
Turn chemical selecter to the off position.
3. Disconnect Spray line
Disconnect the spray line at base of machine.
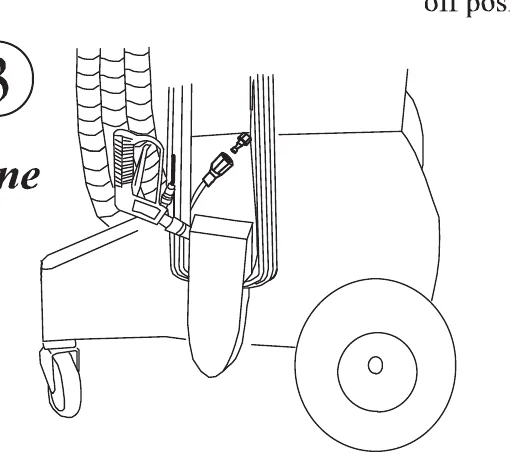
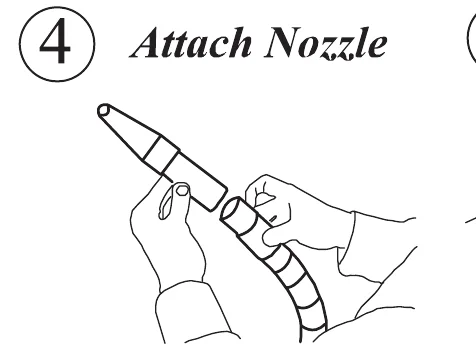
4. Attach Nozzle
Connect the nozzle to the end of the vac hose.
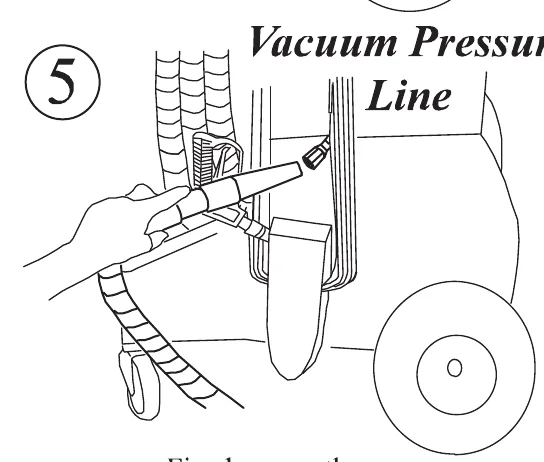
5. Vacuum Pressure Line
Firmly press the vac nozzle over the pressure line fitting coming out of the base of the machine.(turn on vac and pump motor and wait for prime)
Prime should accur within 1 minute.
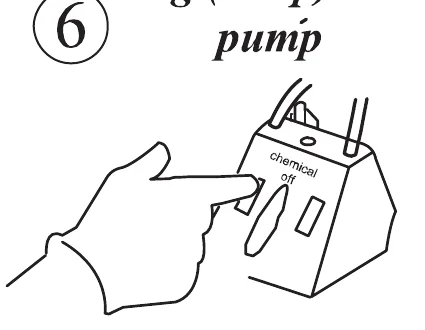
6. Jog (Burp) the pump
Continue step 5 and jog the pump motor on and off every 3 seconds, allowing the pump to come to rest each time.
KaiTricks C
KaiTricks
POWER PRIME (SERIAL NUMBERS 3000 AND LESS)
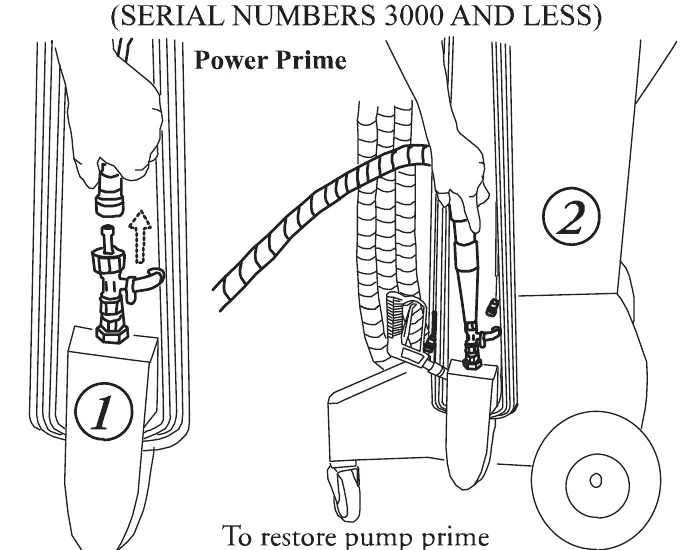
To restore pump prime connect blow nozzle on vacuum hose and place over injector. Hold in place until priming occurs. Reconnect spray line.
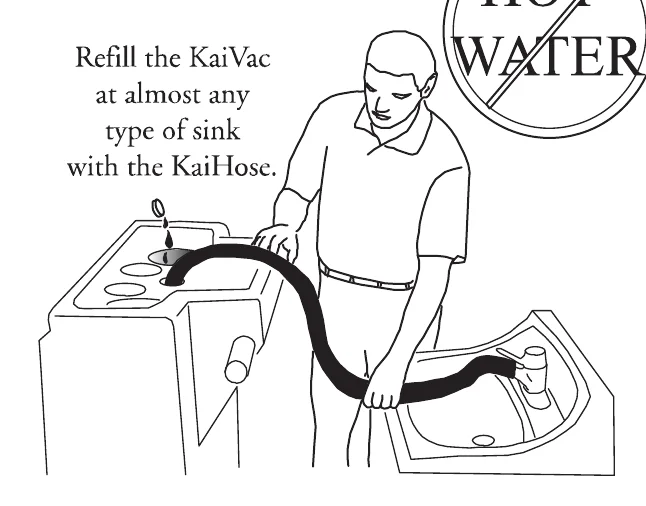
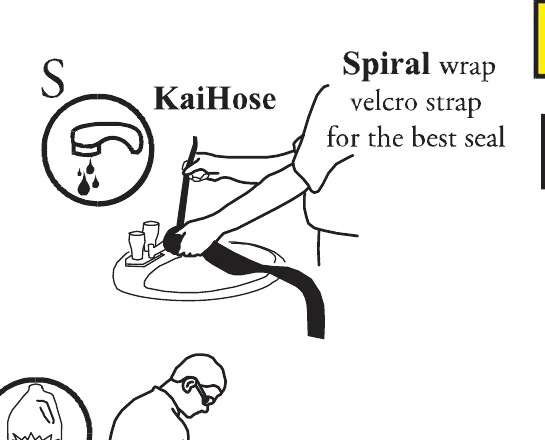
Refill the KaiVac at almost any type of sink with the KaiHose.

Spiral wrap velcro strap for the best seal
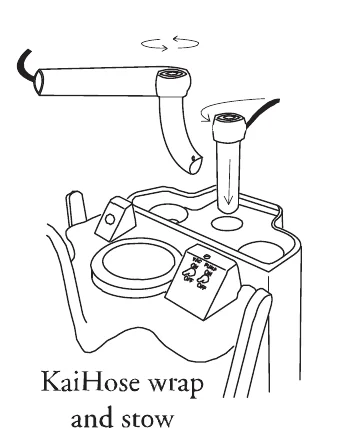
KaiHose wrap and stow
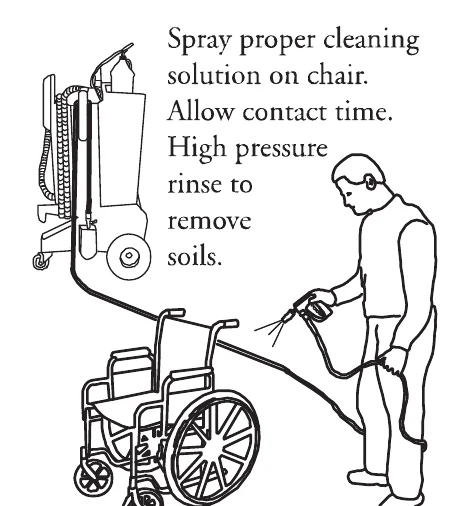
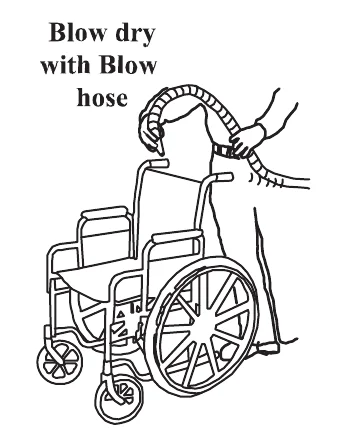
Spray proper cleaning solution on chair. Allow contact time. High pressure rinse to remove soils.
Blow dry with Blow hose
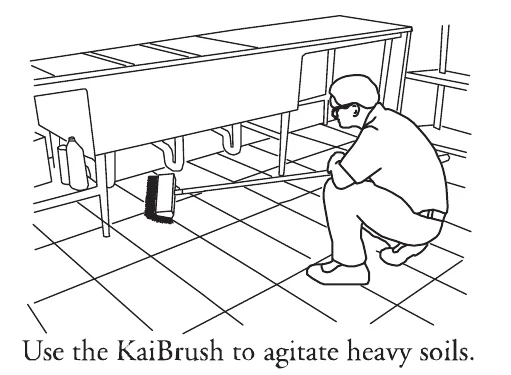
Use the KaiBrush to agitate heavy soils.
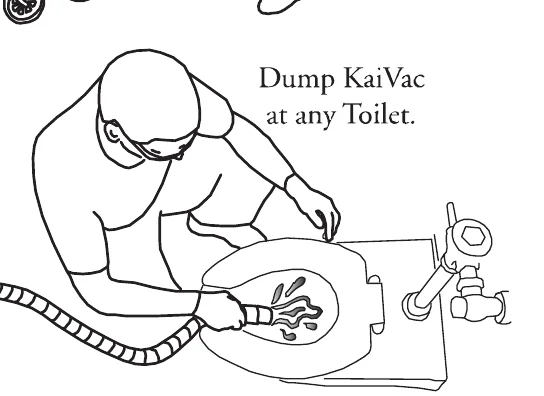
Dump KaiVac at any Toilet.
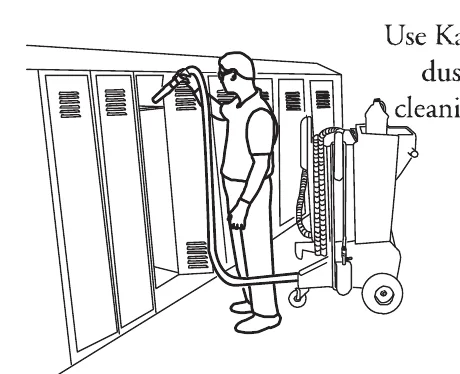
Use KaiBlower for dusting and cleaning lockers.
KaiTricks B
KaiTricks
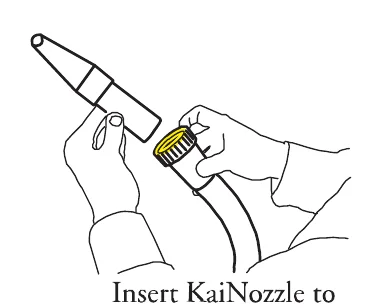
Insert KaiNozzle to blow- dust elevated areas.
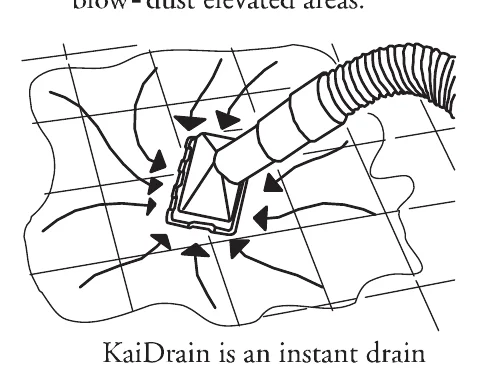
KaiDrain is an instant drain if puddling occurs.
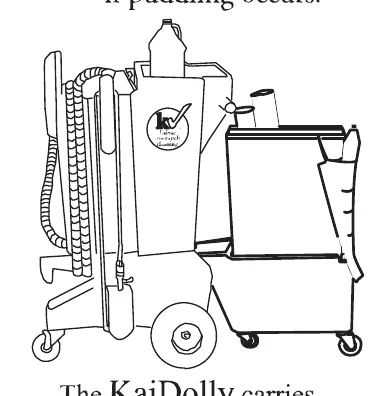
The KaiDolly carries everything you need to get the job done.
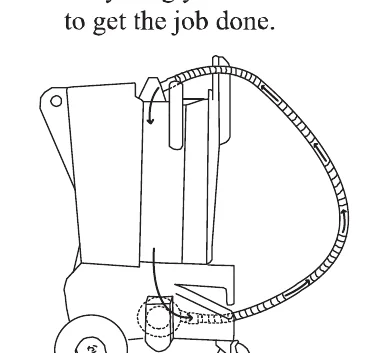
Dry vac hose by connecting hose ends to vac motor, then discharge air into vac tank.
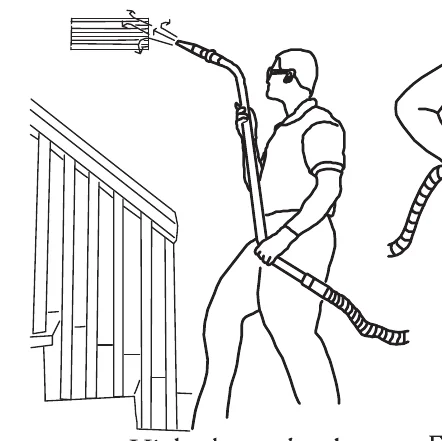
High- dust cobwebs from hard to reach areas using KaiBlower and squeegee wand
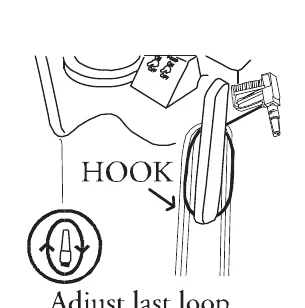
Adjust last loop.
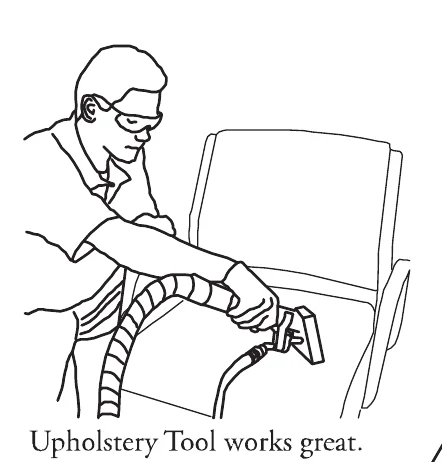
Upholstery Tool works great.
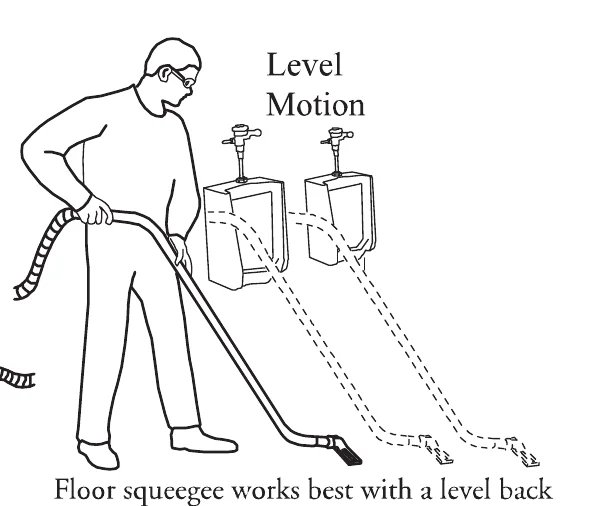
Level Motion
Floor squeegee works best with a level back and forward motion. Suction sound at the squeegee produces best pickups.
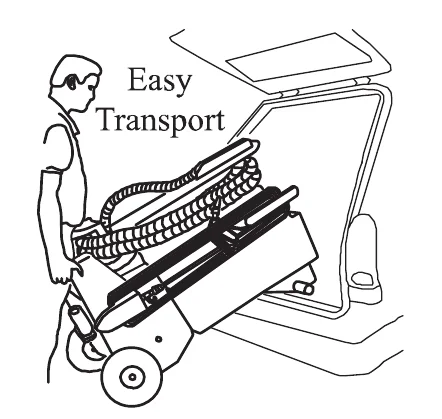
Easy Transport
Remove Placards, Tools, Chemicals and empty tanks before loading.
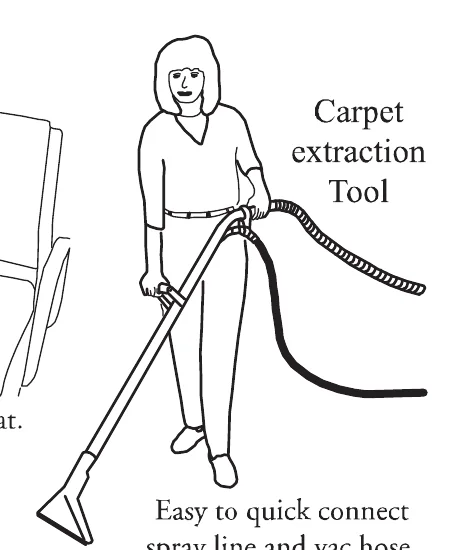
Carpet extraction Tool
Easy to quick connect spray line and vac hose.
KaiTricks A
Tank and Hose Cleaning
- Unwrap vac hose and lay it on floor.
- Suck water and air from water tank. Lower hose end to surface of water gulping both air and water. This action flushes soils from line and quickly empties water tank.
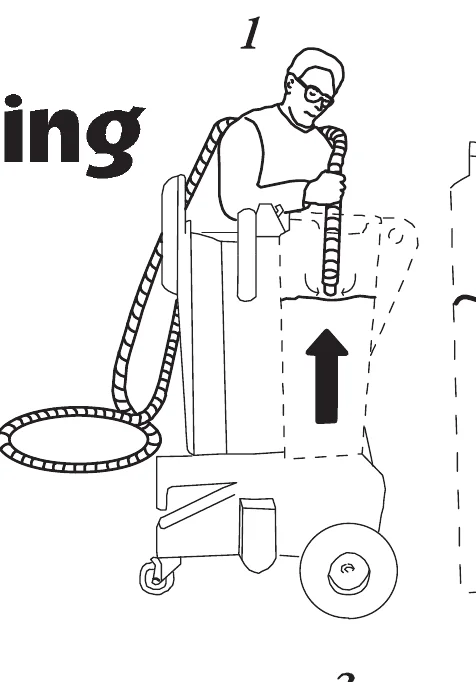
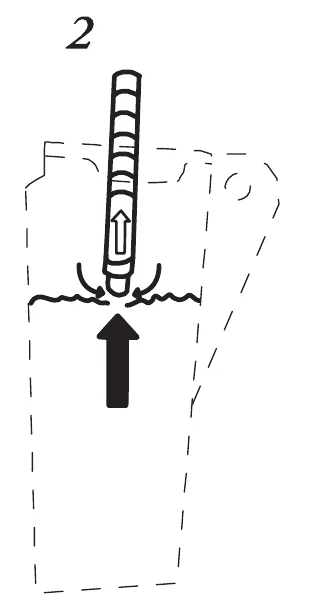
*Dry vac hose by connecting hose ends to vac motor, then discharge air into vac tank
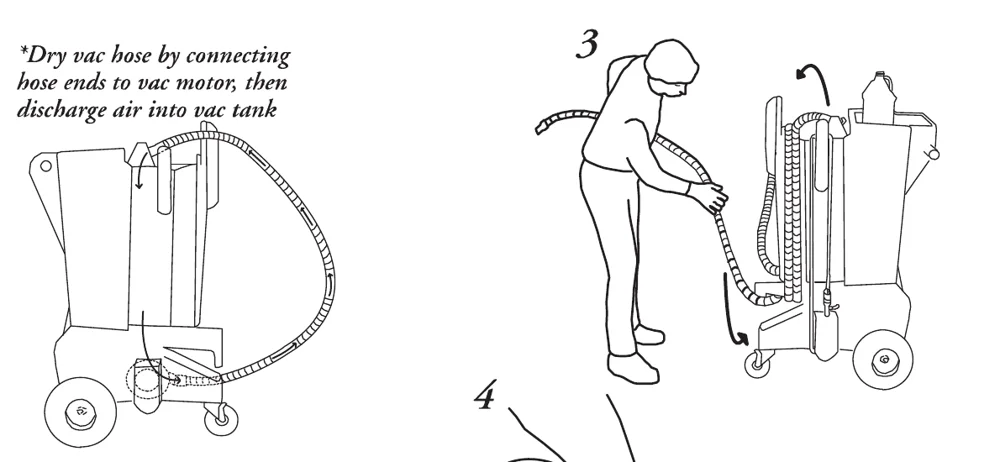
- Vac hose can now be wrapped onto machine. Leave vac motor running while wrapping to avoid water dripping from end of hose. To completely dry hose leave vac motor running for about 3 minutes.
- With Dump Hose opened to floor drain, spray inside of vac tank with clean water moving hose in a circular pattern to insure tank walls and float shutoff are rinsed.
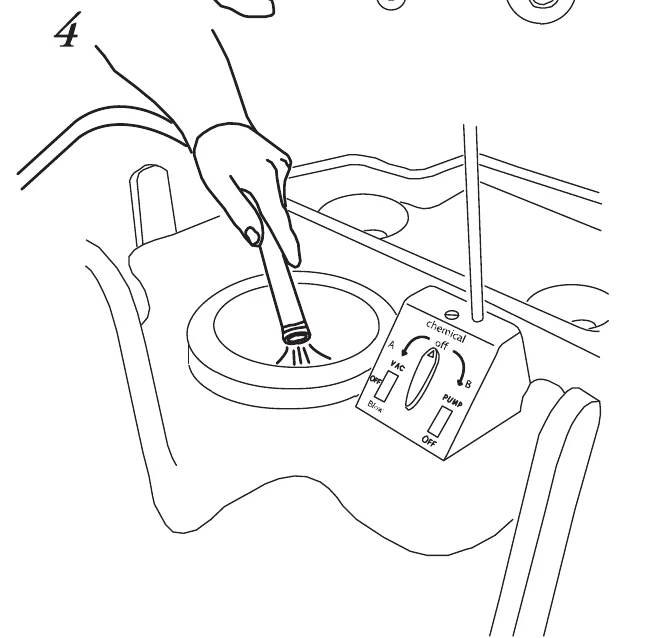
Tank and Hose Cleaning
General Maintenance
Inspect Filters for dirt.
If found, remove cover, clean filter screen and reinstall.
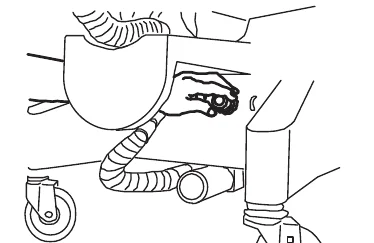
Inspect Muffler for soils.
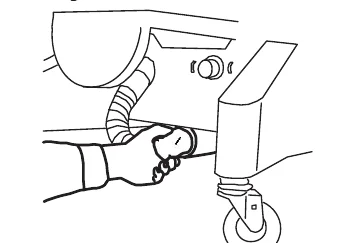
If found, remove stuffing, wash and reinstall.
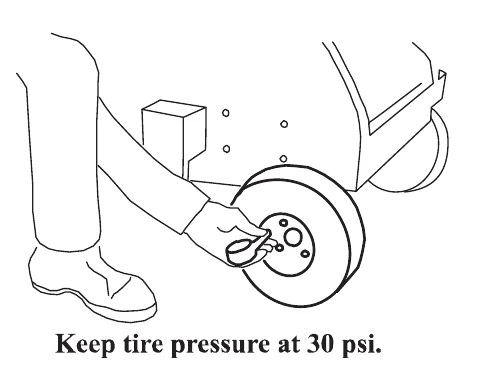
Keep tire pressure at 30 psi.
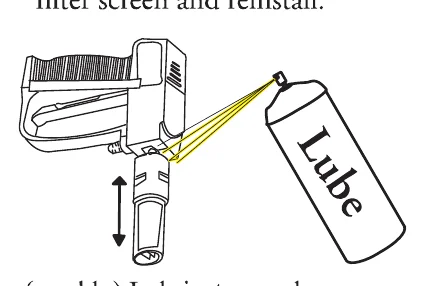
(weekly) Lubricate nozzle with penetration oil. Nozzle must move freely forward and backwards.
Windshield Fluid
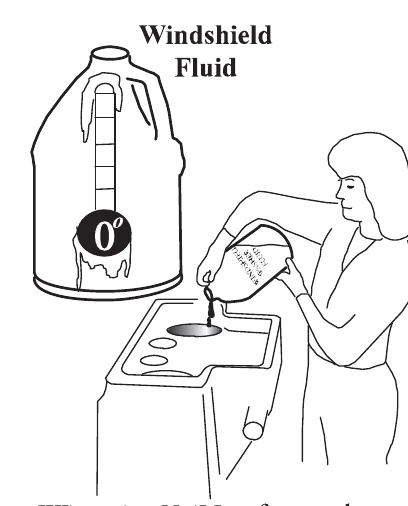
Winterize KaiVac for outdoor storage or transport in sub freezing temperatures. Remove all water from tank, add 1/2 gallon windshield washer fluid. Run pump and spray until fluid is discharged from gun.
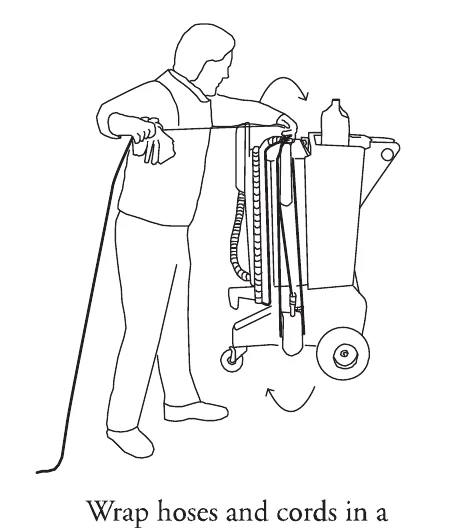
Wrap hoses and cords in a Clockwise direction and use a cleaning rag in one hand to wipe & dry.
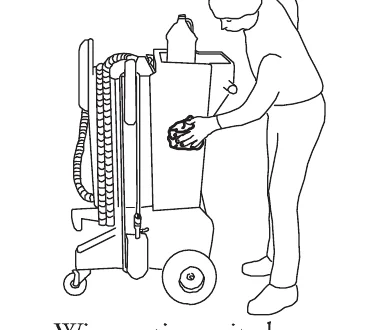
Wipe entire unit clean with an all purpose cleaner.
Unscrew locking collar to remove tools
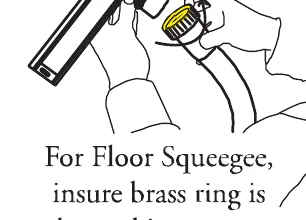
For Floor Squeegee, insure brass ring is located in groove.
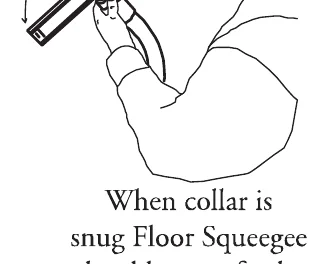
When collar is snug Floor Squeegee should rotate freely.
Floor Squeegee
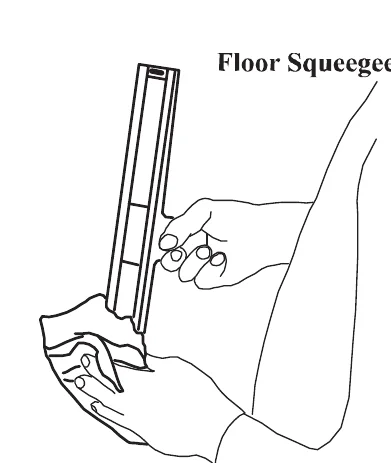
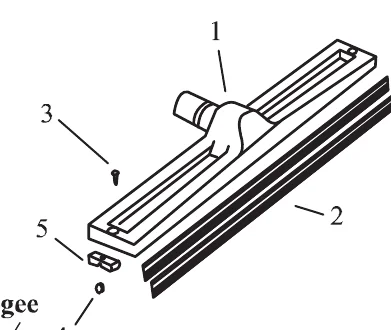
- Squeegee Head
- Blades
- Screw
- Wheel
- Wheel Holder
Wipe Squeegee blades with cloth. Inspect tool for worn wheels and blades Replace as needed.
Safety
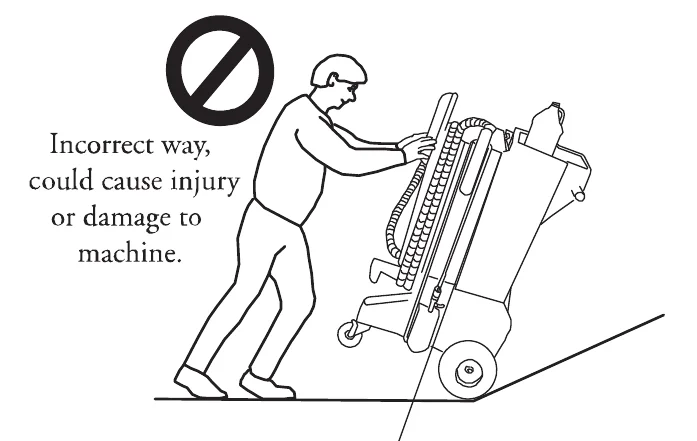
Incorrect way, could cause injury or damage to machine.
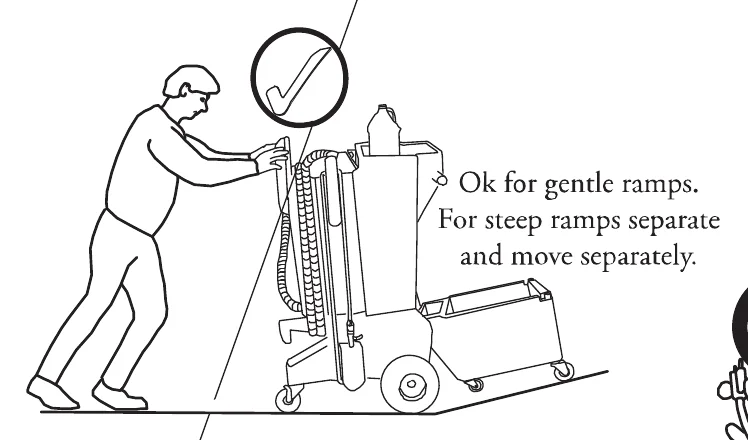
Ok for gentle ramps. For steep ramps separate and move separately.
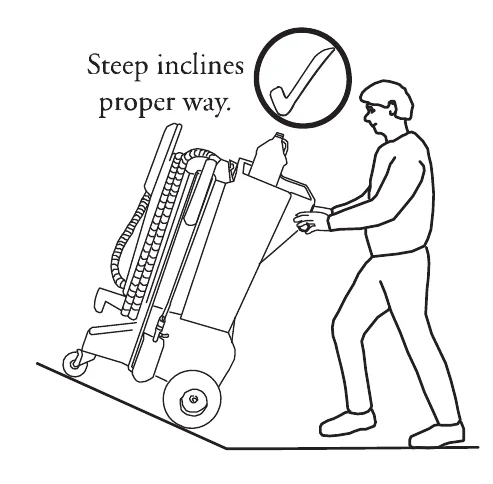
Steep inclines proper way.
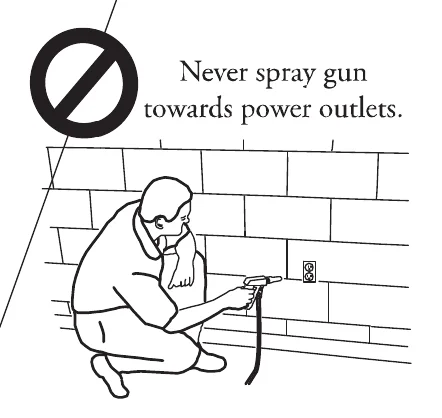
Never spray gun towards power outlets.
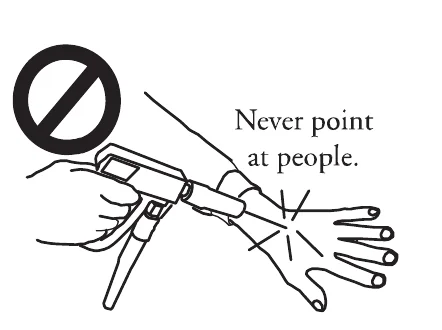
Never point at people.
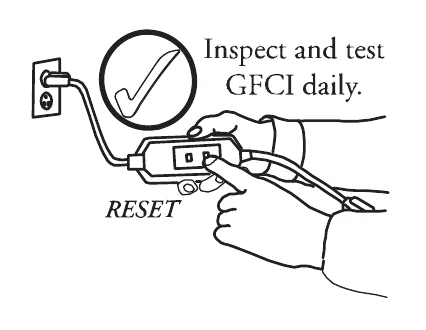
Inspect and test GFCI daily.

Inspect Hoses and cords daily.
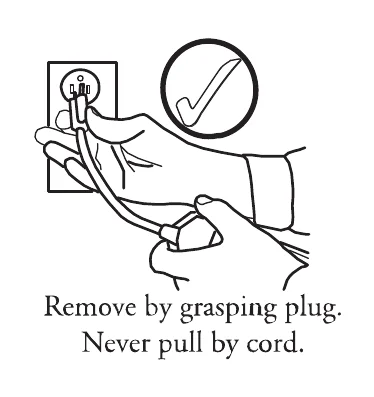
Remove by grasping plug. Never pull by cord.
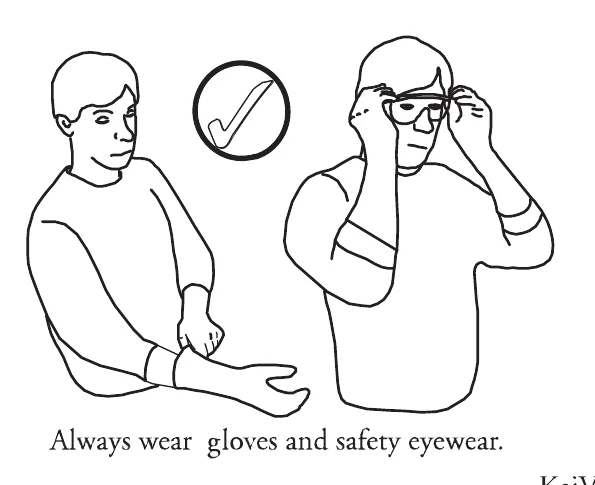
Always wear gloves and safety eyewear.
KaiVac Safety
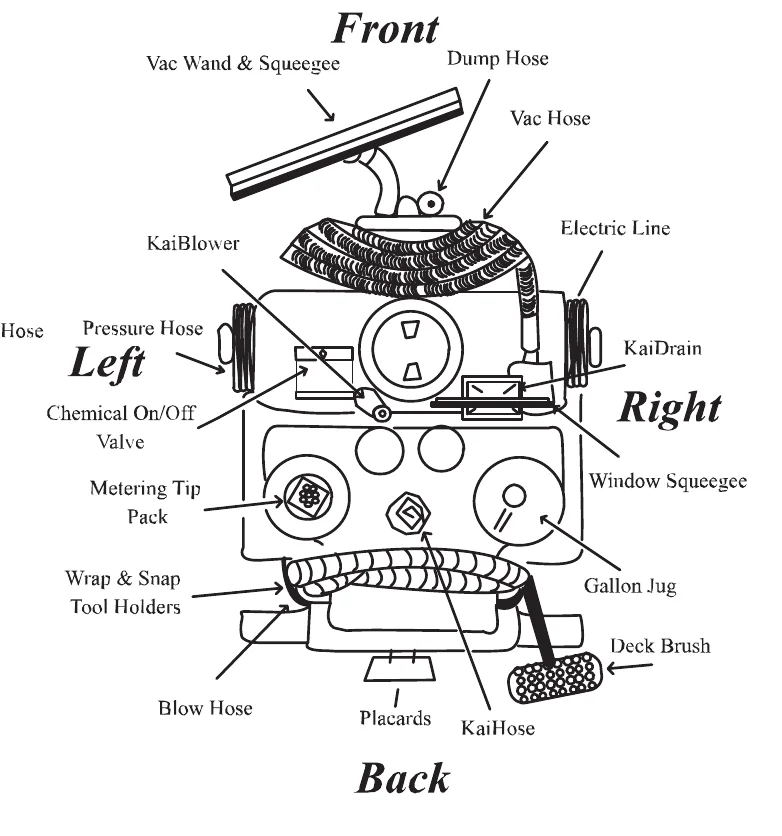
Tool Arrangement
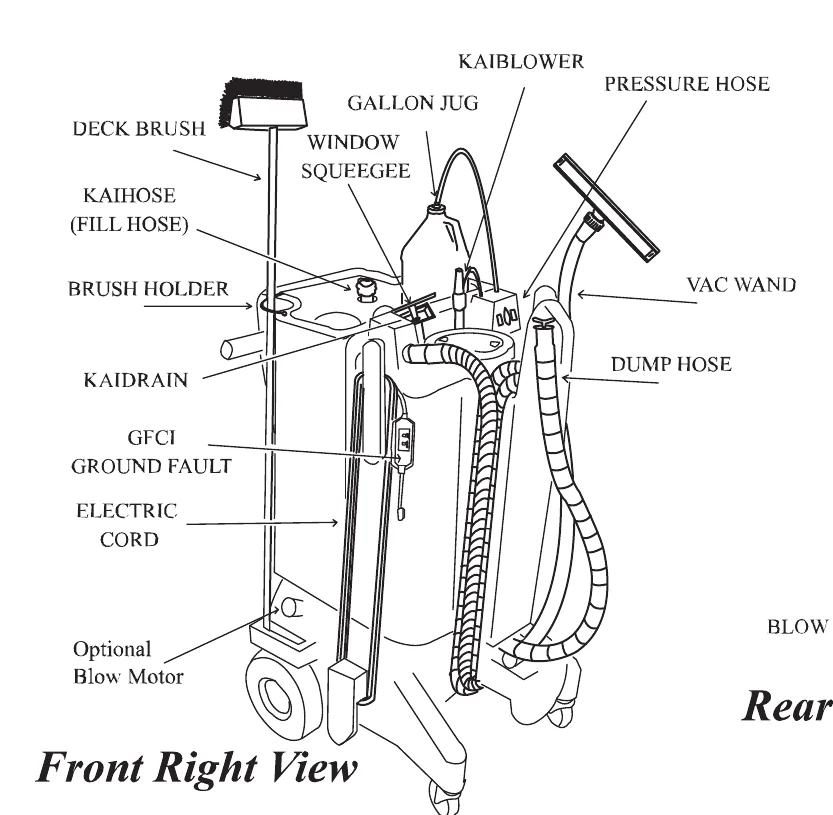
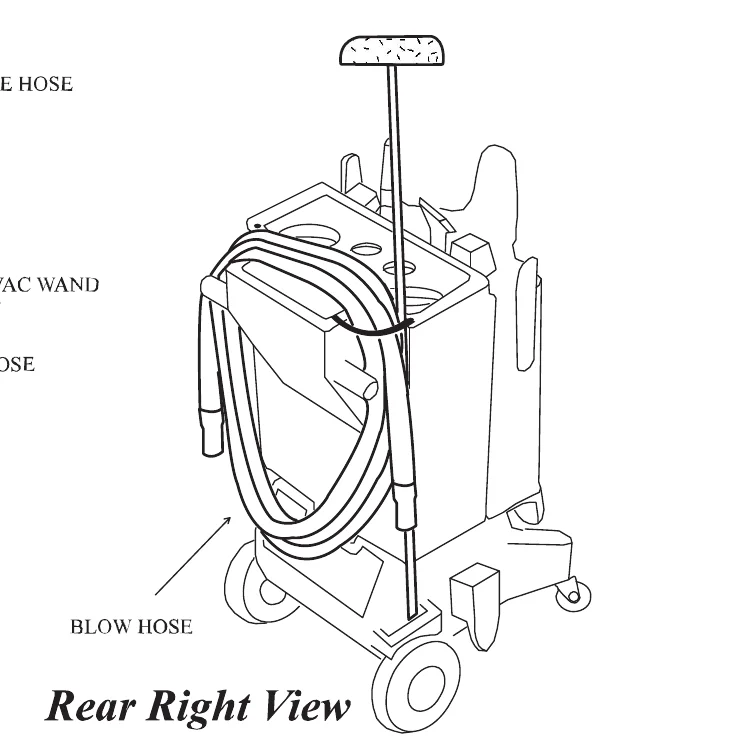
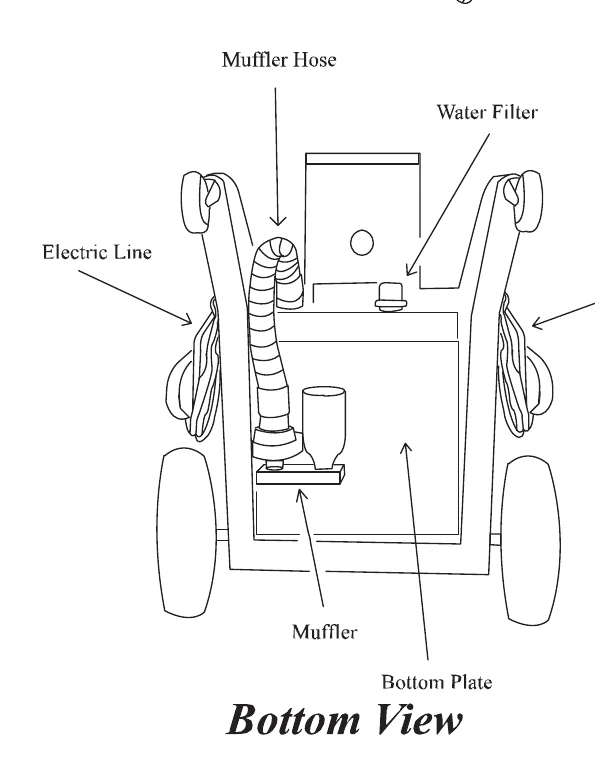
Blow Operation
Using Vac Hose
(Must Clean & Dry Before Use)
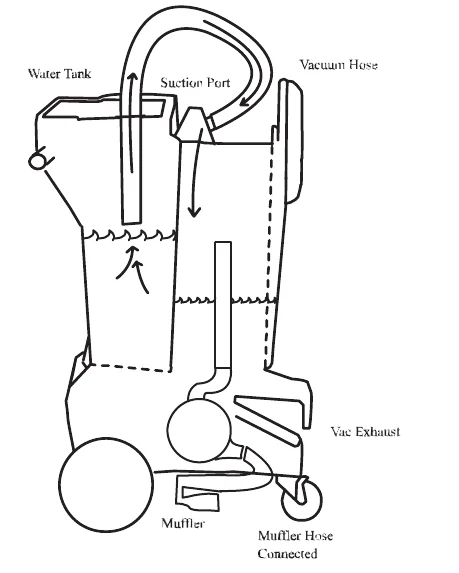
Flush (clean) Vac Hose
Operator inserts hose into water tank for 2-3 seconds
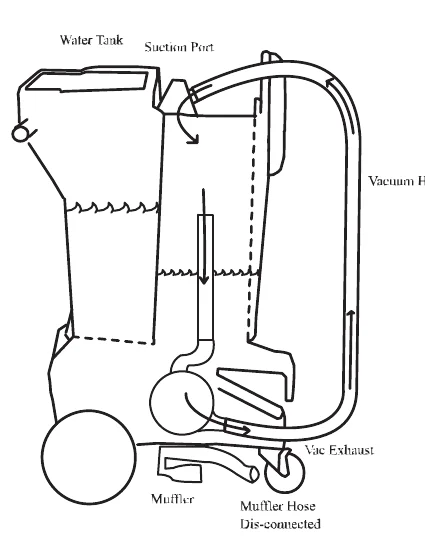
Rinse & Dry out Vac Hose
Operator disconnects muffler hose and connects vac hose to vac motor exhaust, running motor for 3 minutes. Operator disconnects hose at vac suction port and ready for blow operation.
OPTIONAL STEP if blow dry is required
Using Blow Hose
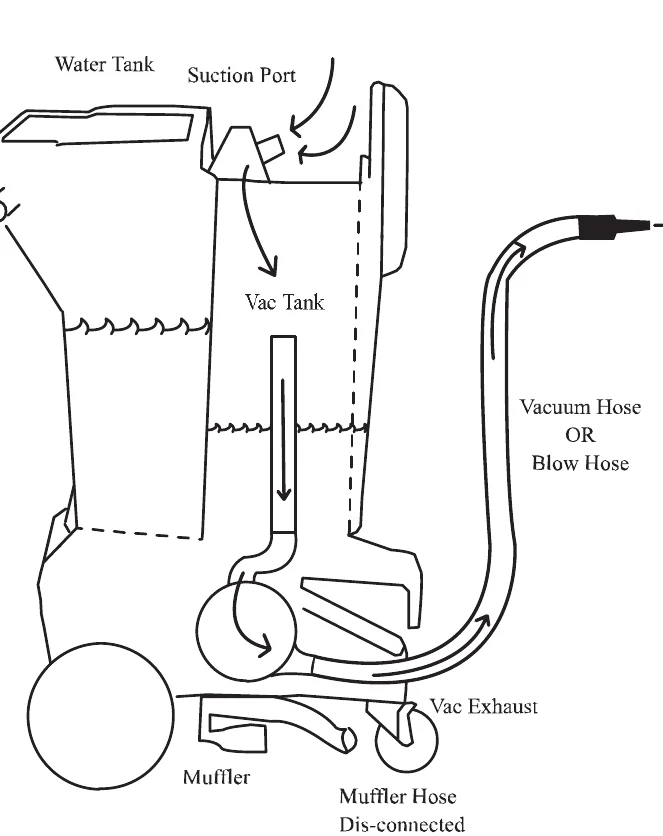
Blow Mode
Optional Uses
Cafeterias and Kitchens
Note: Cover all food and utensils before cleaning
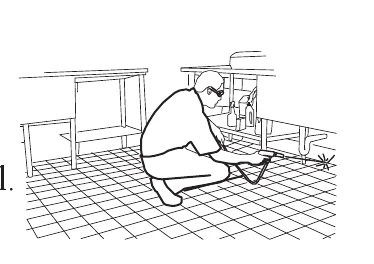
- Deep clean grout lines in quarry tile with the optional KaiMop.
- Tables, chairs and equipment may be pressure washed to remove embedded soil.
- Walls and floors may be cleaned using the S-I-M-P-L-E system.
Locker and Shower Rooms
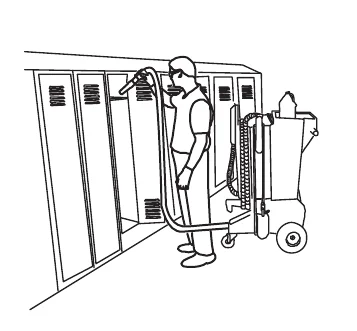
- Blow debris from in and under lockers, overhead fixtures and vents with the blow feature.
- Pressure wash and disinfect inside lockers.
- Use KaiBlooey cleaner for deliming shower rooms via chemical injection system.
- Use S-I-M-P-L-E procedures in other shower and locker room areas.
Stripping Floors
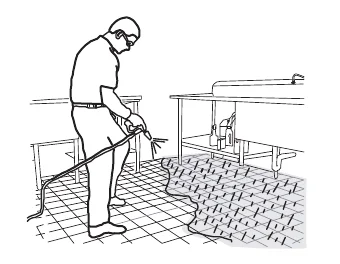
- Apply concentrated stripping solution using the chemical injection system. The chemical injection system will allow a 1:8 dilution ratio with no metering tip in place.
- Walk backwards while applying stripper to avoid stepping on wet surfaces.
- Scrub the floor with stripping pads or brushes.
- Wet-vac stripping solution from floor with the KaiVac squeegee tool.
- Use the spray gun and clean water from the water tank to rinse the floor an hard to reach areas as necessary. Turn the chemical valve to the "off" position to rinse the floor with water in low pressure mode.
- Blow the remaining stripper solution from behind baseboards, lockers and other hard to reach areas with the blow dry tool.
- Finally wet-vac rinse solution from the floor and touch up as needed.
Other Uses
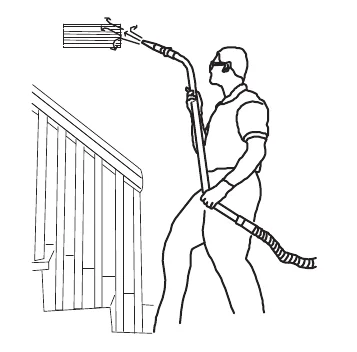
- High-Dusting - Use air blast for cobweb and other dusting jobs.
- Salt and water pickup - Great for picking up water and salt during winter and rainy seasons.
- Entrance Mat Cleaning - Pressure wash and wet vac entry mats.
- Window Cleaning - Apply window washing solution with gun, squeegee window and wet vac off floor. Use only on compatible floors and walls.
- Walls - Use S-I-M-P-L-E process.
- Stairwells - Dust with air blast. Use S-I-M-P-L-E for deep cleaning.
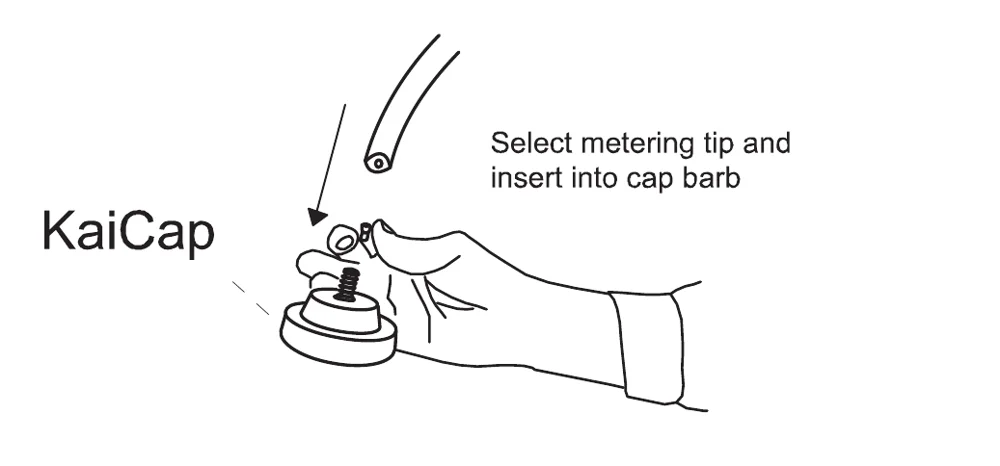
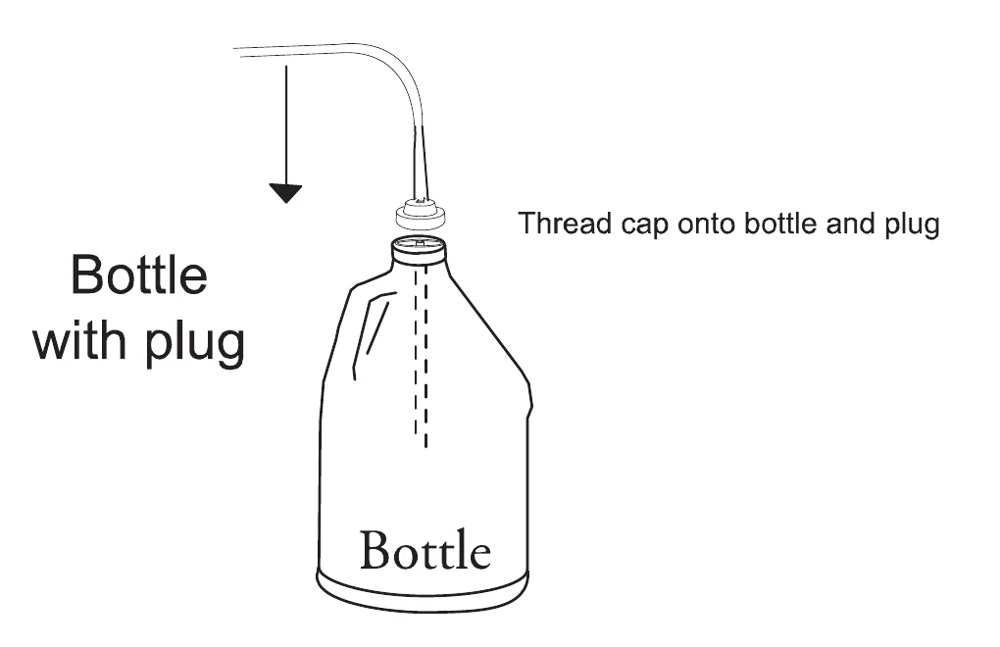
Chemical Injection Chart
METERING TIP CHART
| TIP | PSI | OZ Per Gallon |
|---|---|---|
| Black | 300/500 | 1.25 /2 |
| Aqua | 300/500 | 3.00/4 |
| Orange | 300/500 | 4.75 /5 |
| Tan | 300/500 | 9.50/10 |
| None | 300/500 | 35/40 |
Maintenance
| Item | Procedure |
|---|---|
| Floor Squeegee | Check condition of rubber squeegee blades and wheels on the floor tool. Rough floor surfaces will cause the blades and wheels to wear out more quickly. Replace as necessary. |
| Spray Gun | Check spray pattern. If spray pattern will not pinpoint, clean orifice by removing it with an Allen wrench and flushing. Replace if not pinpointing. If nozzle becomes difficult to move from high to low pressure lubricate nozzle with lithium grease. |
| Pressure Hose | Wipe clean after each use. Check for cuts or frays in the hose jacket, particularly at the end of the fittings. Replace hose if cuts are found. |
| Water Filter | Check filter screens for debris and clean as needed. Be careful not to crush the end of the filter screen when replacing. Check the clear filter bowl cover to be sure it is tight. Check for leaks around filter and filter connections. |
| Water Tank | Check condition of filter in water tank. Clean as needed. Empty the water tank to prevent mildew and bacteria growth. Empty tank by dipping the vacuum hose onto the water tank and transferring the water to the vacuum tank. |
| Vacuum Tank | Empty and flush vacuum tank. Clean and disinfect. Check the float shutoff screen to be sure it is not plugged up. A plugged filter screen restricts airflow and results in reduced suction. |
| Leaks | Be alert for leaks around hoses, fittings, spray wand, tanks or elsewhere. Discontinue use until leaks are repaired. |
| Electrical System | The ground fault circuit interrupter (GFCI) must be tested before each use. Electric cords must be inspected for tears or cuts in the insulation. |
| DVD System | Make sure DVD player is dry and free of any debris placed on top or inside of storage compartment. |
Troubleshooting
| Area | Problem | Possible Cause | Remedy |
|---|---|---|---|
| Electrical | No power to pump or vac motor. | 1. KaiVac not plugged in. 2. Switch not "on". 3. GFCI tripped. 4. Building circuit overloaded. 5. Switch wires loose. 6. Terminal block connections loose. | 1. Plug machine in. 2. Check switches for "on". 3. Test and reset GFCI. 4. Check and reset circuit. 5. Disconnect power and check for loose wire. 6. Disconnect power and check for loose wire. |
| Electrical | Electrical burning smell | 1. Vac motor brushes worn. 2. Vac motor hung up. 3. Pump motor hung up. | 1. Replace vac motor brushes. 2. Replace vac motor. 3. Release pressure on hose and jog pump switch. Or replace. |
| Vacuum System | No / Weak vacuum | 1. Vac tank full. 2. Squeegee blades or wheels worn. 3. Float-shutoff screen dirty. 4.Float ball stuck. 5. Damaged hose. 6. Dump hose plug missing. 7. Access lid not tight. 8. Vacuum hose plugged. 9. To much liquid in vac hose. 10. Vac hose still wrapped. 11. Muffler plugged. 12. Hose from vac motor to standpipe loose. 13. Leak in vac tank. | 1. Empty vac tank. 2. Replace wheels or blades and check peroidically. 3. Spray off float bag to clean. 4. Tap float and release / clean. 5. Cut and repair / replace. 6. Contact dealer and replace. 7. Tighten lid hand tight. 8. Flush hose to remove debris. 9. Allow air in when Vacuuming. 10. Unwrap vac hose fully. 11. Remove padding and clean. 12. Reattach and tighten. 13. If repairable, clean and dry affected area and silicone. |
| Vacuum System | Moister from exhaust | 1. Vac tank full. 2. Float-shutt off missing. 3. Excessive foam in vac tank. 4. Standpipe leaking. 5. Water sprayed into standpipe while cleaning. | 1. Dump vac tank. 2. Replace. 3. Use defoamer. 4. Silicone threads or replace. 5. Use care to avoid spraying dirrectly into float housing. |
| Blow dry system | No air flow | 1. Hose disconnected. | 1. Reconnect hose. |
| Blow dry system | Moister from nozzle | 1. Water in vac hose. | 1. Dry vac line. |
| Blow dry system | Suction instead of blow action | 1. Vacuum hose connected to tank inlet. | 1. Reconnect to vac motor exhaust. |
Troubleshooting
| Area | Problem | Possible Cause | Remedy |
|---|---|---|---|
| High Pressure System | No water from pump or low pressure |
|
|
| Bad fan pattern or pinpoint pattern on gun |
|
| |
| Chemical Injection System | No chemical flow |
|
|
Troubleshooting
| Area | Problem | Possible Cause | Remedy |
|---|---|---|---|
| Chemical Injection System cont. | Not enough chemical flow | 1. Metering tip plugged. 2. Wrong metering tip. | 1. Remove and clean. 2. Check and replace per chart. |
| Chemical Injection System cont. | Chemical line blows off safety cap. | 1. Debris in injector. 2. Bad seat on injector valve. | 1. Using an airline or equal, blow small bursts of air into affected chemical line. Or remove electric box and clean injector. 2. Check injector o-ring or replace. |
| Chemical Injection System cont. | Water backflows into chemical bottle | 3. Injector installed backwards. | 3. Remove and reinstall correctly, arrow on injector should point towards pressure hose. |
| Dump System | Tank will not empty | 1. Dump hose plug not removed. 2. Drain hose plugged. 3. Dumping area to high for flow. | 1. Hold hose high and remove plug, lower and dump. 2. Raise and lower dump hose to agitate. If garden hose is available blow water back through line to remove blockage. 3. Dump into lower area. |
| Dump System | Dump hose leaks | 1. Hose cut. 2. Clamp loose. 3. Dump plug bushing missing. 4. Plug missing. | 1. If leak is lees than 4" from tank side, cut and reattach. Or replace. 2. Retighten hose clamp. 3. Replace bushing. 4. Replace plug. |
| Wheels and casters | Wheels won't roll or they rub | 1. Flat tires. 2. Debris wrapped around axle. 3. Bearings tight. 4. Wheels to loose on axle. 5. Bearing falling out. | 1. Inflate tires to 30 psi. 2. Check for debris on axle. 3. Grease bearings. 4. Remove wheel, add washers to take up slack. 5. Refer to remedy 4. |
| Squeegee Head | Floor streaks | 1. Worn blades or wheels. | 1. Replace wheels and or blades. |
| Squeegee Head | Squeegee head doesn't easily rotate when installed on wand | 1. Brass ring on wand not in grove. 2. Coupling nut to tight. | 1. Loosen coupling nut and re-position head on grove. 2. Loosen 1/2 turn. |
| Squeegee Head | Head wont stay on wand | 1. Coupling nut cracked. 2. Brass ring worn. | 1. Replace. 2. Replace. |
| Squeegee Head | Premature blade ware | 1. Squeegee wheels worn. | 1. Check wheels for wear/ replace. |
| Squeegee Head | Sucks to the floor to tightly | 1. Squeegee wheels worn. | 1. Check wheels for wear/ replace. |
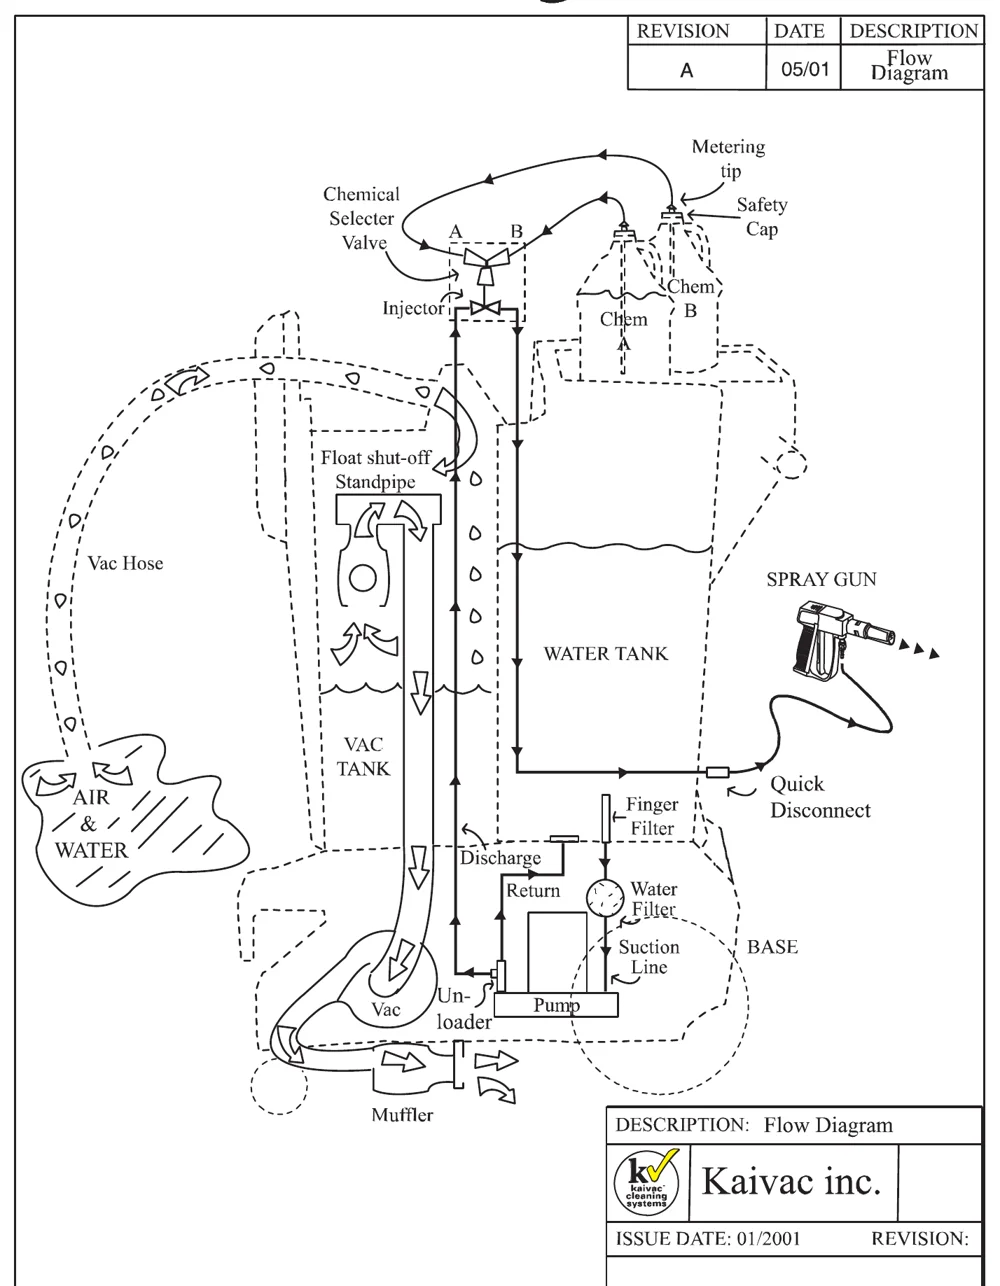
Flow Diagram
Electrical Diagram
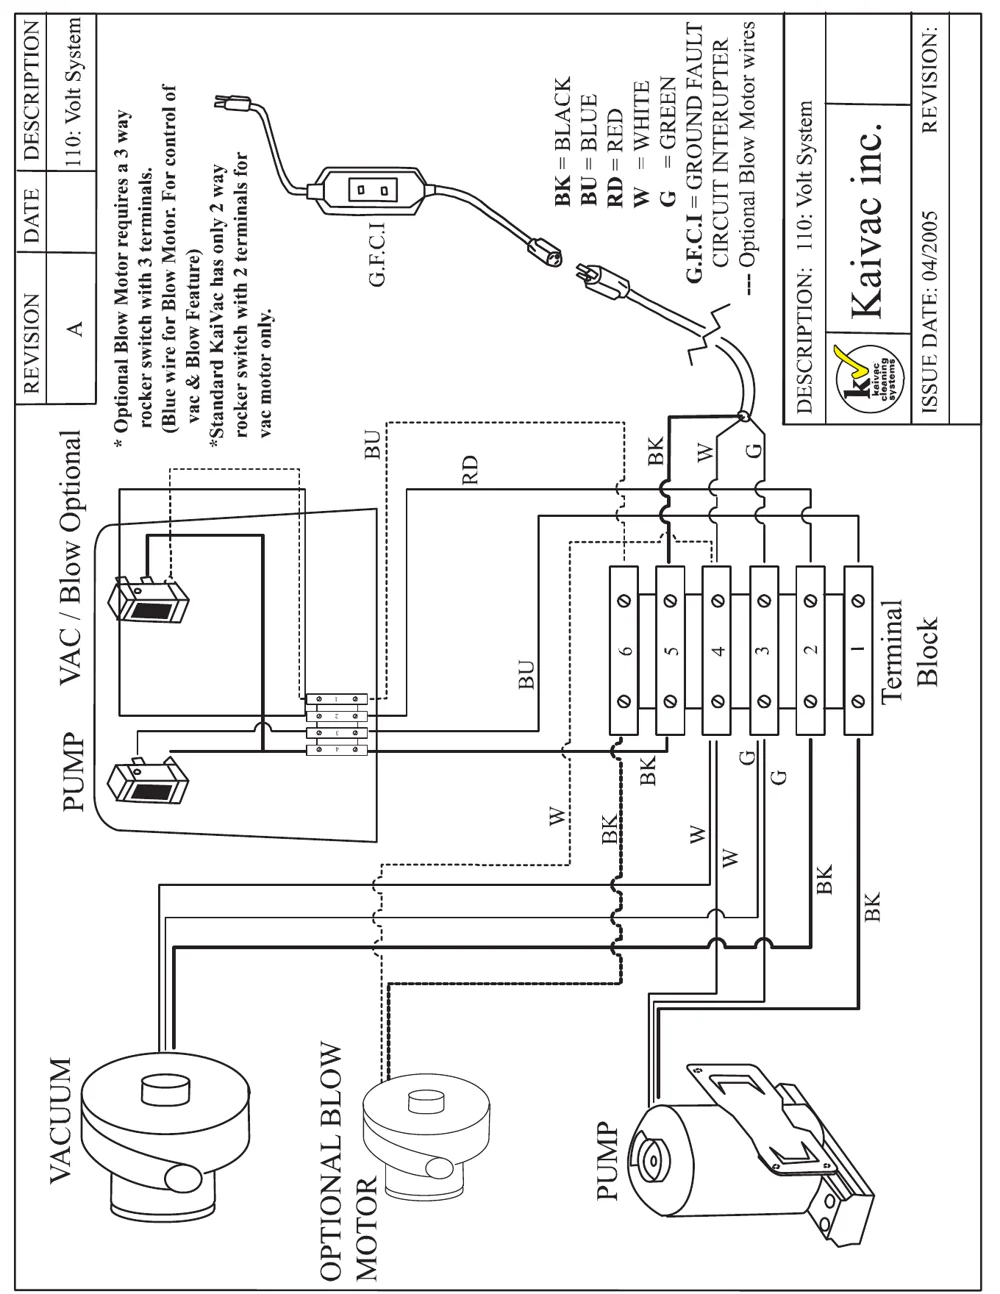
* Optional Blow Motor requires a 3 way rocker switch with 3 terminals. (Blue wire for Blow Motor. For control of vac & Blow Feature)
*Standard KaiVac has only 2 way rocker switch with 2 terminals for vac motor only.
BK = BLACK
BU = BLUE
RD = RED
W = WHITE
G = GREEN
G.F.C.I = GROUND FAULT CIRCUIT INTERUPTER
--- Optional Blow Motor wires
| REVISION | DATE | DESCRIPTION |
|---|---|---|
| A | 110: Volt System |
DESCRIPTION: 110: Volt System
ISSUE DATE: 04/2005
REVISION:
SECTION 2
External View
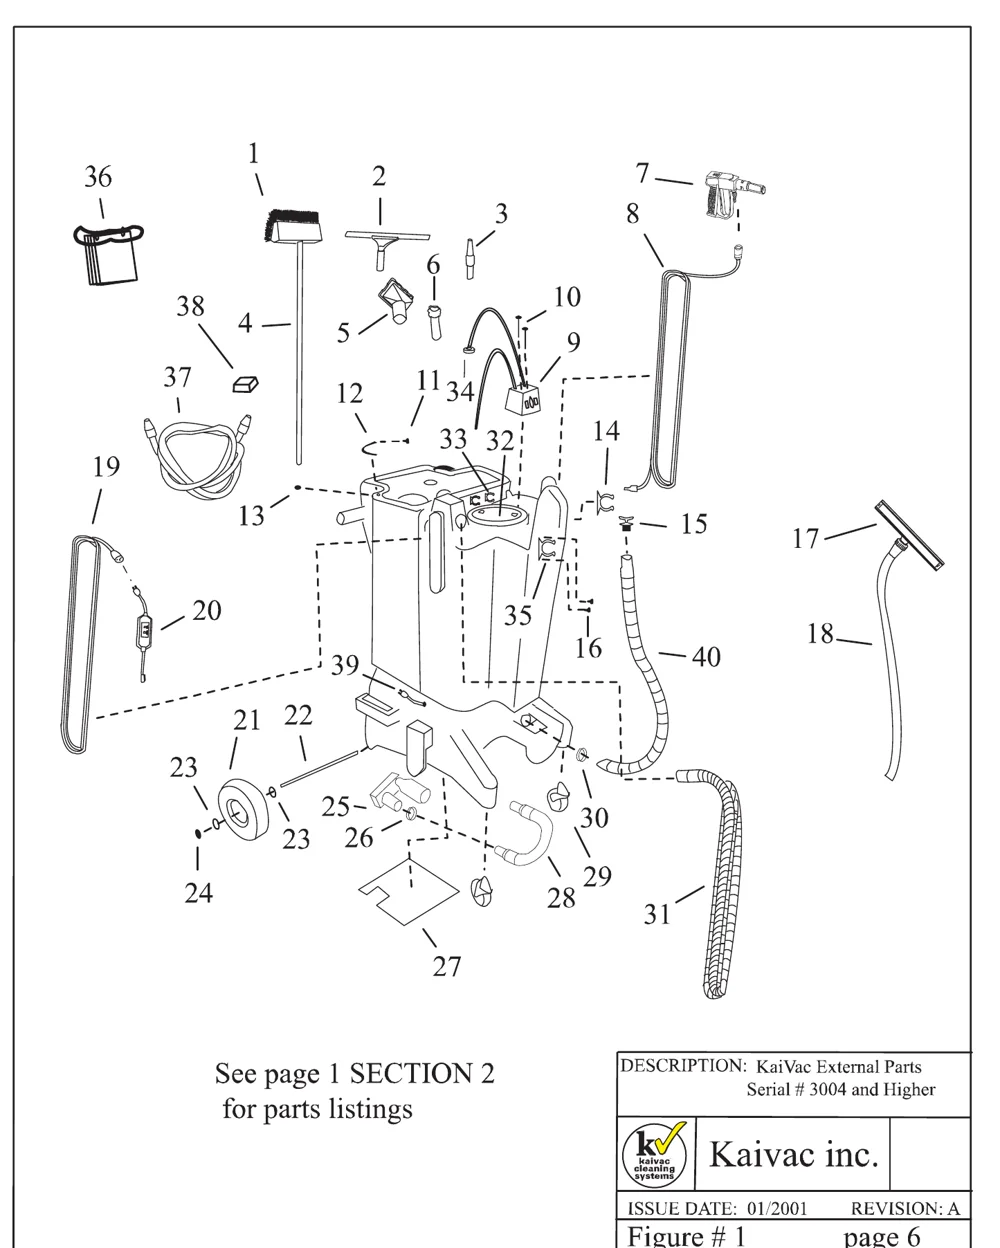
See page 1 SECTION 2 for parts listings
Internal View
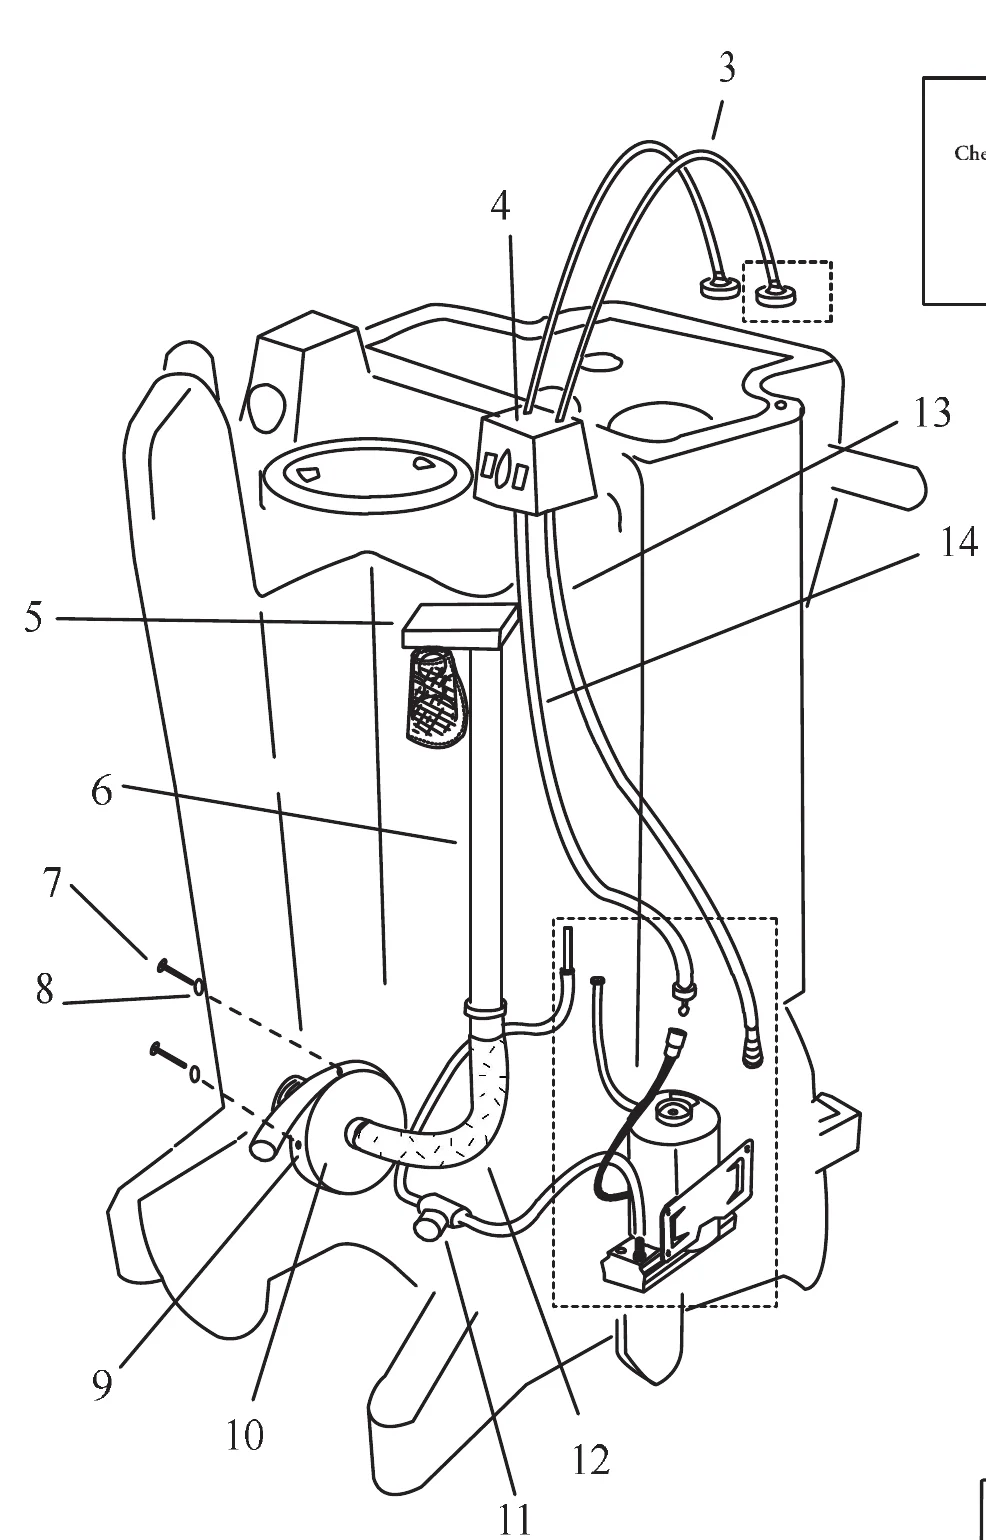
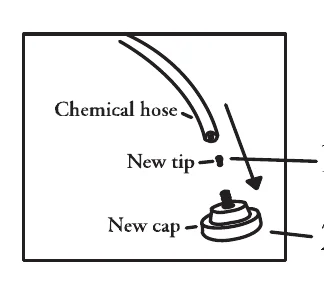
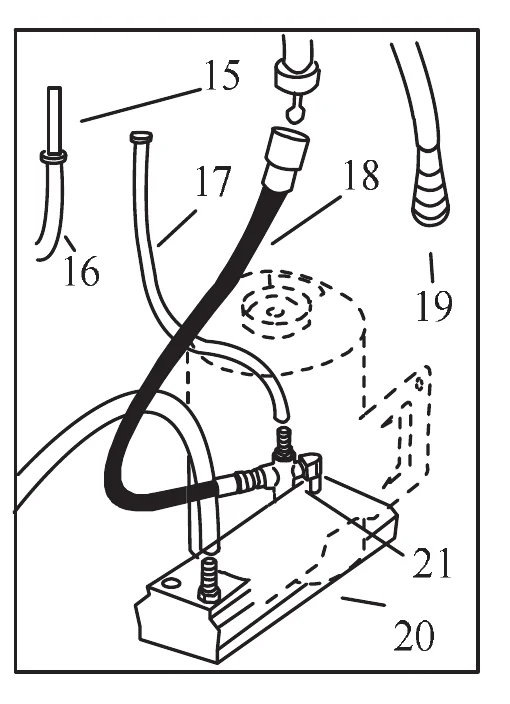
See page 2 SECTION 2 for parts listings
DESCRIPTION: KaiVac Internal Parts, Serial # 3004 and Higher
ISSUE DATE: 04/2005 REVISION: A
Figure # 2 page 7
Kaivac and KaiVac are trademarks of Kaivac, Inc. Southeastern Equipment & Supply is an independent dealer.