AUTO VAC OPERATOR & PARTS MANUAL
P/N: MANUALAV
www.kaivac.com
©2020 Kaivac, Inc. All rights reserved
Revision Sheet for MANUALAV
| Release No. | Date | Revision Description |
|---|---|---|
| 1 | 06/18/20 | Initial design/release of MANUALAV |
NOTE: Specifications and parts are subject to change without notice
Kaivac, Inc.
2680 Van Hook Ave.
Hamilton, OH 45015
Operator & Parts Manual - Table Of Contents
1.0 Getting Started
- 1.1 Product Identification ... 5
- 1.2 Warranty Registration ... 5
- 1.3 Limited Warranty Protection Plan ... 6
- 1.4 Safety Precautions: Corded Units Only ... 7
- 1.4 Safety Precautions: Corded (Continued) ... 8
- 1.5 Safety Precautions: Battery Operated Units Only ... 9
- 1.5 Safety Precautions: Battery Operated (Continued) ... 10
- 1.6 Battery Information ... 11
2.0 Assembly
- 2.1 Power Pack Assembly and Charging ... 12
- 2.2 Pad Replacement ... 12
3.0 Operation
- 3.1 Filling The Unit ... 13
- 3.2 Emptying Vacuum Tank ... 13
- 3.3 AutoVac Operation ... 14
- 3.4 Stretch Recycling ... 15
4.0 Maintenance
- 4.1 Daily Maintenance: Clean-out ... 16
- 4.2 Troubleshooting Tips ... 17
- 4.3 DC Quick Change Power Pack Electrical Wiring Diagram ... 18
- 4.4 AC Electrical Wiring Diagram ... 19
5.0 Parts Diagrams and Specifications
- 5.1 Handle Assembly Parts Diagram ... 20
- 5.2 Trolley-Bucket Assembly Parts Diagram ... 20
- 5.3 Vacuum Head Assembly Parts Diagram ... 21
- 5.4 Vacuum Tank Assembly Parts Diagram ... 21
- 5.5 AutoVac Assembly Parts Diagram ... 22
- 5.6 Quick Change Power Pack Assembly Diagram ... 22
1.1 Product Identification
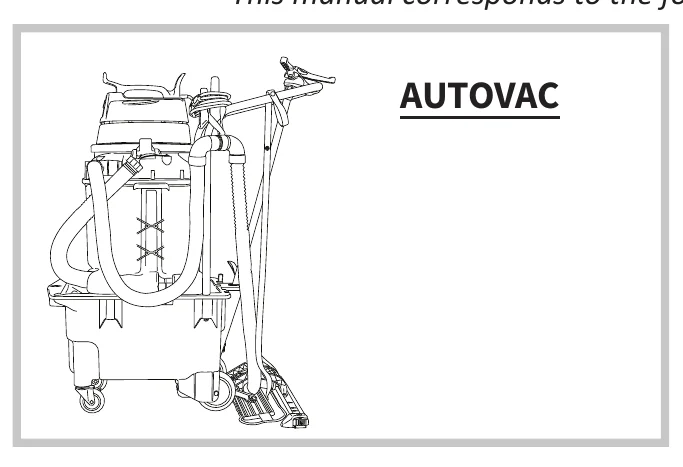
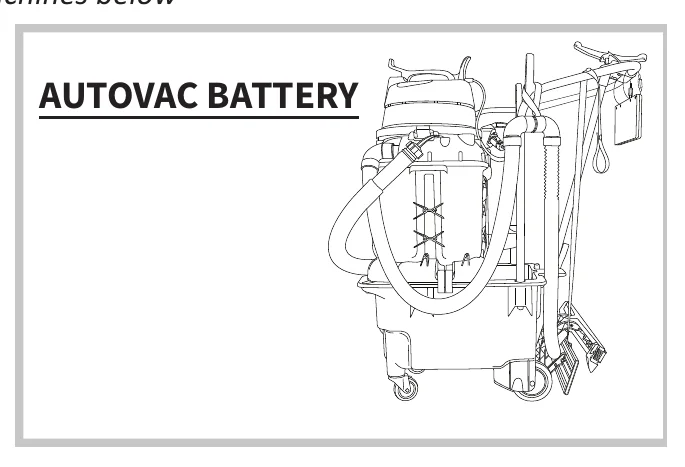
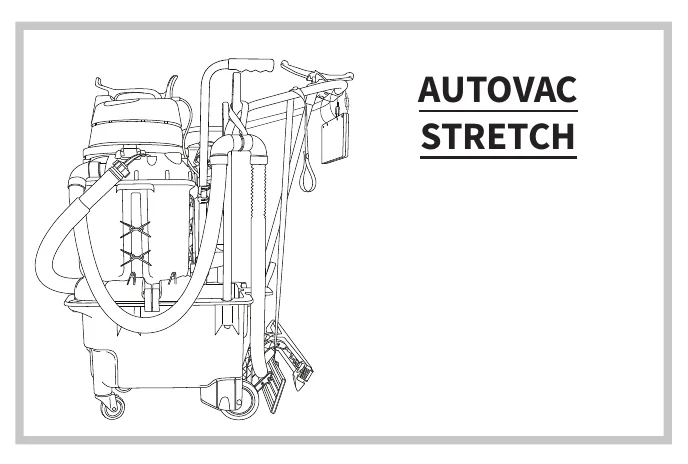
This manual corresponds to the following machines below
1.2 Warranty Registration
Thank you for purchasing a Kaivac product. Please take a few moments to register your product at kaivac.com/warranty.
Why register?
- Ensure your warranty coverage
- Simplify warranty service in the future with your information on file
- Be the first to know about upgrades, issues, new options and special offers.
1.3 Limited Warranty Protection Plan
5 YEAR TROLLEY/TANK AND 1 YEAR PARTS AND LABOR (EXCLUDING BATTERY) Kaivac warrants to the original purchaser/user that the vacuum tank and bucket body are free from defects in workmanship and materials under normal use for a period of Five Years, and the battery box body and components (excluding Lithium-ion battery), vacuum motor, and spray system are free from defects in workmanship and materials under normal use for a period of One Year. This warranty does not include accessories or wear items. Items EXCLUDED from coverage: Squeegee blades and wheels, hoses, seals, gaskets, cords, casters, HEPA filter cartridges, chemical feed caps, spray gun, GFCI, vacuum wand assembly and other accessory tools.
- Please Note: using inappropriate chemicals constitutes misuse of these machines. These machines are not meant to be used with high-foaming or corrosive chemicals. Please check with your distributor or with Kaivac if you have questions about your chemical.
Battery Program Details
- Battery Warranty covers 2 years on a defective Battery.
- Battery Warranty covers the replacement of the Battery unit.
- Battery replacement remains under Warranty only for the remaining Warranty period of the original Battery unit (for a maximum of 2 years from the date of purchase of the machine.
WARRANTY LIMITATIONS:
- This warranty does not assume responsibility for damage or faulty performance caused by misuse or abuse, or where repairs or modifications have been made or attempted. Kaivac will make the final determination on whether the damage falls under this limited warranty for manufacturer’s defects.
- The following actions constitute misuse or neglect of the battery that void the warranty of the battery:
- Any modifications to Kaivac equipment may nullify any warranty
- Improper installation of the OmniFlex battery box
- Exposure to temperatures above the battery limits
- Use of any charger besides the supplied OmniFlex charger
- Dropping the battery box
- Long term storage of the battery without maintaining a battery charge of 25 to 40% capacity
- Under no circumstances will Kaivac be liable for any loss, damage, expenses or consequential damages arising in connection with the use or inability to use Kaivac’s product. This warranty is in lieu of any other warranty expressed or implied, including any warranty of merchantability or fitness for a particular purpose.
1.4 Safety Precautions: Corded Units Only
IMPORTANT SAFETY INSTRUCTIONS — SAVE THESE INSTRUCTIONS
READ ALL INSTRUCTIONS BEFORE USING (THIS APPLIANCE)
When using an electrical appliance, basic precautions should always be followed, including the following:
- Turn off the unit before unplugging. Do not leave appliance when plugged in. Unplug from outlet when not in use and before servicing.
- Connect to a properly grounded outlet only. Do not remove ground pin. See Grounding Instructions below.
- Do not allow to be used as a toy. Close attention is necessary when used by or near children.
- Use only as described in this manual. Use only manufacturer’s recommended attachments.
- Inspect cord prior to use. Do not use with damaged cord or plug. If appliance is not working as it should, has been dropped, damaged, left outdoors or dropped into water, return it to a service center.
- Do not handle plug or appliance with wet hands.
- Do not pull or carry by cord, use cord as handle, close a door on cord, or pull cord around sharp edges or corners. Do not run appliance over cord. Keep cord away from heated surfaces.
- Do not unplug by pulling on cord. To unplug, grasp the plug, not the cord.
- Do not put any object into openings. Do not use with any opening blocked; keep free of dust, lint, hair, and anything that may reduce air flow.
- Keep hair, loose clothing, fingers, and all parts of body away from openings and moving parts. Turn off all controls before unplugging.
- Use extra care when cleaning on stairs.
- Do not use to pick up flammable or combustible liquids such as gasoline, or use in areas where they may be present.
- Do not pick up anything that is burning or smoking, such as cigarettes, matches or hot ashes.
- If using extension cord with appliance, make sure the connection is above the floor and away from exposure to liquid.
- Keep all connections dry and off the ground.
- To reduce the risk of injury, close supervision is necessary when a product is used near children.
- Stay alert - watch what you are doing.
- Keep operating area clear of all persons.
- The Kaivac shall be disconnected from mains during cleaning or maintenance and when replacing parts or converting the machine to another function.
- Turn off all controls before unplugging.
- DO NOT overreach or stand on unstable support. Keep good footing and balance at all times.
- DO NOT operate without the float installed. If float is removed, reinstall by screwing back into place.
- Keep the cord away from heated surfaces.
- DO NOT leave appliance when plugged in. Unplug from outlet when not in use and before servicing.
- To Reduce The Risk Of Electric Shock - Do not expose to rain. Store indoors.
- DO NOT use without dust bag and/or filters in place.
- Personal Protective Equipment (PPE): It is recommended to wear proper personal protective equipment as required by the chemical product label instructions used in conjunction with the appliance.
- This product comes with a grounded attachable extension cord. If damaged, replace with equivalent cord. This cord must be attached and mechanically secured using the provided cord connector to use the equipment.
- WARNING — Improper connection of the equipment-grounding conductor can result in a risk of electric shock. Check with a qualified electrician or service person if you are in doubt as to whether the outlet is properly grounded. Do not modify the plug provided with the appliance – if it will not fit the outlet; have a proper outlet installed by a qualified electrician.
- DO NOT operate the product when fatigued or under the influence of alcohol or drugs.
- Know how to stop the product and bleed pressures quickly. Be thoroughly familiar with the controls.
- Follow the maintenance instructions specified in the manual.
1.4 Safety Precautions: Corded (Continued)
SPRAY SYSTEM WARNINGS (ONLY):
- Do not spray liquid from the Kaivac onto electrical outlets or any electrical devices.
- Risk of injection or injury to persons - do not direct discharge stream at persons.
- INJECTION HAZARD: Equipment can cause serious injury if the spray permeates the skin. do not point the gun at anyone or any part of the body. In case of permeation, seek medical aid immediately.
- This system is capable of producing 500 PSI (3447 kPa). To avoid rupture and injury, do not operate this pump with components rated less than 500 PSI (3447 kPa) working pressure (including but not limited to spray guns, hose, and hose connections); and before servicing, cleaning or removal of any part, shut off power and relieve pressure.
- High pressure cleaners shall not be used by children, persons with reduced physical, sensory or mental capabilities or lack of experience and knowledge or untrained personnel. Children shall not play with the appliance. Cleaning and user maintenance shall not be made by children without supervision.
- This product may also have been provided with a ground fault circuit interrupter built into the power cord. If replacement of the plug or cord is needed, use only identical replacement parts.
- Test the ground fault circuit interrupter (GFCI) before each use.
GROUND FAULT CIRCUIT INTERRUPTER PROTECTION (for spray systems only)
This machine was supplied with a ground-fault circuit-interrupter(GFCI) built into the plug of the power-supply cord. This device provides additional protection from the risk of electric shock. Should replacement of the plug or cord become necessary, use only identical replacement parts that include GFCI protection.
This appliance is for use on a nominal circuit and has a grounding attachment plug. Make sure that the appliance is connected to an outlet having the same configuration as the plug. No adapter should be used with this appliance.
GROUNDING INSTRUCTIONS
This product must be grounded. If it should malfunction or breakdown, grounding provides a path of least resistance for electric current to reduce the risk of electric shock. This product is equipped with a cord having an equipment-grounding conductor and a grounding plug. The plug must be plugged into an appropriate outlet that is properly installed and grounded in accordance with all local DOE and ordinances.
FOR INDOOR USE ONLY
INTENDED FOR COMMERCIAL USE
1.5 Safety Precautions: Battery Operated Units Only
Batteries and chargers: make sure your charger is compatible with your batteries, and set its charging algorithm to your battery pack before you use it.
IMPORTANT SAFETY INSTRUCTIONS — SAVE THESE INSTRUCTIONS
READ ALL INSTRUCTIONS BEFORE USING (THIS APPLIANCE)
When using an electrical appliance, basic precautions should always be followed, including the following:
- Battery Box Securing Straps MUST be secured around handle and attached from Vacuum prior to use. Failure to do so can result in product damage.
- ONLY USE with Kaivac, Inc. battery, OBATT series, and charger, CHARG36V series.
- When charging, make sure charger has at least 6 inches of clearance on all sides for adequate air flow.
- DO NOT charge batteries outdoors.
- DO NOT attempt to repair, service or modify the batteries or charger. Contact Kaivac Technical Support with any issues.
- DO NOT short-circuit the battery or charger terminals with conductive items such as paper clips. This can deliver high current, resulting in heat and fire.
- Keep sparks and flames away from batteries.
- DO NOT crush, drop, incinerate or damage the Battery Box. Do NOT use a Battery Box that has been damaged in any way. DO NOT incinerate the battery even if it is non-working or severely damaged. The battery can explode in a fire.
- DO NOT expose a Battery pack or appliance to fire or excessive temperature. Exposure to fire or temperature above 265ºF (130ºC) may cause explosion.
- DO NOT use or store the OmniFlex System or Battery Box in wet or moist conditions, or near flammable or combustible materials.
- DO NOT charge or store Battery Box for extended time (1 month or more) in temperatures below 40ºF (4ºC).
- If fumes smelled from battery, discontinue use immediately, place inside a metal canister in a well-ventilated area.
- Prevent unintentional starting. Ensure the switch is in the off-position before connecting to battery pack, picking up or carrying the appliance. Carrying the appliance with your finger on the switch, or energizing an appliance that has the switch on invites accidents.
- Disconnect the battery pack from the appliance before making any adjustments, changing accessories, or storing appliance. Such preventive safety measures reduce the risk of starting the appliance accidentally.
- When battery pack is not in use, keep it away from other metal objects like paper clips, coins, keys, nails, screws or other small metal objects that can make a connection from one terminal to another. Shorting the battery terminals together may cause burns or a fire.
- Under abusive conditions, liquid may be ejected from the battery; avoid contact. If contact accidentally occurs, flush with water. If liquid contacts eyes, additionally seek medical help. Liquid ejected from the battery may cause irritation or burns.
- Do not use a battery pack or appliance that is damaged or modified. Damaged or modified batteries may exhibit unpredictable behavior resulting in fire, explosion or risk of injury.
Charger/Electrical Warnings:
- For commercial or residential use.
- Connect charging cord to a properly grounded outlet only. See Grounding Instructions.
- DO NOT plug in Charger while Vacuum Head is in ON position. It may damage the system.
- Follow all charging instructions and do not charge the battery pack or appliance outside of the temperature range specified in the instructions. Charging improperly or at temperatures outside of the specified range may damage the battery and increase the risk of fire.
- DO NOT leave charger plugged in when not in use.
- DO NOT operate charger if it has received a sharp blow, been dropped, or damaged in any way.
- DO NOT use charger if it has a damaged cord or plug. DO NOT carry charger by cord.
- DO NOT pull on charger cord to unplug. Grasp and pull the plug, not the cord.
- DO NOT handle charger, including charger plug and charger terminals, with wet hands while charger is plugged in or while inserting plug into electrical outlet.
Vacuum and operation warnings:
- NO COMBUSTIBLES! Sparks inside the motor can ignite flammable vapors or dust. Do not use near combustible liquids and gases, or to pick up explosive dusts or gasoline. Do not pick up anything that is burning or smoking such as cigarettes or hot ashes.
- DO NOT plug Battery in while Vacuum Motor is in ON position. It may damage the system.
1.5 Safety Precautions: Battery Operated (Continued)
- CHECK FLOAT on Vacuum Motor and clean before each use. Clogged screen may lead to loss of suction.
- DO NOT allow to be used as a toy. Close attention is necessary when used by or near children.
- Use only as described in this manual. Use only manufacturer’s recommended attachments.
- DO NOT put any object into openings. Do not use with any opening blocked; keep free of dust, lint, hair and anything that may reduce air flow.
- Keep hair, loose clothing, fingers, and all parts of body away from openings and moving parts.
- Use extra care when cleaning on stairs.
- DO NOT use without Vacuum Motor Float Cage in place.
SPRAY SYSTEM WARNINGS (ONLY):
- Do not spray liquid from the Kaivac onto electrical outlets or any electrical devices.
- Risk of injection or injury to persons - do not direct discharge stream at persons.
- INJECTION HAZARD: Equipment can cause serious injury if the spray permeates the skin. Do not point the gun at anyone or any part of the body. In case of permeation, seek medical aid immediately.
- This system is capable of producing 500 PSI (3447 kPa). To avoid rupture and injury, do not operate this pump with components rated less than 500 PSI (3447 kPa) working pressure (including but not limited to spray guns, hose, and hose connections); and before servicing, cleaning or removal of any part, shut off power and relieve pressure.
- High pressure cleaners shall not be used by children, persons with reduced physical, sensory or mental capabilities or lack of experience and knowledge or untrained personnel. Children shall not play with the appliance. Cleaning and user maintenance shall not be made by children without supervision.
This product comes with a grounded attachable extension cord. If damaged, replace with equivalent cord rated 120V, 15 amps, 3-wire, 14 GA. This cord must be attached and mechanically secured using the provided cord connector to use the equipment.
QUICK RELEASE INSTRUCTIONS
- To disconnect the motor from the Battery Pack, pull the button on the electrical connector toward you and turn the electrical connector counter-clockwise 90 degrees to disengage the motor electrical cord from the Battery Pack.
- Then to remove the Battery Pack from the OmniFlex unit, detach the straps which wrap around the metal handle. Then while standing at the rear of the OmniFlex, grab the Battery Pack on either side and pull it away from the OmniFlex unit.
- To reconnect the Battery Pack to the electrical motor, insert the motor electrical connector into the Battery Pack outlet aligning the key features of the electrical connector into the outlet key-way. Press the connector into the outlet and turn clockwise 90 degrees until the connector locks into place.
GROUNDING INSTRUCTIONS
Batteries and chargers: make sure your charger is compatible with your batteries, and set its charging algorithm to your battery pack before you use it.
The charger must be grounded. If it should malfunction or breakdown, grounding provides a path of least resistance for electric current to reduce the risk of electric shock. This appliance is equipped with a cord having equipment grounding conductor and grounding plug. The plug must be inserted into an appropriate outlet that is properly installed and grounded in accordance with all local codes and ordinances.
This appliance is for use on a nominal circuit and has a grounding attachment plug. Make sure that the appliance is connected to an outlet having the same configuration as the plug. No adapter should be used with this appliance.
Personal Protective Equipment (PPE): It is recommended to wear proper personal protective equipment as required by the Chemical product label instructions used in conjunction with the appliance.
1.6 Battery Information
Batteries and chargers: make sure your charger is compatible with your batteries, and set its charging algorithm to your battery pack before you use it.
Keep Batteries at Room Temperature: That means storing between 32 and 80 degrees F (0ºC to 27ºC). The worst thing that can happen to a lithium-ion Battery is to have it exposed to elevated temperatures.
Batteries Lose Capacity Over Time: Batteries naturally deteriorate over time whether being used or not. Batteries deteriorate at a rate of 10% run time per year.
Fully Discharge vs. Partial Discharge and the Effect on Battery Cycles: Unlike lead acid batteries typically used in auto scrubber, the Kaivac Battery is not damaged by fully discharging. The BMS (Battery Management System) has a cutoff voltage of 30V which protects the Battery from experiencing full discharge. Running the Battery to full discharge will reduce the amount of charge cycles. The expected hours of use are approximately 600 hours. For example, if running to full discharge, you would expect 400 cycles. If you run to 80% discharge, then you would expect to get more cycles (500 cycles).
Extended Storage: It is recommended to discharge to 40% capacity (35V) and store in a cool location (between 32ºF to 80ºF or 0ºC to 27ºC). Hour
Battery Gauge: The Kaivac Batteries come with a built-in Battery Gauge or “Fuel Gauge” which shows the approximate run time remaining.
Disposal: Properly dispose of Battery at a local recycling location.
| Battery Specifications | |
|---|---|
| Weight | With Box, 11 lbs. (4,9 kg) |
| Body Material | Injection Mold Polypropylene |
| Dimensions (H x W x D) | 18 x 7 x 5 in. (45,7 x 17,8 x 12,7 cm) |
| Voltage | 36V DC |
| Battery Capacity | 15 A-hr |
| Battery Current | 15 A DC |
| Battery Type | Lithium-Ion |
| Approx. Run Time BOL (Beginning of Life) | 60 minutes |
| Approx. Run Time EOL (End of Life) | 35 minutes (discontinue use and take to recycling center) |
| Battery Box Receptacle | IP65 / IP67 (not required for UL) |
| Run Time Hour Meter | Acts as “odometer for battery” and runs only when motor switch is ON |
| Approx. Charge Cycles | 400 @ 100% discharge / 500 @ 80% discharge |
| Cut off Voltage (fully discharged) | 30V |
| Charger Specifications | |
| Approx. Charge Time | 5.5 hours |
| Charger Amps | 4 Amps |
| Charge Voltage | 42V DC |
| Charger Voltage | 110-240VAC / 36VDC (240VAC version only needs correct plug for wall outlet) |
| Charging Robustness | No special instructions |
| Battery Charge Memory | None |
| Battery Charge Gauge | Yes, LED Indicator |
| Approx. Charge Cycles | 400 @ 100% discharge / 500 @ 80% discharge |
| Storage/Inventory: | |
| Storage & Operation Ambient Temp | 32ºF (0ºC) to 80ºF(27ºC) |
| Storage & Shipping Charge | 40-60% Charge (35-38VDC) |
2.1 Power Pack Assembly and Charging
Batteries and chargers: make sure your charger is compatible with your batteries, and set its charging algorithm to your battery pack before you use it.
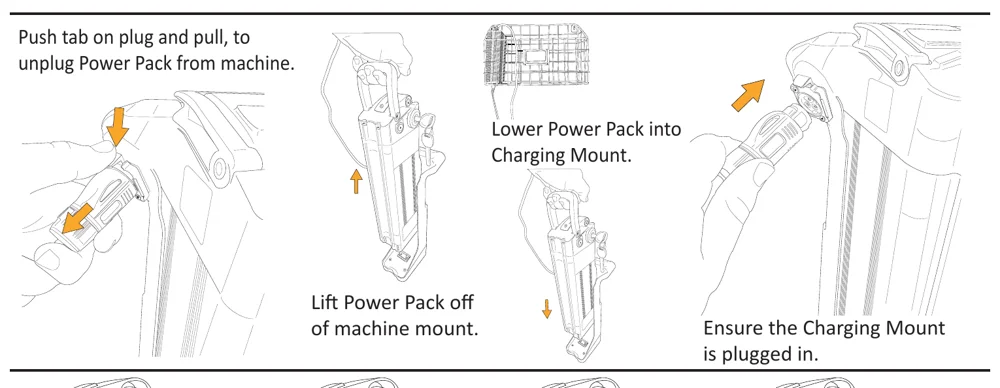
Push tab on plug and pull, to unplug Power Pack from machine.
Lift Power Pack off of machine mount.
Lower Power Pack into Charging Mount.
Ensure the Charging Mount is plugged in.
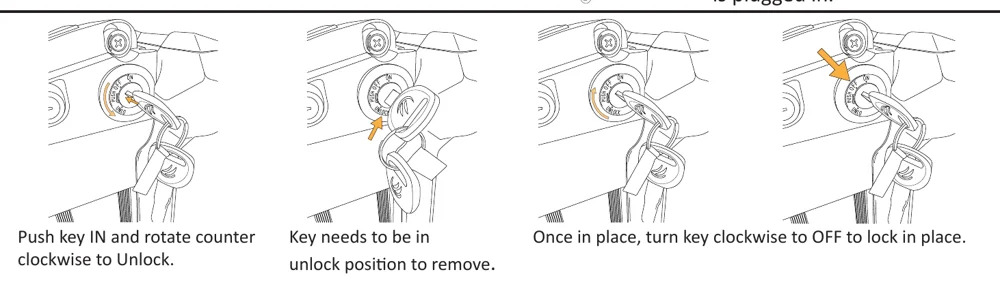
Push key IN and rotate counter clockwise to Unlock.
Key needs to be in unlock position to remove.
Once in place, turn key clockwise to OFF to lock in place.
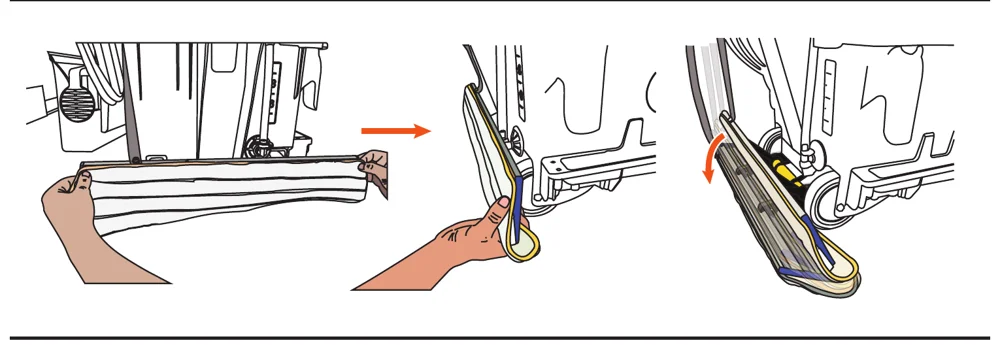
2.2 Pad Replacement
3.1 Filling The Unit
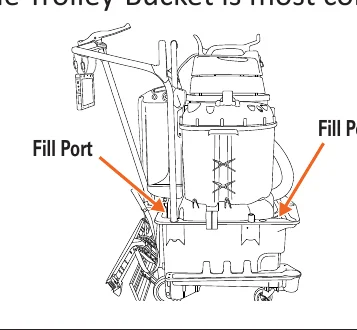
There are multiple Fill Ports available to fill the Bucket with a hose or other source. The Fill Port at the rear of the Trolley-Bucket is most convenient to access when using Chemical packets or Jugs.
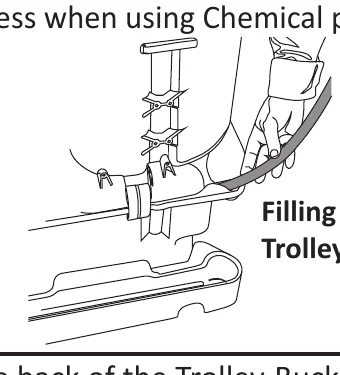
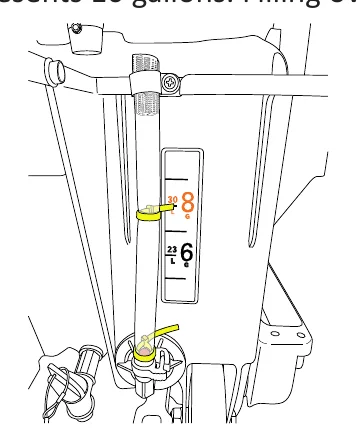
Note the location of the Sight Gauge on the back of the Trolley-Bucket.
The Trolley-Bucket has a label with graduated markings. Gallon markings are displayed for 5 to 9 gallons. For lesser quantity needs, the bottom of the label represents 4 gallons. For higher volume needs, the top of the label represents 10 gallons. Filling over 10 gallons is not recommended.
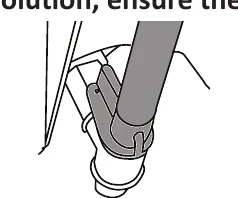
Fill the tank with Kaivac or Kaivac approved Chemicals. Follow the proper dilution instructions on bottles or dispenser. For accuracy and convenience, use Kaivac proportioned chemical packets. Do not add chemical to Trolley-Bucket if using Pump Box set-up.
TIP: IF A CHEMICAL IS BEING USED, USE ONLY THE RECOMMENDED DILUTION.
3.2 Emptying Vacuum Tank
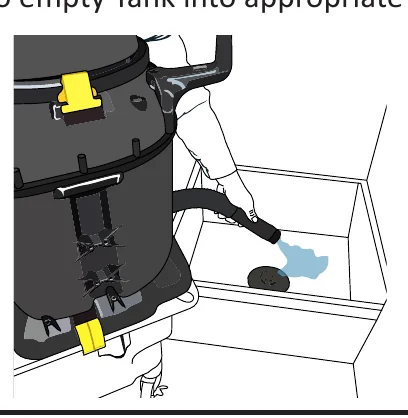
If the Vacuum Motor shuts off before the job is complete, the Vacuum Tank may be full and need to be emptied. Lift the Vacuum Motor to check liquid level inside the Vacuum Tank. If unit is full or your job is complete, follow the instructions below to empty Tank into appropriate sink/drain.
To begin the dumping process, you must first press down on the Cap and turn counter-clockwise
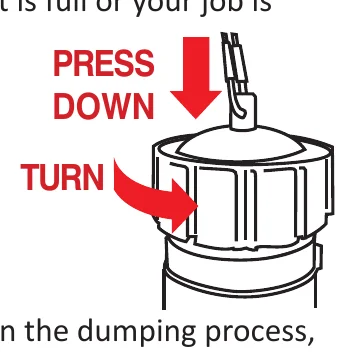
Once cap is removed, lower Dump Hose into appropriate sink/drain. To prevent an accidental spill or overflow from the Dump Hose, be careful to keep hose end upright until it is over sink/drain.
3.3 AutoVac Operation
The AutoVac feature is a walk-behind system for high speed cleaning of hard surface areas. It cleans as well and as fast as a walk-behind or ride-on auto scrubber at a fraction of the cost.
After the unit has been filled with the appropriate amount of water/solution, ensure that the AutoVac Connector on the side of the cart is connected in place.
Lower the Microfiber Pad and Wide-area Squeegee Head by lifting the left Strap on the rear handle to unsnap it, and lower the pad and Squeegee Head.
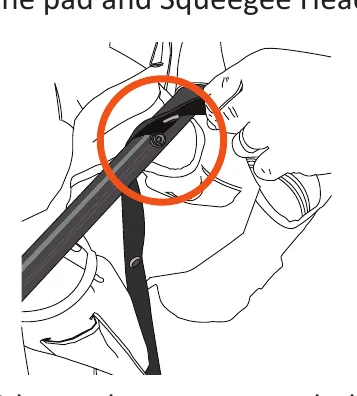
Reattach with next button snap to hold the Strap in place.
To begin cleaning floor area with AutoVac:
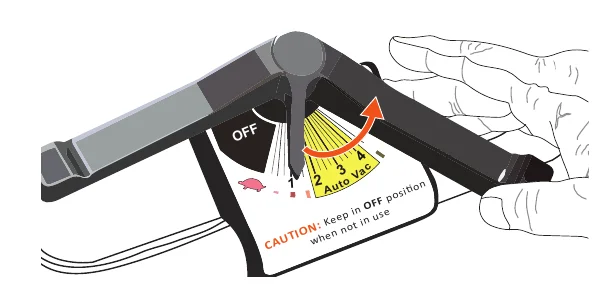
Use Thumb Throttle to dispense solution through the Spigot. Turn dial on Thumb Throttle to number that corresponds to your applicable floor type.
Walk back and forth across the area to be cleaned, using a three point turn approach when reaching turns, as detailed below.
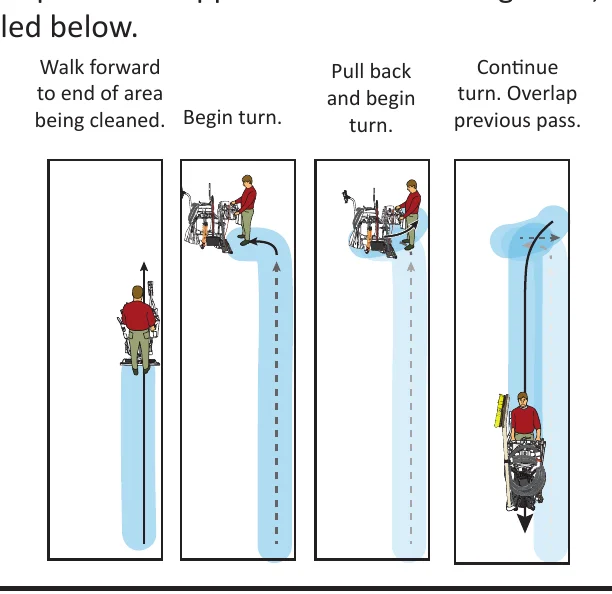
Once complete, lift the left Strap to raise the Spreader Pad and Squeegee Head and snap into place.
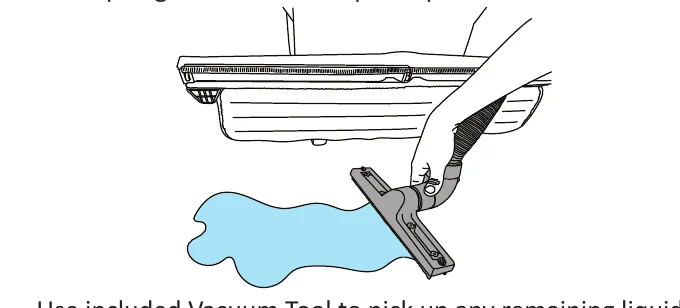
Use included Vacuum Tool to pick up any remaining liquids or drips on the floor.
3.4 STRETCH RECYCLING *If applicable
To make use of the Stretch process: After you have fully emptied the trolley bucket of solution, you can then reuse the recovered solution to extend (or STRETCH) the AutoVac process by turning the handle mounted on the Vacuum Tank to the right (as displayed below) and dispensing the recovered solution back into the Trolley Bucket.
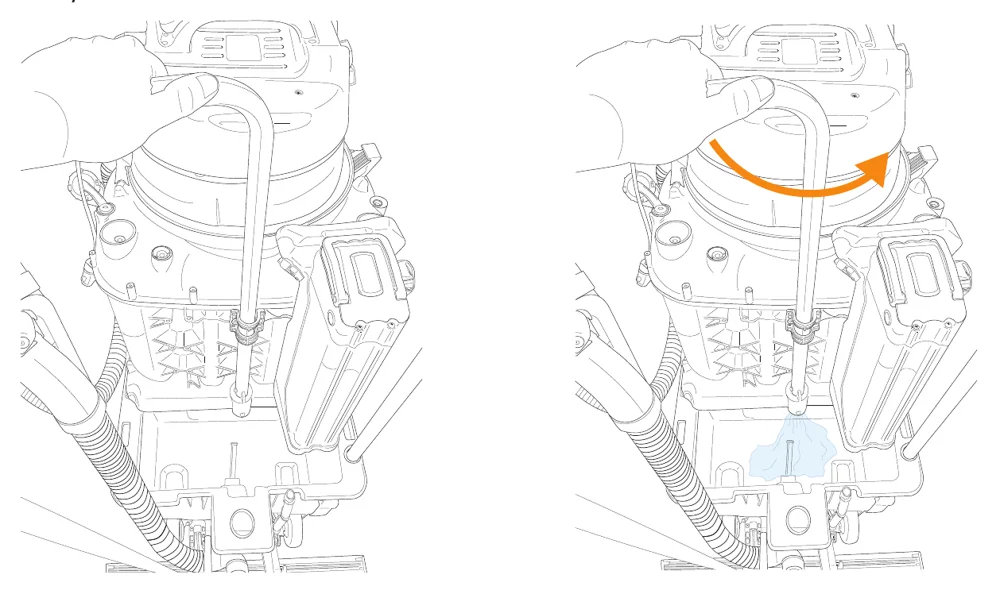
Once all the solution from the Tank has been dumped into the Trolley Bucket, you may then continue your AutoVac process, just as before.
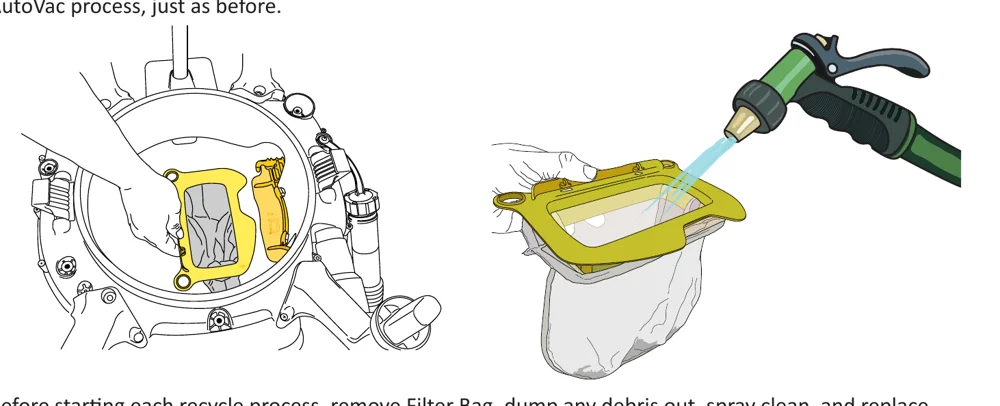
Before starting each recycle process, remove Filter Bag, dump any debris out, spray clean, and replace.
4.1 Daily Maintenance: Clean-out
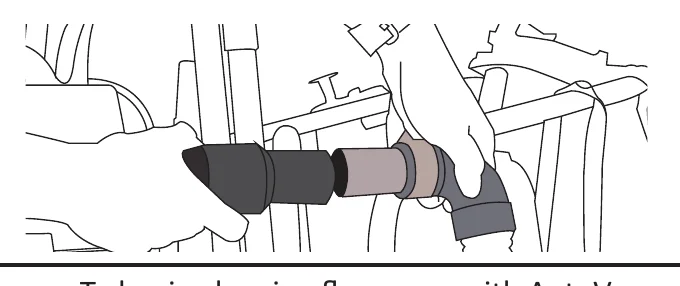
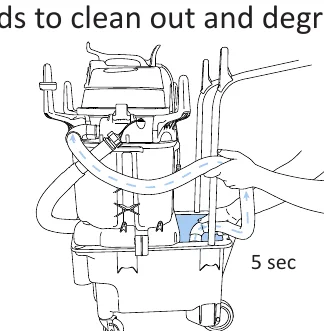
When work is complete, vacuum excess cleaning solution from the bucket for 5 seconds to clean out and degrease the Vacuum Hose.
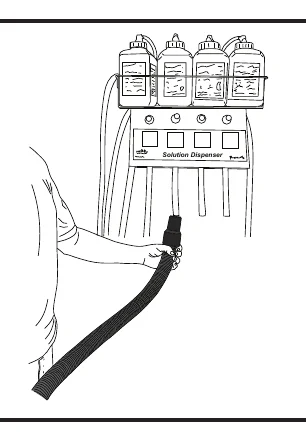
Alternatively, you can also turn Vacuum on and dispense solution into Vacuum Hose as shown to clean Hose and Tank.
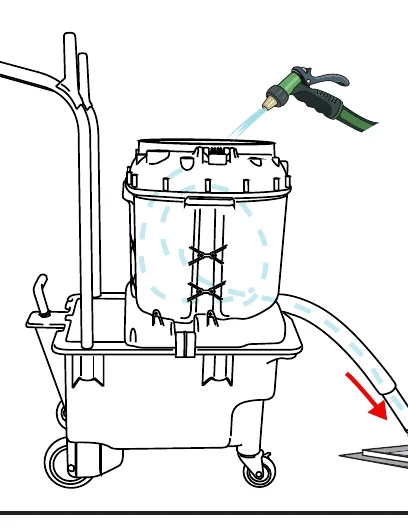
Rinse Vacuum Tank thoroughly at clean-up sink, preferably with hot water.
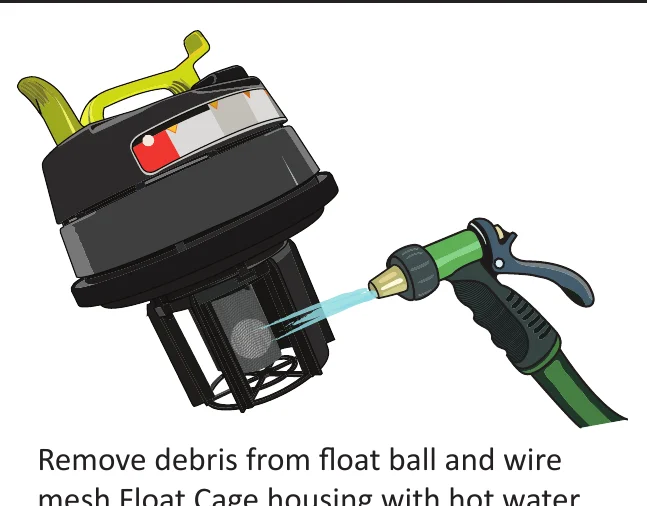
Remove debris from float ball and wire mesh Float Cage housing with hot water.
Scrub debris from Spreader Pad with broom.
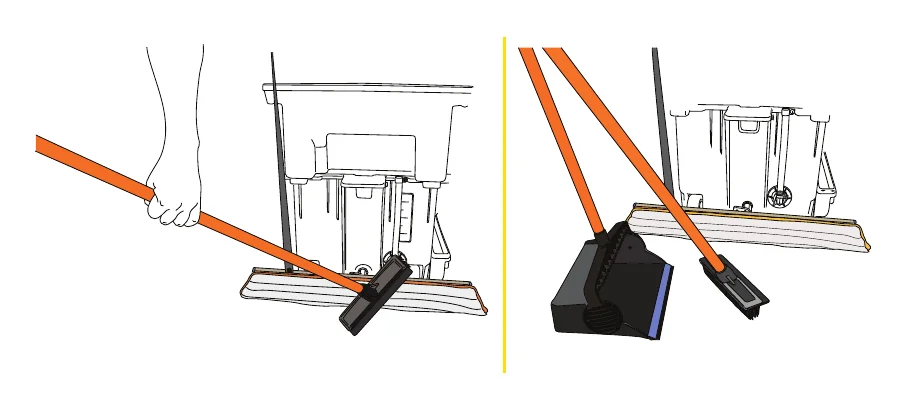
Sweep debris. Vacuum if necessary.
4.2 Troubleshooting Tips
Poor Vacuum Pickup
- Check Squeegee Blades. If blades are worn or damaged, replace Squeegee Head.
- Clean Float Cage.
- Check for leaks in the Vacuum Hose or Gasket.
- Check for clogged Vacuum Hose.
- For battery units, charge may be too low for heavy soils.
- Check to see if float ball was tripped.
Vacuum Shuts Off Prematurely
- Check Float Cage; clean if dirty
- Cleaning Chemicals may be producing too much foam. Use correct Chemicals.
- Battery may need recharged or replaced.
Other Issues? Contact Technical Support
Phone:
United States and Canada: 1-800-287-1136
International: 1-513-887-4600
Email:
For Technical Support Contact Form go to: https://www.kaivac.com/contactus.php and choose Technical Support tab.
4.3 DC Quick Change Power Pack Electrical Diagram
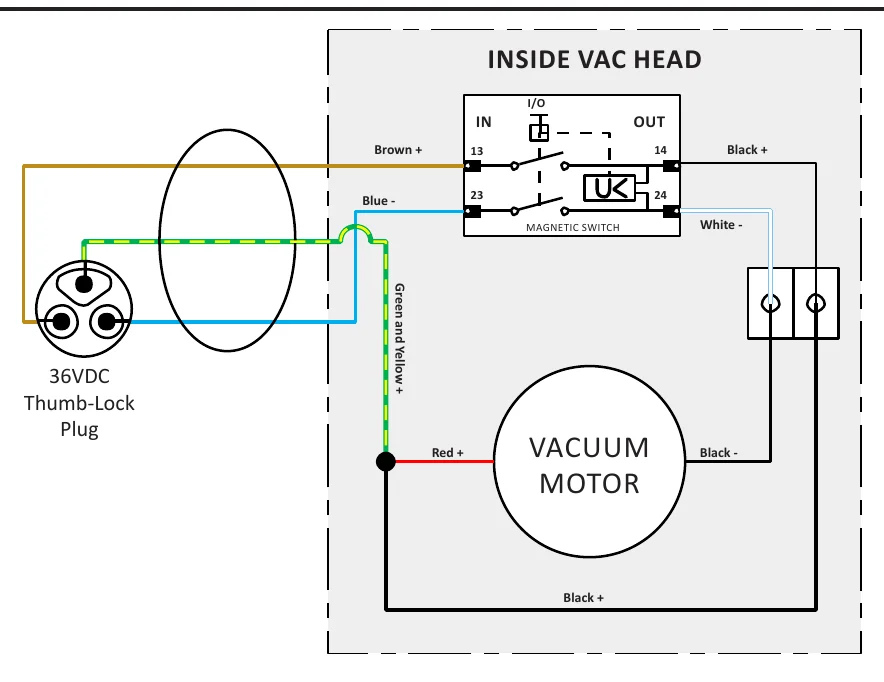
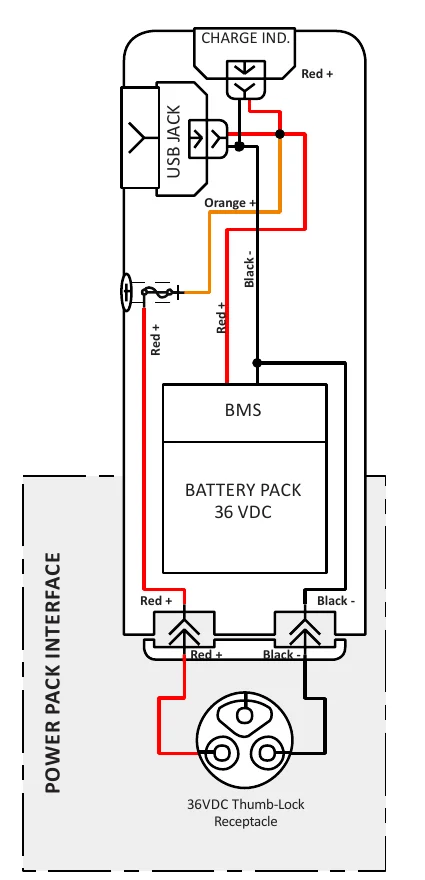
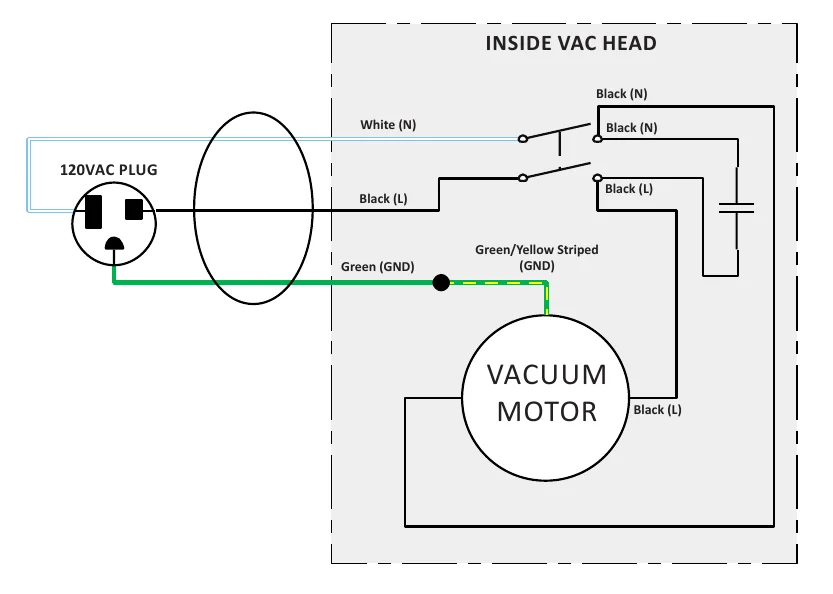
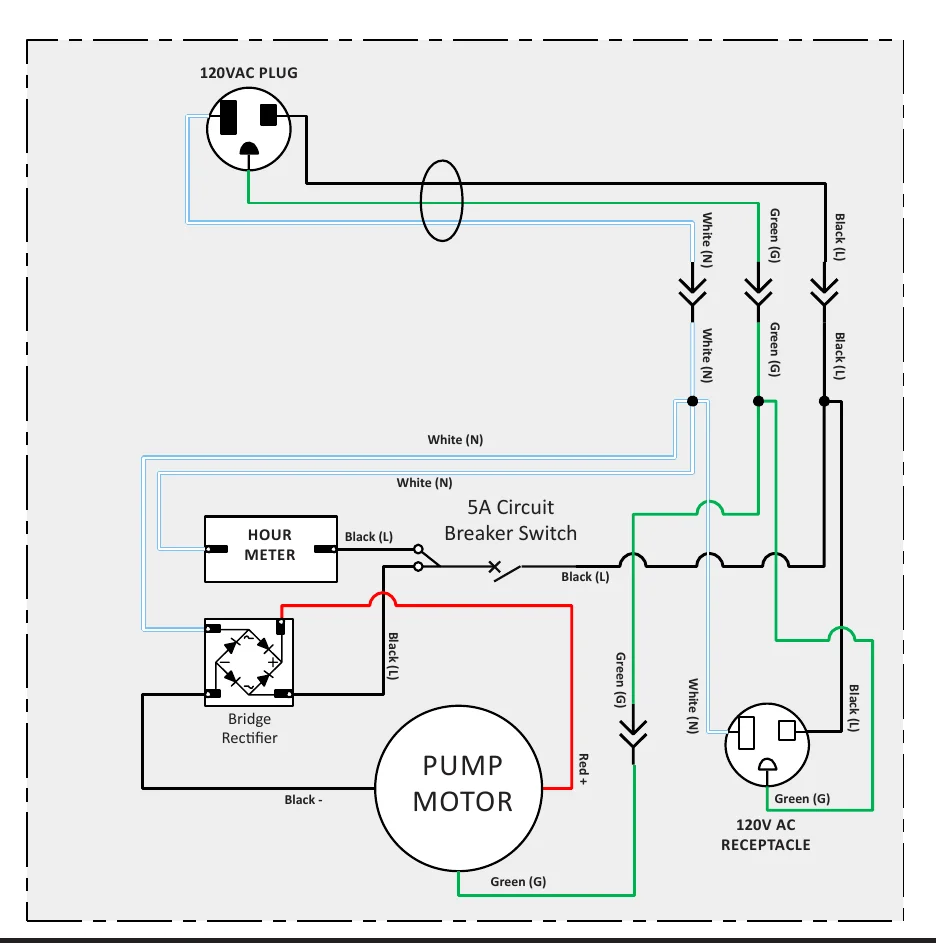
4.4 AC Electrical Diagram
5.0 Parts Diagrams and Specifications
5.1 Handle Assembly Parts Diagram
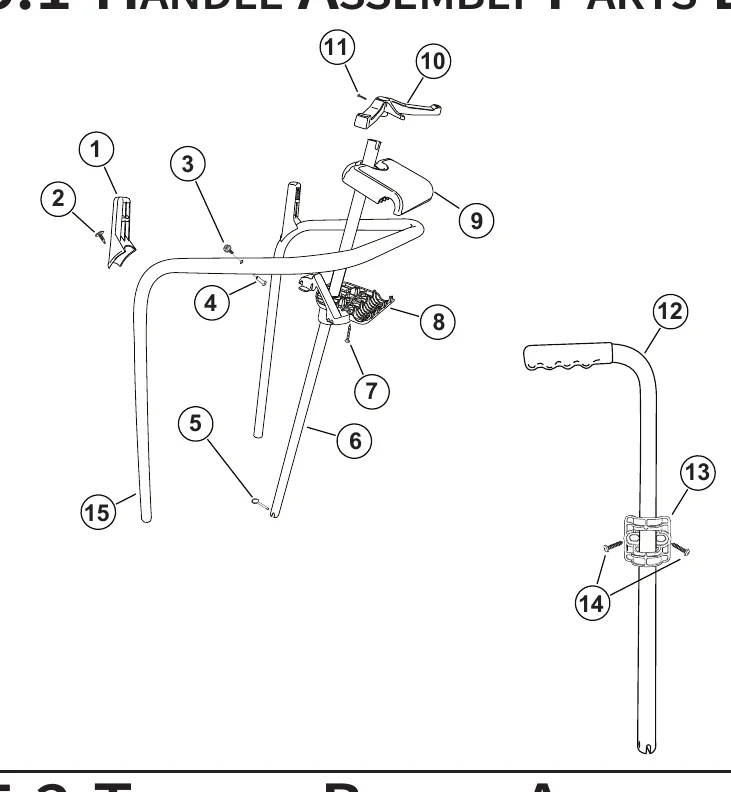
[P/N: OFUHA]
| # | PART NO. | PART DESCRIPTION |
|---|---|---|
| 1 | STOB | PLASTIC HANDLE POST |
| 2 | CSS208 | HANDLE POST HARDWARE |
| 3 | CSS147 | MALE SNAP 18-8 SS 8-32 X 1/2 |
| 4 | CSS335 | 8-32 FEMALE BINDING POST |
| 5 | CSS338 | 1/4 IN X 1-1/2 IN DETENT RING PIN |
| 6 | EXTROD | OMNIFLEX THUMB THROTTLE EXTENSION ROD |
| 7 | CSS329 | 1/4 X 10 X 1 PLASTITE ZINC PAN TORX 30 |
| 8 | OTTPLATL | OMNIFLEX THUMB THROTTLE LOWER PLATFORM |
| 9 | OTTPLAT | OMNIFLEX THUMB THROTTLE PLATFORM |
| 10 | OTT | OMNIFLEX THUMB THROTTLE |
| 11 | CSS332 | 8 SST SCREW 7/8 |
| 12 | PCSH | POWDER COATED SPIGOT HANDLE |
| 13 | OVTSHB | OMNIFLEX VAC TANK SPIGOT HANDLE BRACKET |
| 14 | CSS329 | 1/4-10 X 1 PLASTITE ZINC PAN TORX 30 |
| 15 | OFUHA | HANDLE ASSEMBLY |
5.2 Trolley-Bucket Assembly Parts Diagram
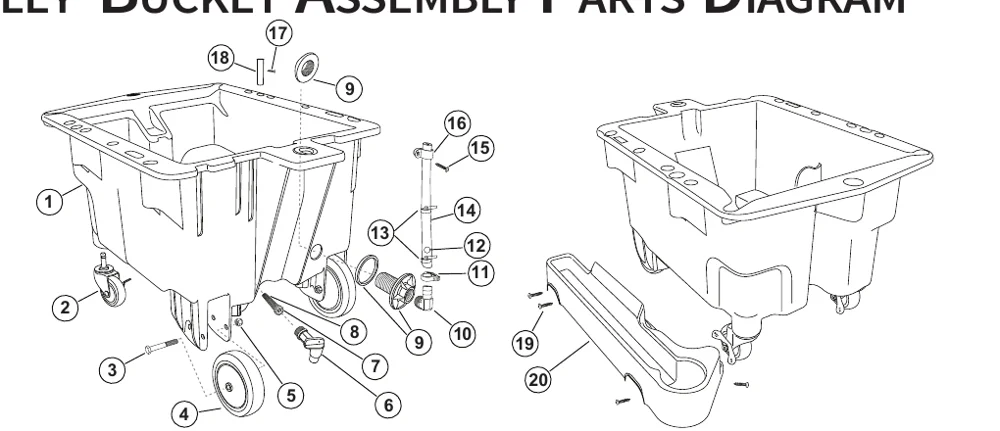
[P/N: KMF02, KMF04]
| # | PART NO. | PART DESCRIPTION |
|---|---|---|
| 1 | KMFBLK | OMNIFLEX TROLLEY BLACK |
| 2 | KMFCSTR3 | LOCKING CASTER |
| 2 | OFCSTR | OMNIFLEX 3 IN CASTER NO BRAKE |
| 3 | CSS302 | 3/18 - 16 X 2 3/4 HEX SCREW WHEEL |
| 4 | WH5KMF2 | 5 IN DIA REAR WHEEL |
| 5 | CSS311 | 3/8 - 16 NYLON LOCK NUT |
| 6 | KMB20SR | SUV 2 HOLE BROWN PLASTIC SPIGOT ASSEMBLY |
| 7 | CPS39V | VITON O-RING |
| 8 | CPS07 | PLASTIC FINGER FILTER |
| 9 | CSS330 | 1/2 IN GREY BULKHEAD FITTING |
| # | PART NO. | PART DESCRIPTION |
|---|---|---|
| 10 | CSS333 | 90 DEG BRASS 1/2 NPT X 1/2 BH |
| 11 | CSS114 | NYLON SNAP GRIP CLAMP SIZE F |
| 12 | CSS367 | 10MM RED PLASTIC BALL |
| 13 | KF009 | YELLOW TIES FOR KAIMOTION |
| 14 | ST9 | SIGHT TUBE 9 INCH |
| 15 | CSS208 | 8 X 1/2 SS TRUSS SCREW |
| 16 | CPS70 | HOSE TIE DOWN, BLACK |
| 17 | CSS17A | 8 SST SCREW 3/4 |
| 18 | OTP | OMNIFLEX TROLLEY POST .85 DIA X 3.5 LNG |
| 19 | CSS17A | 8 SST SCREW 3/4 |
| 20 | KF013A | SIDE TRAY FOR KAIMOTION FLEX |
Kaivac and KaiVac are trademarks of Kaivac, Inc. Southeastern Equipment & Supply is an independent dealer.