Free Shipping on Equipment & Parts orders of $200 or more! * Click for Restrictions

Have a question? 800-440-6723 International: 803-252-0100

English Se habla español
Parts β€Ί PartFinder β€Ί Advance Retriever 134B β€Ί Operator manual
Form 041346, Rev. 5/96
Advance Β· Battery walk-behind sweeper

Advance Retriever 134B Operator Manual

041346 Rev. 5/9614 pagesRetriever 134B, Model 467215
Before first use: charge the batteries overnight before you run the machine the first time.
Free to read, no account neededEvery page has its own linkPart numbers link to the part
COVER

OPERATOR MANUAL

Retrieverβ„’ 134Bβ€Œβ€Œβ€‹β β€Œβ€‹β€‹β€‹β€Œβ β€β€β β€β€‹β€Œβ β€β€‹β€β€‹β€‹β€‹β€‹β€‹β€‹β€‹β€Œβ€‹β€‹β€‹β€Œβ€‹β β€‹β€‹β€‹β€β€Œβ€‹β€Œβ β€Œβ β β β€Œβ€Œβ€Œβ€‹β€‹β β€Œβ€β€Œβ€‹β€Œβ€β€Œβ 

Model 467215

5/96 Form Number 041346

Cover artwork showing the ADVANCE brand name in large bold black letters running vertically along the left side of the page
Source: Advance Retriever 134B Operator Manual 041346 Rev. 5/96, page 1, used with permission. SES ref PF-IRYK-FAPHβ€Œβ€Œβ€‹β β€Œβ€‹β€‹β€‹β€Œβ β€β€β β€β€‹β€Œβ β€β€‹β€β€‹β€‹β€‹β€‹β€‹β€‹β€‹β€Œβ€‹β€‹β€‹β€Œβ€‹β β€‹β€‹β€‹β€β€Œβ€‹β€Œβ β€Œβ β β β€Œβ€Œβ€Œβ€‹β€‹β β€Œβ€β€Œβ€‹β€Œβ€β€Œβ 
Retriever 134B 041346 (5/96)Page 1 of 14
TABLE OF CONTENTS

TABLE OF CONTENTS

TopicPage
Introduction2
Parts and Service2
Nameplate2
Uncrating the Machine2
Important Safety Instructions3
Consignes de sΓ©curitΓ©4
Know Your Machine5
Preparing the Machine for Use6-7
Battery Installation6
To Install the Side Broom7
Operating the Machine8
After Using the Machine9
Batteries9
Maintenance10-11
Dust Control Filter10
Lubrication10
Broom Maintenance11
To Adjust the Main Broom11
To Replace the Main Broom11
Troubleshooting12
Technical Specifications13
Source: Advance Retriever 134B Operator Manual 041346 Rev. 5/96, page 2, used with permission. SES ref PF-M2R2-VK55β€Œβ€Œβ€‹β β€Œβ€‹β€‹β€‹β€Œβ β€β€β β€β€‹β€Œβ β€β€‹β€β€‹β€‹β€‹β€‹β€‹β€‹β€‹β€β€‹β€‹β€‹β€Œβ€‹β β€‹β€‹β€β€β€Œβ€‹β€β€‹β€Œβ β β€β€‹β€Œβ€Œβ€β€β€Œβ€Œβ€β β€Œβ€β€β€‹β€Œ
Retriever 134B 041346 (5/96)Page 2 of 14
INTRODUCTION

INTRODUCTION

In short This introduction explains that the manual should be read thoroughly before operating the machine, and that the product is for commercial use only. It also covers where to get parts and service, where to find the model and serial number, and what to do when the machine is delivered.β€Œβ€Œβ€‹β β€Œβ€‹β€‹β€‹β€Œβ β€β€β β€β€‹β€Œβ β€β€‹β€β€‹β€‹β€‹β€‹β€‹β€‹β€‹β β€‹β€‹β€‹β€Œβ€‹β β€‹β€‹β€β β€Œβ€‹β€β β€β€β€β€‹β€Œβ β€‹β€β€Œβ€β β€β β β€‹β β€‹β€

This manual will help you get the most from your Advance Retrieverβ„’ 134B. Read it thoroughly before operating the machine.β€Œβ€Œβ€‹β β€Œβ€‹β€‹β€‹β€Œβ β€β€β β€β€‹β€Œβ β€β€‹β€β€‹β€‹β€‹β€‹β€‹β€‹β€‹β β€‹β€‹β€‹β€Œβ€‹β β€‹β€‹β€β β€Œβ€‹β€β β€β€β€β€‹β€Œβ β€‹β€β€Œβ€β β€β β β€‹β β€‹β€

Note: Bold numbers in parentheses indicate an item illustrated on page 5.

This product is intended for commercial use only.

PARTS AND SERVICE

Repairs, when required, should be performed by your Authorized Advance Service Center, who employs factory trained service personnel, and maintains an inventory of Advance original replacement parts and accessories.

Call the ADVANCE DEALER named below for repair parts or service. Please specify the Model and Serial number when discussing your machine.

(Dealer, affix service sticker here.)

NAME PLATE

The Model and Serial Number of your machine are shown on the Nameplate on the rear of the machine. This information is needed when ordering repair parts for the machine. Use the space below to note the Model and Serial Number of your machine for future reference.

MODEL ____________

SERIAL NUMBER ____________

UNCRATING THE MACHINE

When the machine is delivered, carefully inspect the shipping carton and the machine for damage. If damage is evident, save the shipping carton so that it can be inspected. Contact the Advance Customer Service Department immediately to file a freight damage claim.

After removing the carton, cut the plastic strapping and remove the wooden blocks next to the wheels. Use a ramp to roll the machine from the pallet to the floor.

Source: Advance Retriever 134B Operator Manual 041346 Rev. 5/96, page 3, used with permission. SES ref PF-ZO7L-BE4Xβ€Œβ€Œβ€‹β β€Œβ€‹β€‹β€‹β€Œβ β€β€β β€β€‹β€Œβ β€β€‹β€β€‹β€‹β€‹β€‹β€‹β€‹β€‹β β€‹β€‹β€‹β€Œβ€‹β β€‹β€‹β€β β€Œβ€‹β€β β€β€β€β€‹β€Œβ β€‹β€β€Œβ€β β€β β β€‹β β€‹β€
Retriever 134B 041346 (5/96)Page 3 of 14
IMPORTANT SAFETY INSTRUCTIONS

IMPORTANT SAFETY INSTRUCTIONS

SYMBOLS

In short This section explains the DANGER, WARNING and CAUTION symbols used in the manual to signal hazards. Read the information carefully and take the steps needed to protect personnel and property.β€Œβ€Œβ€‹β β€Œβ€‹β€‹β€‹β€Œβ β€β€β β€β€‹β€Œβ β€β€‹β€β€‹β€‹β€‹β€‹β€‹β€‹β€Œβ€‹β€‹β€‹β€‹β€Œβ€‹β β€‹β€‹β€‹β β€‹β β€‹β€‹β€Œβ β€‹β€β€Œβ€‹β€Œβ€‹β€Œβ€Œβ€‹β€β€Œβ€Œβ€Œβ€β€‹β 

Advance uses the symbols below to signal potentially dangerous conditions. Read this information carefully and take the necessary steps to protect personnel and property.β€Œβ€Œβ€‹β β€Œβ€‹β€‹β€‹β€Œβ β€β€β β€β€‹β€Œβ β€β€‹β€β€‹β€‹β€‹β€‹β€‹β€‹β€Œβ€‹β€‹β€‹β€‹β€Œβ€‹β β€‹β€‹β€‹β β€‹β β€‹β€‹β€Œβ β€‹β€β€Œβ€‹β€Œβ€‹β€Œβ€Œβ€‹β€β€Œβ€Œβ€Œβ€β€‹β 

DANGER ! Is used to warn of immediate hazards that will cause severe personal injury or death.
WARNING ! Is used to call attention to a situation that could cause severe personal injury.
CAUTION ! Is used to call attention to a situation that could cause minor personal injury or damage to the machine or other property.

GENERAL SAFETY INSTRUCTIONS

In short These are general safety rules for using the walk-behind sweeper. Only trained and authorized personnel may use it, and it must be switched off before cleaning, maintenance or part replacement.

Specific Cautions and Warnings are included to warn you of potential danger of machine damage or bodily harm.

WARNING !
  • This walk-behind sweeper is not suitable for sweeping toxic substances. It is a U class machine.
  • The walk-behind sweeper must only be used by trained and authorized personnel.
  • Always switch the walk-behind sweeper OFF before performing any cleaning, maintenance, or part replacement operations.
  • Always park the walk-behind sweeper on a flat, level surface so the machine will not roll away.
  • Keep all bystanders, and particularly children, well clear of the walk-behind sweeper when in use.
  • Only charge the battery in a well ventilated area.
  • Remove the key when you finish work to avoid unauthorized use of the walk-behind sweeper.
  • Make sure that the motor is stopped before opening the electric motor compartment.
  • When transporting the walk-behind sweeper, make sure that it is securely anchored to the vehicle.
  • Always dispose of the debris according to all Designated Disposal Laws.
IMPORTANT ! Read these operating and maintenance instructions carefully before starting the walk-behind sweeper. Perform the operations listed in the scheduled maintenance table punctually to maintain the walk-behind sweeper at peak efficiency and to ensure a long working life.

SAVE THESE INSTRUCTIONS

Source: Advance Retriever 134B Operator Manual 041346 Rev. 5/96, page 4, used with permission. SES ref PF-RB5S-EI46β€Œβ€Œβ€‹β β€Œβ€‹β€‹β€‹β€Œβ β€β€β β€β€‹β€Œβ β€β€‹β€β€‹β€‹β€‹β€‹β€‹β€‹β€Œβ€‹β€‹β€‹β€‹β€Œβ€‹β β€‹β€‹β€‹β β€‹β β€‹β€‹β€Œβ β€‹β€β€Œβ€‹β€Œβ€‹β€Œβ€Œβ€‹β€β€Œβ€Œβ€Œβ€β€‹β 
Retriever 134B 041346 (5/96)Page 4 of 14
KNOW YOUR MACHINE

KNOW YOUR MACHINE

In short This page shows the machine with numbered callouts. The bold numbers in parentheses used in the text refer to these items, so you can find any control or component mentioned.β€Œβ€Œβ€‹β β€Œβ€‹β€‹β€‹β€Œβ β€β€β β€β€‹β€Œβ β€β€‹β€β€‹β€‹β€‹β€‹β€‹β€‹β€Œβ€β€‹β€‹β€‹β€Œβ€‹β β€‹β€‹β€β β β€β€‹β β€‹β β€‹β€‹β€β€β β β€β€β€β€Œβ β€‹β€β β€β€

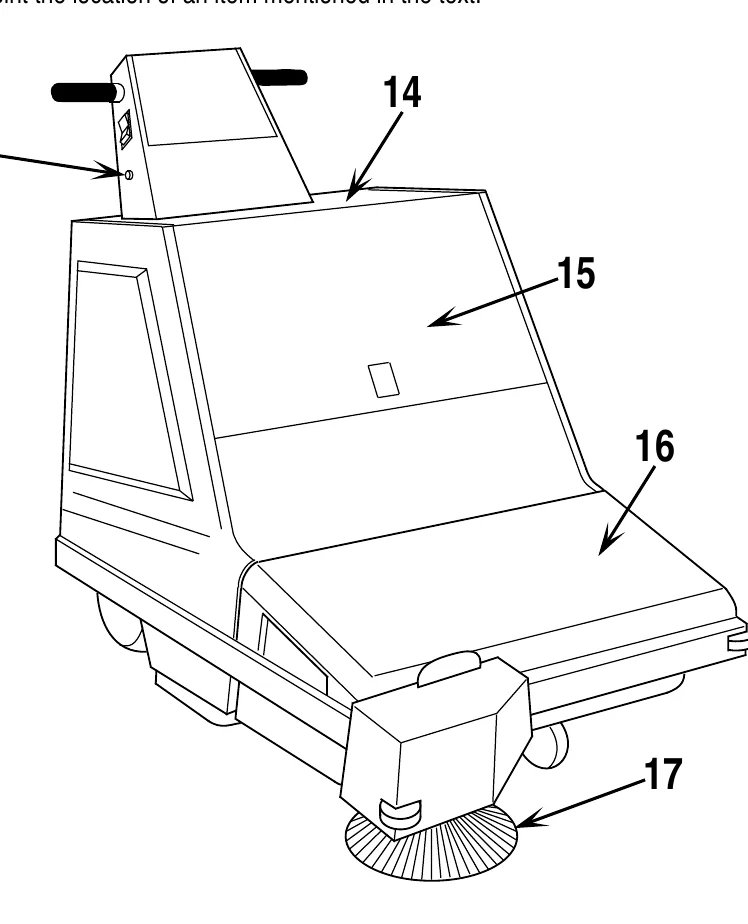
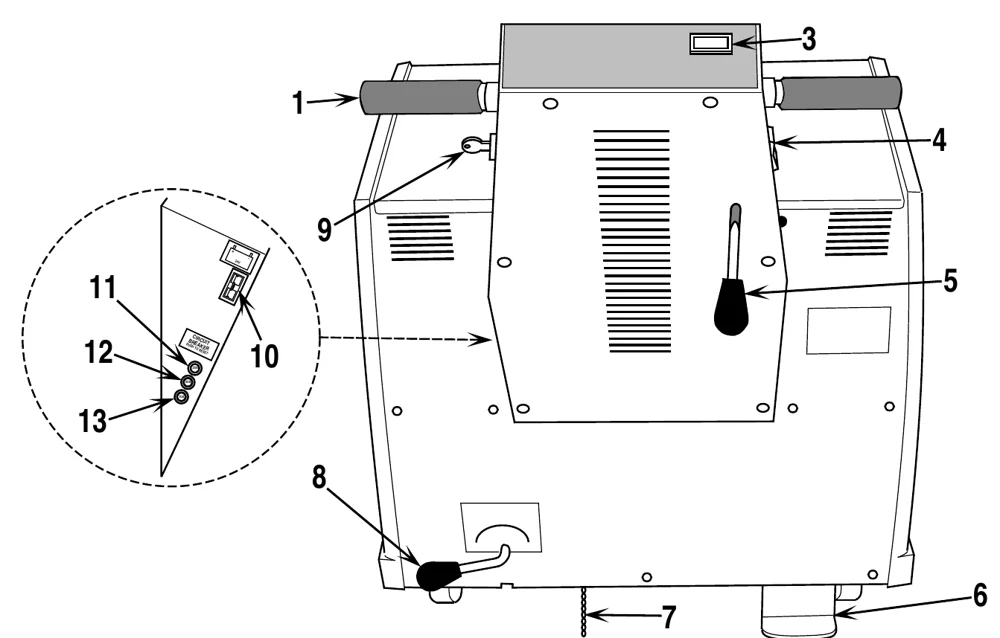
As you read this manual, you will occasionally run across a bold number in parentheses - example: (2). These numbers refer to an item on this page. Refer back to this page whenever necessary to pinpoint the location of an item mentioned in the text.β€Œβ€Œβ€‹β β€Œβ€‹β€‹β€‹β€Œβ β€β€β β€β€‹β€Œβ β€β€‹β€β€‹β€‹β€‹β€‹β€‹β€‹β€Œβ€β€‹β€‹β€‹β€Œβ€‹β β€‹β€‹β€β β β€β€‹β β€‹β β€‹β€‹β€β€β β β€β€β€β€Œβ β€‹β€β β€β€

No.Item
1Control Handle Twist Grips
2Shaker Motor Switch
3Battery Gauge
4Brush Switch
5Parking Brake Lever
6Kick back Stand
7Static Arrestor
8Main Broom Height Adjustment Lever
9Master Switch ON/OFF
10Machine Battery Charger Plug
11Broom Motor Circuit Breaker
12Drive Motor Circuit Breaker
13Control Circuit Circuit Breaker
14Battery Compartment
15Shaker Motor / Dust Filter Access Door
16Hopper
17Side Broom
Three-quarter view of the sweeper from the front right with callouts: 2 shaker motor switch on the control column, 14 battery compartment, 15 shaker motor / dust filter access door, 16 hopper, and 17 side broom at the front corner
Top view of the machine with callouts: 1 control handle twist grips, 3 battery gauge, 4 brush switch, 5 parking brake lever, 6 kick back stand, 7 static arrestor, 8 main broom height adjustment lever, 9 master switch; a dashed circular detail shows 10 battery charger plug and circuit breakers 11, 12 and 13
Source: Advance Retriever 134B Operator Manual 041346 Rev. 5/96, page 6, used with permission. SES ref PF-TQN3-RZRSβ€Œβ€Œβ€‹β β€Œβ€‹β€‹β€‹β€Œβ β€β€β β€β€‹β€Œβ β€β€‹β€β€‹β€‹β€‹β€‹β€‹β€‹β€Œβ€β€‹β€‹β€‹β€Œβ€‹β β€‹β€‹β€β β β€β€‹β β€‹β β€‹β€‹β€β€β β β€β€β€β€Œβ β€‹β€β β€β€
Retriever 134B 041346 (5/96)Page 6 of 14
PREPARING THE MACHINE FOR USE

PREPARING THE MACHINE FOR USE

BATTERY INSTALLATION

In short This section explains how to install the batteries in the machine. Inspect the batteries for damage, set them in the compartment as shown in Figure 1, connect and tighten the cables, then coat and cover the terminals. Installation should be done by an Advance Dealer or a Qualified Electrician.β€Œβ€Œβ€‹β β€Œβ€‹β€‹β€‹β€Œβ β€β€β β€β€‹β€Œβ β€β€‹β€β€‹β€‹β€‹β€‹β€‹β€‹β€Œβ β€‹β€‹β€‹β€Œβ€‹β β€‹β€‹β€β€β€β€Œβ β€Œβ€Œβ β β β€Œβ€β€‹β€Œβ€Œβ€β€Œβ β€β€Œβ€Œβ€Œβ β€
WARNING ! Use extreme caution when working with batteries. Sulfuric acid in batteries can cause severe injury if allowed to contact the skin or eyes. Explosive hydrogen gas is vented from inside the batteries through openings in the battery caps. This gas can be ignited by any electric arc, spark or flame.
WARNING ! When servicing batteries...
  • Remove all jewelry
  • Do not smoke
  • Wear safety glasses
  • Work in a well ventilated area
  • Do not allow tools to touch more than one battery terminal at a time
CAUTION ! Electrical components in this machine can be severely damaged if the batteries are not installed and connected properly. Batteries should be installed by your local Advance Dealer or by a Qualified Electrician.
  1. Remove the batteries from their shipping crate and carefully inspect them for cracks or other damage. If damage is evident, contact the trucking company that delivered them or the battery manufacturer to file a damage claim.
  2. Open the hood and remove the battery cables from inside. Make sure that the Master Switch is in the OFF position.
  3. Carefully lift the batteries into the battery compartment and arrange them exactly as shown in Figure 1.
  4. The terminals on the battery cables are marked (+) for positive and (-) for negative. Install the battery cables as shown in Figure 1, with the terminals marked (+) on the positive battery terminals and the terminals marked (-) on the negative battery terminals. Position the cables so that all battery caps can be easily removed for battery service.
  5. Carefully tighten the nut on each battery terminal until the terminal will not turn on the battery posts. Then tighten the nut one more full turn. Do not over tighten the terminals, or they will be very difficult to remove for future service.
  6. Coat all of the terminals and posts with grease, petroleum jelly or spray-on battery terminal coating (available at most auto parts stores).
  7. Put one of the black rubber β€œboots” over each of the terminals and use the plastic tie straps to hold them in place.
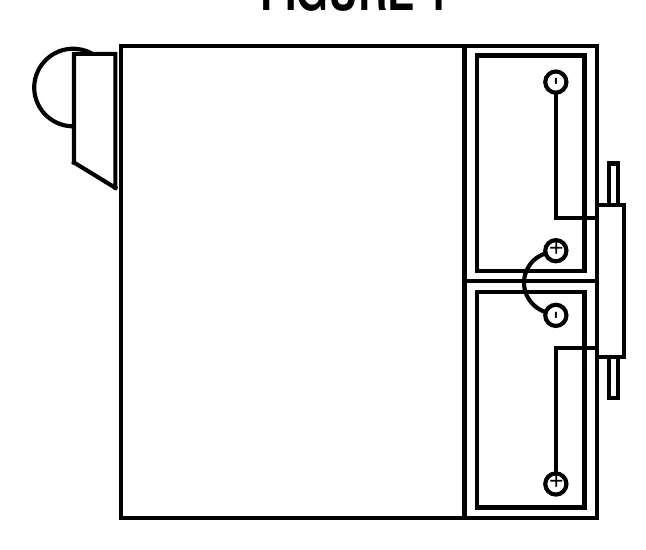
Top view of the battery compartment showing two batteries stacked side by side at the right end of the machine outline, with battery cables connecting the positive (+) and negative (-) terminals and a connector at the right edge
FIGURE 1
Source: Advance Retriever 134B Operator Manual 041346 Rev. 5/96, page 7, used with permission. SES ref PF-UN24-PCNBβ€Œβ€Œβ€‹β β€Œβ€‹β€‹β€‹β€Œβ β€β€β β€β€‹β€Œβ β€β€‹β€β€‹β€‹β€‹β€‹β€‹β€‹β€Œβ β€‹β€‹β€‹β€Œβ€‹β β€‹β€‹β€β€β€β€Œβ β€Œβ€Œβ β β β€Œβ€β€‹β€Œβ€Œβ€β€Œβ β€β€Œβ€Œβ€Œβ β€
Retriever 134B 041346 (5/96)Page 7 of 14
PREPARING THE MACHINE FOR USE

PREPARING THE MACHINE FOR USE

TO INSTALL THE SIDE BROOM

In short This procedure shows how to attach the side broom to the machine. Slide the broom onto the mounting plate at the front right corner, then plug its electrical cable into the outlet on the frame.β€Œβ€Œβ€‹β β€Œβ€‹β€‹β€‹β€Œβ β€β€β β€β€‹β€Œβ β€β€‹β€β€‹β€‹β€‹β€‹β€‹β€‹β€β€‹β€‹β€‹β€‹β€Œβ€‹β β€‹β€‹β€Œβ€β€Œβ€β€β€Œβ€‹β€‹β β β€‹β€Œβ€‹β€‹β€‹β β€β€Œβ€β€‹β€β€‹β€‹β€
  1. Push the spring plate on the side broom assembly and slide onto side broom mounting plate located at the front right corner of the machine.
  2. Plug the electrical cable of the side broom into the outlet on the machine frame.

FIGURE 2
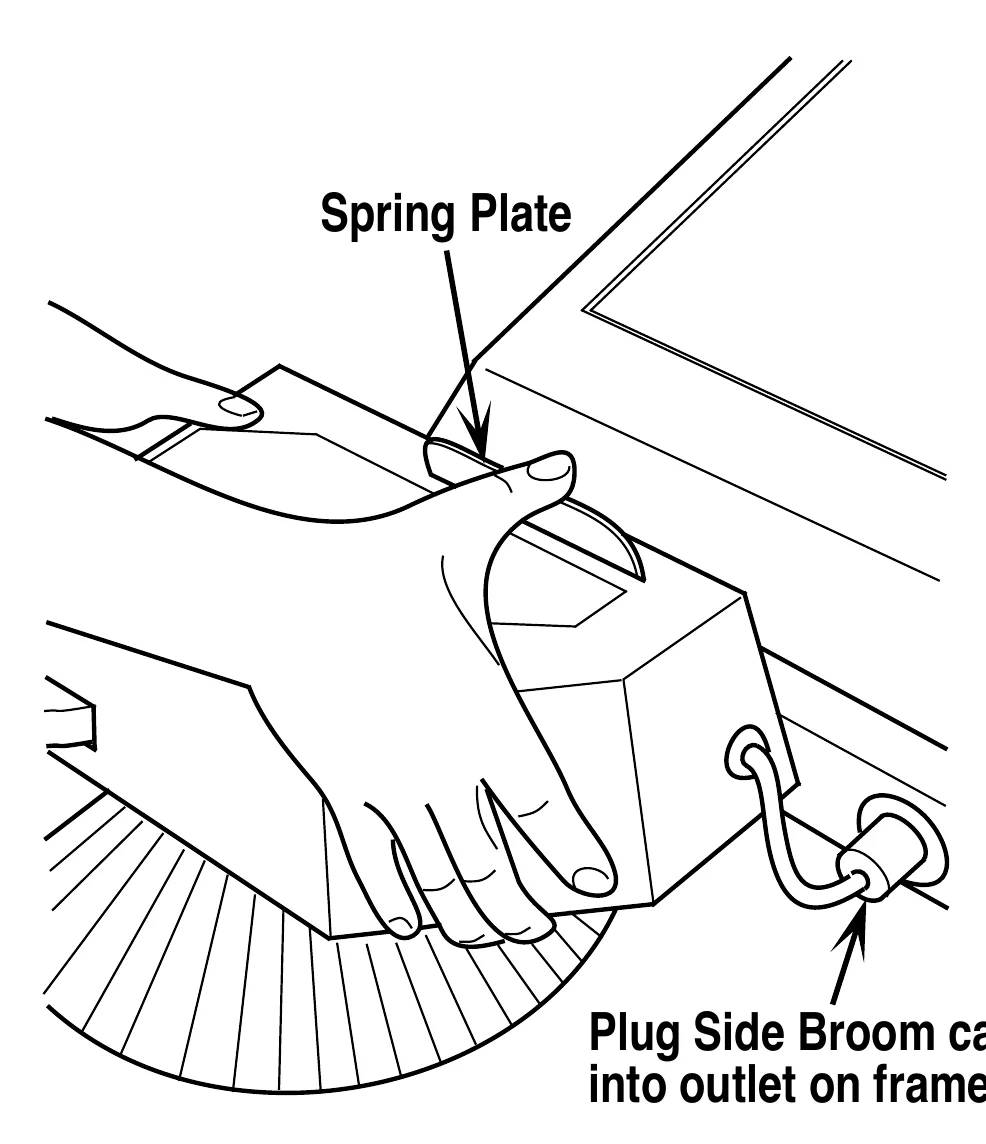
Drawing of two hands pushing the spring plate on the side broom assembly onto the mounting plate at the front right corner of the machine, with the side broom cable shown being plugged into the outlet on the frame. Callouts: Spring Plate and Plug Side Broom cable into outlet on frame.
FIGURE 2
Source: Advance Retriever 134B Operator Manual 041346 Rev. 5/96, page 8, used with permission. SES ref PF-IMS7-NNPJβ€Œβ€Œβ€‹β β€Œβ€‹β€‹β€‹β€Œβ β€β€β β€β€‹β€Œβ β€β€‹β€β€‹β€‹β€‹β€‹β€‹β€‹β€β€‹β€‹β€‹β€‹β€Œβ€‹β β€‹β€‹β€Œβ€β€Œβ€β€β€Œβ€‹β€‹β β β€‹β€Œβ€‹β€‹β€‹β β€β€Œβ€β€‹β€β€‹β€‹β€
Retriever 134B 041346 (5/96)Page 8 of 14
OPERATING THE MACHINE

OPERATING THE MACHINE

In short This section explains how to sweep with the Retriever 134B once it has been prepared: switch on the master switch and brooms, use the side broom for edges, then finish with the main broom. It also covers emptying the hopper and shaking the filter on very dusty floors.β€Œβ€Œβ€‹β β€Œβ€‹β€‹β€‹β€Œβ β€β€β β€β€‹β€Œβ β€β€‹β€β€‹β€‹β€‹β€‹β€‹β€‹β€β€Œβ€‹β€‹β€‹β€Œβ€‹β β€‹β€‹β€Œβ β€β€Œβ€‹β€Œβ β€‹β β€‹β€‹β€β€Œβ€‹β€Œβ€Œβ€‹β€Œβ€Œβ β β€β€β 

With the machine prepared as covered in the previous section, you are ready to operate the Retriever 134B.β€Œβ€Œβ€‹β β€Œβ€‹β€‹β€‹β€Œβ β€β€β β€β€‹β€Œβ β€β€‹β€β€‹β€‹β€‹β€‹β€‹β€‹β€β€Œβ€‹β€‹β€‹β€Œβ€‹β β€‹β€‹β€Œβ β€β€Œβ€‹β€Œβ β€‹β β€‹β€‹β€β€Œβ€‹β€Œβ€Œβ€‹β€Œβ€Œβ β β€β€β 

  1. Turn the Master Switch (9) ON.
  2. Set the Main Broom Lever (8) to the number 1 position.
  3. Turn the main broom on by switching Brush Switch (4) to the up position.
  4. Lower the Side Broom (17) (if so equipped) so that the front right third of the brush is touching the floor as shown in Figure 3. Plug Side Broom electrical cord into outlet at front of machine.
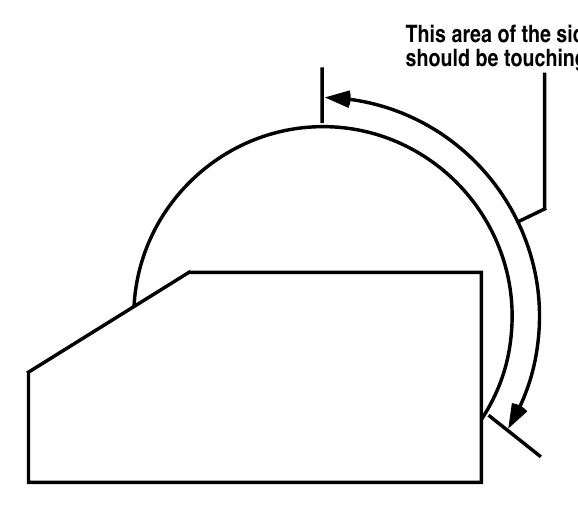
Side view of the side brush from above-front, showing a circular brush partly under the machine body, with an arrow along the brush edge and a callout line pointing to the area of the side brush that should be touching the floor
FIGURE 3
  1. Turn on the side and main broom by pushing Brush Switch (4) to the down position. Do all edge sweeping using the side broom, then raise the side broom and finish sweeping with only the main broom. This procedure will minimize airborne dust generated by the side broom.
  2. Rotate the Control Handle Twist Grips (1) forward to propel forward, backward to propel in reverse.
  3. Check hopper periodically and empty when needed. To empty hopper, turn Master Switch (9) and Brush Switch (4) OFF. Lift Hopper (16) out of machine as shown in Figure 4.
  4. When sweeping extremely dusty floors, it will be necessary to stop sweeping and push the Shaker Motor Switch (2). Hold the button in for about 10-15 seconds to operate the filter shaker, repeat 5 times in succession to clean the filter thoroughly.
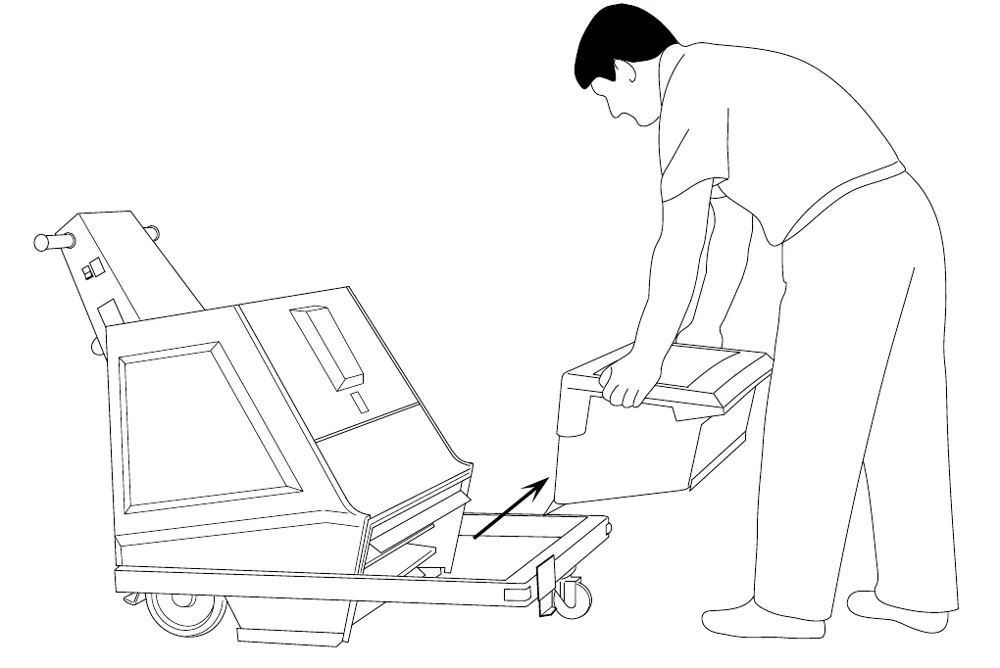
Operator bending over and lifting the hopper out of the front of the machine, with an arrow showing the direction the hopper slides out
FIGURE 4
Note: Avoid sweeping wet surfaces. Moisture laden air will mix with dust accumulated on panel filter causing permanent clogging. For additional information on care and maintenance of filter, see page 10.
Source: Advance Retriever 134B Operator Manual 041346 Rev. 5/96, page 9, used with permission. SES ref PF-FBEM-CQXAβ€Œβ€Œβ€‹β β€Œβ€‹β€‹β€‹β€Œβ β€β€β β€β€‹β€Œβ β€β€‹β€β€‹β€‹β€‹β€‹β€‹β€‹β€β€Œβ€‹β€‹β€‹β€Œβ€‹β β€‹β€‹β€Œβ β€β€Œβ€‹β€Œβ β€‹β β€‹β€‹β€β€Œβ€‹β€Œβ€Œβ€‹β€Œβ€Œβ β β€β€β 
Retriever 134B 041346 (5/96)Page 9 of 14
AFTER USE

AFTER USE

In short After use, shake the filter, empty the hopper, raise the side broom, park the machine and turn it off. Charge the batteries in a ventilated area if the machine ran more than an hour or the fuel gauge flashes twice, then check the battery fluid after each charge.β€Œβ€Œβ€‹β β€Œβ€‹β€‹β€‹β€Œβ β€β€β β€β€‹β€Œβ β€β€‹β€β€‹β€‹β€‹β€‹β€‹β€‹β€β€β€‹β€‹β€‹β€Œβ€‹β β€‹β€‹β€Œβ€β€‹β€Œβ€‹β€‹β€Œβ€‹β€Œβ€Œβ€Œβ€‹β€‹β β€Œβ β€β€Œβ€β€Œβ β€Œβ€‹β€‹

Batteries and chargers: make sure your charger is compatible with your batteries, and set its charging algorithm to your battery pack before you use it.

  1. Push in the Shaker Motor Switch (2) to operate the filter shaker as previously described in operation section.
  2. Empty the Hopper (16).
  3. Put the Side Broom (17) (if so equipped) in the raised position so the bristles do not touch the floor.
  4. Move the machine to its storage area and turn the Master Switch (9) OFF and lift the Parking Brake Lever (5).
  5. Charge the batteries if the machine has been used for more than one hour, or when you see a double flashing light on the Battery Fuel Gauge (3). See Battery Maintenance section for additional battery information.
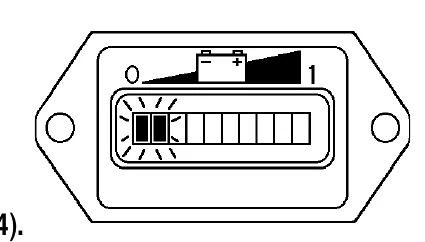
Battery fuel gauge with a scale from 0 to 1 and a battery symbol above it, showing a segmented bar with the first segments lit and flashing marks around them
WARNING ! Charge batteries in a well ventilated area.
Never smoke near batteries.
Never charge batteries near an open flame or spark.
Vent battery compartment while charging batteries by opening battery compartment cover (14).
  1. To charge, open the Battery Compartment Cover (14). Plug the battery charger into the Machine Battery Charger Plug (10), located on the left side of the Control Handle.
  2. Follow the battery charging instructions on the battery charger.

BATTERY MAINTENANCE

The fluid level in all battery cells should be checked after each charge. Add distilled water, if necessary, to bring the fluid level up to the bottom of the filler tube. Wipe any spilled water off of the batteries.β€Œβ€Œβ€‹β β€Œβ€‹β€‹β€‹β€Œβ β€β€β β€β€‹β€Œβ β€β€‹β€β€‹β€‹β€‹β€‹β€‹β€‹β€β€β€‹β€‹β€‹β€Œβ€‹β β€‹β€‹β€Œβ€β€‹β€Œβ€‹β€‹β€Œβ€‹β€Œβ€Œβ€Œβ€‹β€‹β β€Œβ β€β€Œβ€β€Œβ β€Œβ€‹β€‹

CAUTION ! Do not overfill the batteries.
Do not add water before charging the batteries.
Source: Advance Retriever 134B Operator Manual 041346 Rev. 5/96, page 10, used with permission. SES ref PF-X3I4-Z5JSβ€Œβ€Œβ€‹β β€Œβ€‹β€‹β€‹β€Œβ β€β€β β€β€‹β€Œβ β€β€‹β€β€‹β€‹β€‹β€‹β€‹β€‹β€β€β€‹β€‹β€‹β€Œβ€‹β β€‹β€‹β€Œβ€β€‹β€Œβ€‹β€‹β€Œβ€‹β€Œβ€Œβ€Œβ€‹β€‹β β€Œβ β€β€Œβ€β€Œβ β€Œβ€‹β€‹
Retriever 134B 041346 (5/96)Page 10 of 14
MAINTENANCE

MAINTENANCE

DUST CONTROL FILTER

In short The dust control filter is removed and cleaned weekly, along with its compartment, taking care not to puncture the paper. Three cleaning methods are given: tapping, compressed air, or soaking and rinsing.β€Œβ€Œβ€‹β β€Œβ€‹β€‹β€‹β€Œβ β€β€β β€β€‹β€Œβ β€β€‹β€β€‹β€‹β€‹β€‹β€‹β€‹β€β β€‹β€‹β€‹β€Œβ€‹β β€‹β€‹β€Œβ€Œβ€‹β€β€β€Œβ β β€‹β β€Œβ€‹β€‹β β β€‹β β€Œβ€Œβ β€‹β€‹β€β€
CAUTION ! Wear eye protection when cleaning the filter.
Be careful not to puncture the paper in the filter.
Clean the filter in a well ventilated area.

Weekly, remove the dust control filter and clean with a vacuum or compressed air, being careful not to cause a puncture in the filter. Clean the filter compartment and reinstall the filter.β€Œβ€Œβ€‹β β€Œβ€‹β€‹β€‹β€Œβ β€β€β β€β€‹β€Œβ β€β€‹β€β€‹β€‹β€‹β€‹β€‹β€‹β€β β€‹β€‹β€‹β€Œβ€‹β β€‹β€‹β€Œβ€Œβ€‹β€β€β€Œβ β β€‹β β€Œβ€‹β€‹β β β€‹β β€Œβ€Œβ β€‹β€‹β€β€

  1. Open the Access Door (15) and remove the shaker motor assembly as shown in Figure 5.
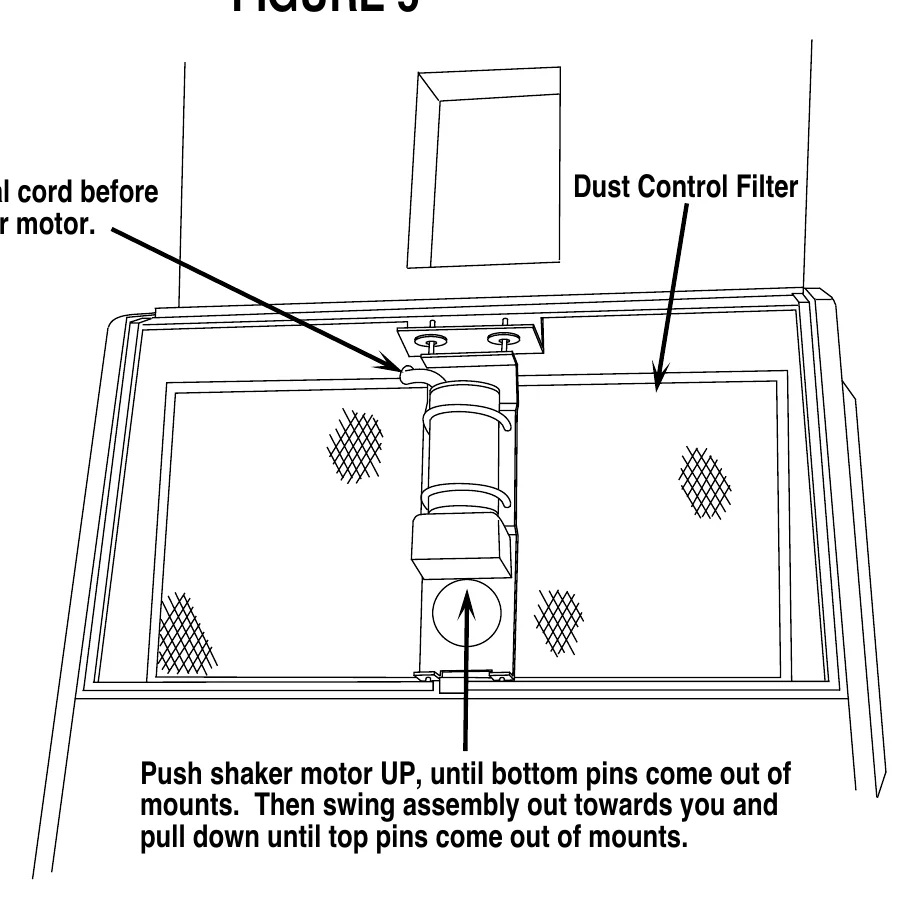
Open filter compartment showing the shaker motor assembly mounted over the dust control filter, with a separate dust control filter panel drawn above. Callouts: unplug electrical cord before removing shaker motor; dust control filter; push shaker motor UP until bottom pins come out of mounts, then swing assembly out towards you and pull down until top pins come out of mounts.
FIGURE 5
  1. Use one of the methods below to clean the dust control filter.

Method A: Gently tap the filter to remove loose dust and dirt.

Method B: Blow compressed air (100 psi max.) into the inside (clean side) of the filter (in the opposite direction of the air flow).

Method C: Soak the filter in warm water for 15 minutes, then rinse it under a gentle stream of water (40 psi max.). Let the filter dry completely before putting it back into the machine.

LUBRICATION

In short The rear drive axle has 4 grease zerks that are greased with a grease gun every 6 months. Pump grease into each fitting until it seeps out around the bearings.

There are 4 grease zerks on the rear drive axle. Use a grease gun to lubricate all zerk fittings every 6 months. Pump grease into each fitting until you can see grease seeping out around the bearings.

Source: Advance Retriever 134B Operator Manual 041346 Rev. 5/96, page 11, used with permission. SES ref PF-OJEP-5SV3β€Œβ€Œβ€‹β β€Œβ€‹β€‹β€‹β€Œβ β€β€β β€β€‹β€Œβ β€β€‹β€β€‹β€‹β€‹β€‹β€‹β€‹β€β β€‹β€‹β€‹β€Œβ€‹β β€‹β€‹β€Œβ€Œβ€‹β€β€β€Œβ β β€‹β β€Œβ€‹β€‹β β β€‹β β€Œβ€Œβ β€‹β€‹β€β€
Retriever 134B 041346 (5/96)Page 11 of 14
MAINTENANCE

MAINTENANCE

BROOM MAINTENANCE

In short This section explains how to adjust the main broom for hard floors and carpet, and how to replace it when it is worn out. Turn off the Master Switch before servicing the broom, and never work under the machine without a jackstand.β€Œβ€Œβ€‹β β€Œβ€‹β€‹β€‹β€Œβ β€β€β β€β€‹β€Œβ β€β€‹β€β€‹β€‹β€‹β€‹β€‹β€‹β β€‹β€‹β€‹β€‹β€Œβ€‹β β€‹β€‹β β β β€Œβ€Œβ€‹β β€‹β β€Œβ€β€β€β€‹β€‹β β€β€Œβ€‹β€‹β€Œβ€‹β€Œβ 
WARNING! Turn off Master Switch before servicing broom.

Periodically check the main broom housing for string, rope, wire, etc., which may be wrapped around the broom. Adjust the main broom down to compensate for wear.β€Œβ€Œβ€‹β β€Œβ€‹β€‹β€‹β€Œβ β€β€β β€β€‹β€Œβ β€β€‹β€β€‹β€‹β€‹β€‹β€‹β€‹β β€‹β€‹β€‹β€‹β€Œβ€‹β β€‹β€‹β β β β€Œβ€Œβ€‹β β€‹β β€Œβ€β€β€β€‹β€‹β β€β€Œβ€‹β€‹β€Œβ€‹β€Œβ 

To Adjust the Main Broom For Hard Floor Use...

  1. Move the machine to a flat, smooth part of the floor.
  2. Set the Broom Adjustment Lever (8) to position 1.
  3. Turn on the Master Switch (9).
  4. Turn on the Brush Switch (4) and allow the main broom to run about 30 to 60 seconds.
  5. Turn off the main broom, move the machine and inspect the polish mark left on the floor.
  6. Adjust the broom up or down with the Broom Adjustment Lever (8) until the polish mark is about 1 inch (2.54 cm) wide.

To Adjust the Main Broom For Use on carpet...

Follow the same adjustment procedure for hard floor use, then raise the broom one notch.

When the main broom is worn to the point where no adjustment is possible, replacement of the broom will be necessary.

To Replace the Main Broom...

WARNING! Turn off Master Switch before servicing broom.
  1. Remove the hopper (16).
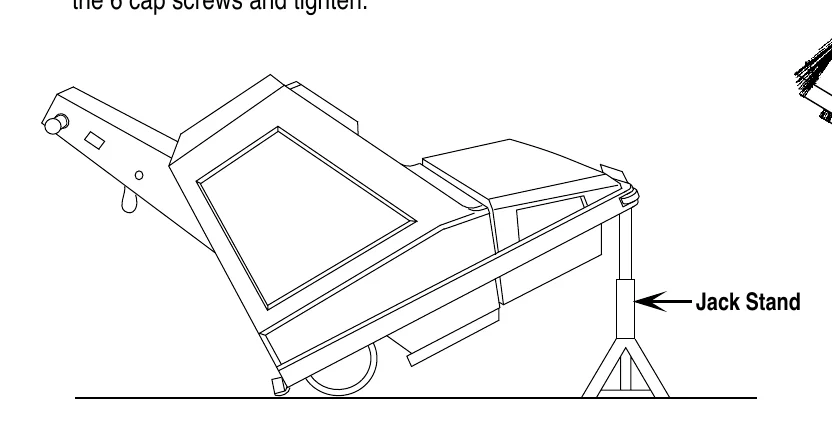
  2. Tip the machine back onto its kickstand (6).
WARNING! Never work under a machine without a jackstand.
  1. See Figure 6. Remove the 6 cap screws holding the main broom together.
  2. Remove the 2 broom halves and install new broom. Reinstall the 6 cap screws and tighten.
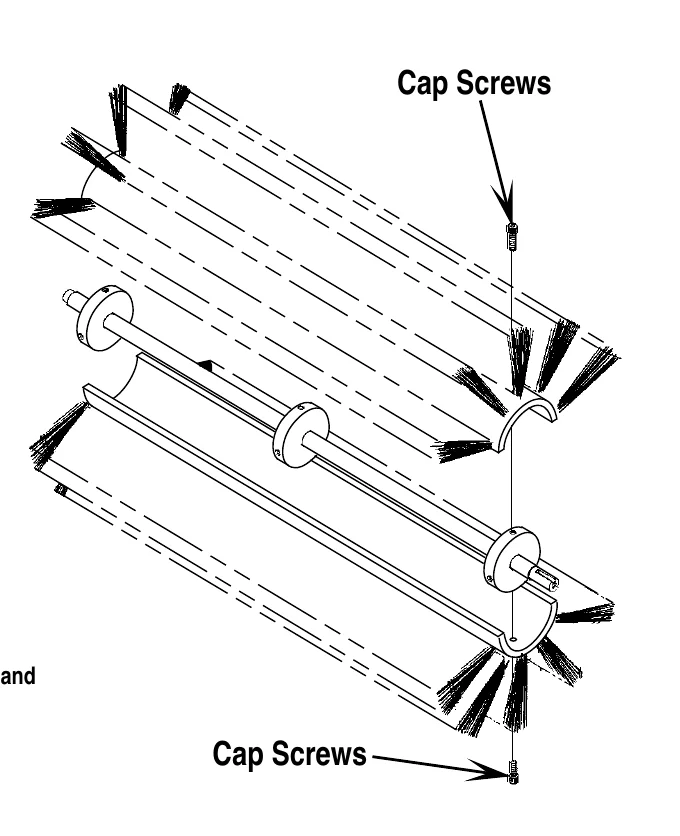
Exploded view of the main broom in two halves with bristles, shown with the shaft and end plates; arrows point to the cap screws at the top and bottom that hold the halves together
FIGURE 6
Side view of the machine tipped back and resting on a jack stand, with an arrow pointing to the Jack Stand
Source: Advance Retriever 134B Operator Manual 041346 Rev. 5/96, page 12, used with permission. SES ref PF-4V4B-YPY5β€Œβ€Œβ€‹β β€Œβ€‹β€‹β€‹β€Œβ β€β€β β€β€‹β€Œβ β€β€‹β€β€‹β€‹β€‹β€‹β€‹β€‹β β€‹β€‹β€‹β€‹β€Œβ€‹β β€‹β€‹β β β β€Œβ€Œβ€‹β β€‹β β€Œβ€β€β€β€‹β€‹β β€β€Œβ€‹β€‹β€Œβ€‹β€Œβ 
Retriever 134B 041346 (5/96)Page 12 of 14
TROUBLESHOOTING

TROUBLESHOOTING

In short This section lists likely causes for reduced running time, poor sweeping performance, poor dust control and tripped circuit breakers. If a circuit breaker has tripped, find the cause of the overload and then press the button to reset it.β€Œβ€Œβ€‹β β€Œβ€‹β€‹β€‹β€Œβ β€β€β β€β€‹β€Œβ β€β€‹β€β€‹β€‹β€‹β€‹β€‹β€‹β β€Œβ€‹β€‹β€‹β€Œβ€‹β β€‹β€‹β€‹β€Œβ€‹β€β€Œβ€‹β€β€Œβ€β β€Œβ€‹β€‹β€‹β€β€β β€‹β€β β€β€‹β€‹β€‹

REDUCED RUNNING TIME:

  • Main broom set too low
  • Parking brake applied
  • Batteries need to be charged
  • Have batteries tested by a Qualified Service Technician

POOR SWEEPING PERFORMANCE (MAIN BROOM)

  • Incorrect broom setting
  • Incorrect broom, see your authorized Advance servicing dealer
  • Full hopper

POOR SWEEPING PERFORMANCE (SIDE BROOM)

  • Incorrect broom setting

POOR DUST CONTROL

  • Clogged dust control filter

CIRCUIT BREAKERS

Circuit breakers protect the drive and broom motors and the control circuit from possible overload. If tripped, determine the cause of the overload, then press button to reset.β€Œβ€Œβ€‹β β€Œβ€‹β€‹β€‹β€Œβ β€β€β β€β€‹β€Œβ β€β€‹β€β€‹β€‹β€‹β€‹β€‹β€‹β β€Œβ€‹β€‹β€‹β€Œβ€‹β β€‹β€‹β€‹β€Œβ€‹β€β€Œβ€‹β€β€Œβ€β β€Œβ€‹β€‹β€‹β€β€β β€‹β€β β€β€‹β€‹β€‹

Source: Advance Retriever 134B Operator Manual 041346 Rev. 5/96, page 13, used with permission. SES ref PF-HK2N-IRQDβ€Œβ€Œβ€‹β β€Œβ€‹β€‹β€‹β€Œβ β€β€β β€β€‹β€Œβ β€β€‹β€β€‹β€‹β€‹β€‹β€‹β€‹β β€Œβ€‹β€‹β€‹β€Œβ€‹β β€‹β€‹β€‹β€Œβ€‹β€β€Œβ€‹β€β€Œβ€β β€Œβ€‹β€‹β€‹β€β€β β€‹β€β β€β€‹β€‹β€‹
Retriever 134B 041346 (5/96)Page 13 of 14
TECHNICAL SPECIFICATIONS

TECHNICAL SPECIFICATIONS

In short This section lists the technical data for the Retriever 134B, model number 467215. It covers electrical values, battery capacity, sound level, weights and hand-control vibration.β€Œβ€Œβ€‹β β€Œβ€‹β€‹β€‹β€Œβ β€β€β β€β€‹β€Œβ β€β€‹β€β€‹β€‹β€‹β€‹β€‹β€‹β β€β€‹β€‹β€‹β€Œβ€‹β β€‹β€‹β€β€β€‹β€β€Œβ€Œβ€‹β€Œβ€Œβ€β€β€‹β€‹β€β€‹β€Œβ€Œβ€‹β€‹β€β€‹β β€‹β€
ModelRetriever 134B
Model No.467215
CurrentA33
Voltage, batteriesV24V/2 x 12V
Battery capacityAh105
Sound pressure level as per ISO3744 (at operator)dB (A)/20Β΅Pa70
Total weight (with acc. and batteries)lbs/kg431 / 196
Net weight (without acc. and batteries)lbs/kg323 / 147
Vibrations at the Hand Controlsm/s2<2.5m/s2
Source: Advance Retriever 134B Operator Manual 041346 Rev. 5/96, page 14, used with permission. SES ref PF-XO2R-23CAβ€Œβ€Œβ€‹β β€Œβ€‹β€‹β€‹β€Œβ β€β€β β€β€‹β€Œβ β€β€‹β€β€‹β€‹β€‹β€‹β€‹β€‹β β€β€‹β€‹β€‹β€Œβ€‹β β€‹β€‹β€β€β€‹β€β€Œβ€Œβ€‹β€Œβ€Œβ€β€β€‹β€‹β€β€‹β€Œβ€Œβ€‹β€‹β€β€‹β β€‹β€
Retriever 134B 041346 (5/96)Page 14 of 14

Advance and Nilfisk are trademarks of Nilfisk A/S. Southeastern Equipment & Supply is an independent dealer.


Not Sure Which Machine Fits Your Floors?

Talk to a real SES tech about new, demo or certified reconditioned options, parts and service.

© 2026 Southeastern Equipment and Supply, Inc. All Rights Reserved.

Visa Discover AMEX Mastercard