Convertamatic™ 200E
OPERATOR MANUAL
Advance MODELS 56324004, 56324006
revised 3/97 Form Number 56041262
This manual replaces revisions 11/92 and 5/93
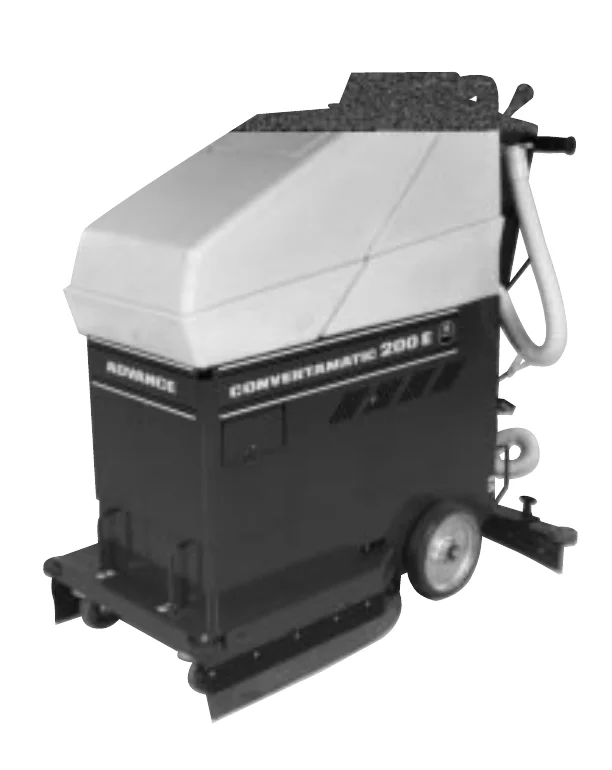
TABLE OF CONTENTS
| Section | Page |
|---|---|
| Introduction | 2 |
| Parts and Service | 2 |
| Nameplate | 2 |
| Uncrating | 2 |
| Important Safety Instructions | 3 |
| Importantes Mesures de Securite | 4 |
| Grounding Instructions | 5 |
| Know Your Machine | 6 |
| Preparing the Machine for Use | 7 |
| Brush or Pad Holder Installation | 7 |
| Filling the Solution Tank | 7 |
| Operating the Machine | 8 |
| Wet Scrubbing | 8 |
| Dry Buffing | 9 |
| Wet Vacuuming | 9 |
| After Use | 10 |
| Maintenance Schedule | 10 |
| Maintenance | 11 |
| Lubrication | 11 |
| Vacuum Motor Brushes | 11 |
| Squeegee Replacement (after serial #0536424) | 12 |
| Squeegee Angle Adjustment (after serial #0536424) | 12 |
| Squeegee Replacement (before serial #0536425) | 13 |
| Squeegee Angle Adjustment (before serial #0536425) | 13 |
| Troubleshooting | 14 |
| Circuit Breakers Tripping | 14 |
| Poor Water Pickup | 14 |
| Squeegee Streaks | 14 |
| Swirl Marks | 14 |
INTRODUCTION
This manual will help you get the most from your Advance Convertamatic™ 200E. Read it thoroughly before operating the machine.
Note: Bold numbers in parentheses indicate an item illustrated on page 6.
This product is intended for commercial use only.
PARTS AND SERVICE
Repairs, when required, should be performed by your Authorized Advance Service Center, which employs factory trained service personnel, and maintains an inventory of Advance original replacement parts and accessories.
Call the ADVANCE DEALER named below for repair parts or service. Please specify the Model Number and Serial Number when discussing your machine.
(Dealer, affix service sticker here.)
NAMEPLATE
The Model and Serial Number of your machine are shown on the Nameplate on the back of the machine. This information is needed when ordering repair parts for the machine. Use the space below to note the Model and Serial Number of your machine for future reference.
MODEL _____________________________________
SERIAL NUMBER _____________________________
UNCRATING
When the machine is delivered, carefully inspect the shipping carton and the machine for damage. If damage is evident, save the shipping carton so it can be inspected by the trucking company that delivered it. Contact the trucking company immediately to file a freight damage claim.
After removing the carton, cut the plastic straps and remove the wooden blocks next to the wheels. Use a ramp to roll the machine from the pallet to the floor.
IMPORTANT SAFETY INSTRUCTIONS
When using an electrical appliance, basic precautions should always be followed, including the following:
Read all instructions before use.
- Do not leave the appliance when it is plugged in. Unplug the unit from the outlet when not in use and before servicing.
- To avoid electric shock, do not expose to rain. Store indoors.
- Do not allow to be used as a toy. Close attention is necesary when used by or near children.
- Use only as described in this manual. Use only manufacturer's recommended attachments.
- Do not use with damaged cord or plug. If appliance is not working as it should, has been dropped, damaged, left outdoors, or dropped into water, return it to a service center.
- Do not pull or carry by cord, use cord as a handle, close a door on a cord, or pull cord around sharp edges or corners. Do not run appliance over cord. Keep cord away from heated surfaces.
- Do not unplug by pulling on cord. To unplug, grasp the plug, not the cord.
- Do not handle plug or appliance with wet hands.
- Do not put any object into openings. Do not use with any opening blocked; keep free of dust, lint, hair, and anything that may reduce air flow.
- Keep hair, loose clothing, fingers, and all parts of body away from openings and moving parts.
- Do not pick up anything that is burning or smoking, such as cigarettes, matches, or hot ashes.
- Turn off all controls before unplugging.
- Use extra care when cleaning on stairs.
- Do not use to pick up flammable or combustible liquids such as gasoline or use in areas where they may be present.
- Connect to a properly grounded outlet only. See grounding instructions.
SAVE THESE INSTRUCTIONS
GROUNDING INSTRUCTIONS
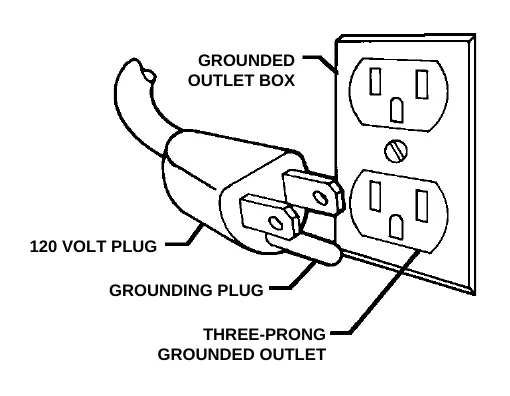
120 volt machines have this kind of three-prong plug at the end of a three-wire electrical cord. The grounding pin on this plug grounds the machine when it is plugged into a three-prong outlet.
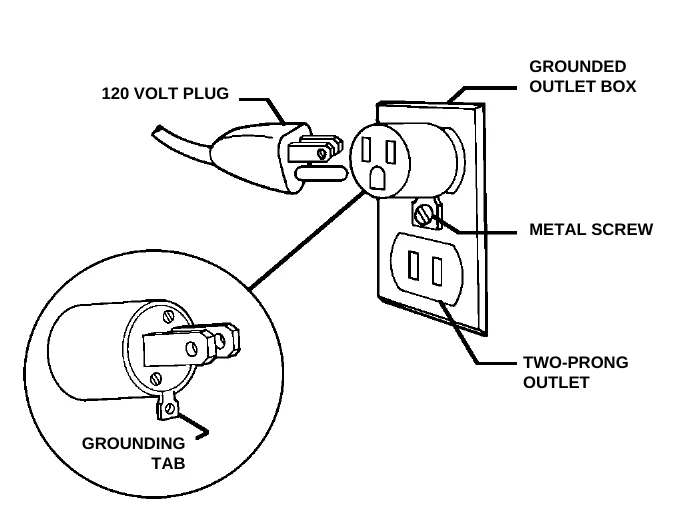
A grounding adapter must be installed as shown here if only two-prong outlets are available. The outlet box must be grounded and the grounding tab (or wire) on the adapter must be installed under the head of the screw in the center of the outlet cover. Grounding adapters for 120 volt plugs are available at most hardware stores.
Grounding adapters are not approved for use in Canada.
- Replace the plug if the grounding pin is damaged or broken.
- The green (or green/yellow) wire in the cord is the grounding wire. When replacing a plug, this wire must be attached to the grounding pin only.
- Extension cords connected to this machine should be 12 gauge, three-wire cords with three-prong plugs and outlets. Do not use extension cords more than 50 feet (15 m) long.
KNOW YOUR MACHINE
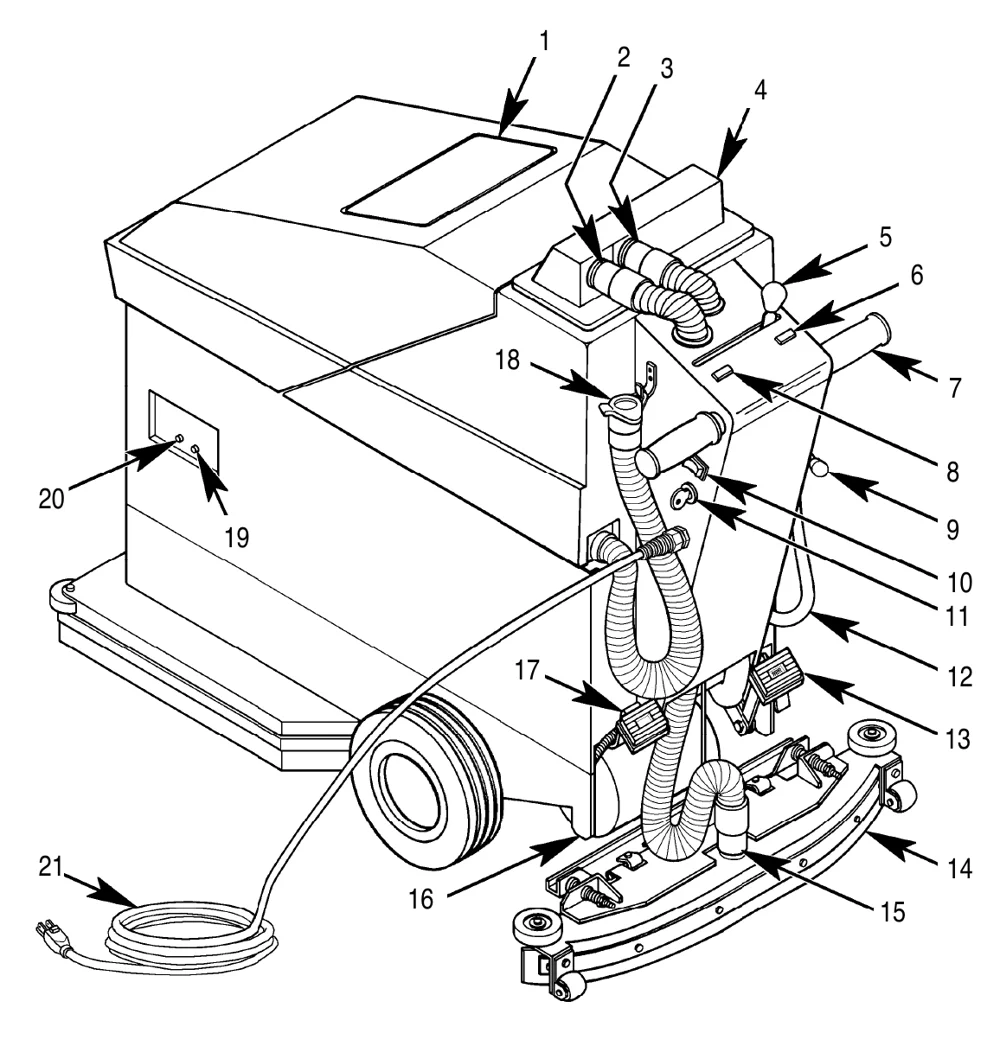
As you read this manual, you will occasionally run across a bold number in parentheses - example: (2). These numbers refer to an item shown on this page. Refer back to this page whenever necessary, to pinpoint the location of an item mentioned in the text.
| No. | Item |
|---|---|
| 1 | Solution Tank Fill |
| 2 | Recovery Hose |
| 3 | Vacuum Hose |
| 4 | Recovery Tank Cover |
| 5 | Squeegee Lever |
| 6 | Solution Auto Control ON Light (Blue) |
| 7 | Twist Grip |
| 8 | Master Power ON Light (Green) |
| 9 | Solution Rate of Flow Control Lever |
| 10 | Solution Switch, ON - OFF - Momentarily ON |
| 11 | Master Key Switch |
| 12 | Solution Tank Drain Hose |
| 13 | Brush Raise/Lower Pedal |
| 14 | Squeegee |
| 15 | Recovery Hose Connection |
| 16 | Tip-Back Leg |
| 17 | Tip-Back Pedal |
| 18 | Recovery Tank Drain Hose |
| 19 | Brush Motor Circuit Breaker 15A |
| 20 | Vacuum Motor Circuit Breaker 6A |
| 21 | Power Cord |
PREPARING THE MACHINE FOR USE
BRUSH OR PAD HOLDER INSTALLATION
- If using a pad, install the pad on the pad holder.
- To tip the machine back, step down on the Tip-Back Pedal (17) while pulling the handle back. The machine will rest on its two Tip-Back Legs (16).
- Align the slots on the brush or pad holder with the lugs on the drive hub.
- Turn the brush or pad holder until it locks in place.
FILLING THE SOLUTION TANK
Fill the solution tank (1) with ten gallons (37 liters) of cleaning solution. Do not fill the solution tank above three inches (7.5 cm) from the top of the tank. The solution should be a mixture of water and the proper cleaning chemical for the job. Always follow the dilution instructions on the chemical container label.
OPERATING THE MACHINE
WET SCRUBBING
Note: Bold numbers in parentheses indicate an item illustrated on page 6.
- Follow the instructions in the Preparing The Machine For Use section of this manual.
- Plug the Power Cord (21) into a properly grounded electrical outlet. Then turn the Master Key Switch (11) ON. The Green Light (8) will light up.
- Move the Squeegee Lever (5) to lower the squeegee and turn on the vacuum system.
- Turn the Solution Switch (10) ON. The Blue Light (6) will light up. Pull the Solution Lever (9) up half way.
- Step down and slide the Brush Raise / Lower Pedal (13) to to the left to lower the brush.
- Move the machine forward and rotate the Twist Grips (7) forward to start the brush motor and the solution flow. For best results, move the machine at a slow walking speed.
The brush and solution will only operate when the Twist Grips are rotated forward.
- Adjust the Solution Flow Control Lever (9) so a thin, even layer of solution can be seen in front of the Squeegee (14).
- The recovery tank has an automatic float shut-off to prevent solution from entering the vacuum system when the recovery tank is full. When the float closes, the recovery tank must be emptied. The machine will not pick up water with the float closed.
- When the recovery tank is full, turn the Solution Switch (10) OFF, raise the squeegee and the brush (or pad), and move the machine to a service area. To empty the recovery tank, remove the Recovery Drain Hose (18) from its hanger. Direct the hose to a floor drain or bucket and remove the plug.
OPERATING THE MACHINE
DRY BUFFING
- Make sure that the floor is clean, dry, and coated with a good floor finish product before polishing.
- Install a polishing brush or pad on the machine.
- Turn the Master Key Switch (11) ON.
- Lower the brush (or pad) to the floor and rotate the Twist Grips (7) to start the brush motor. Make overlapping passes with the solution OFF and the squeegee UP.
WET VACUUMING
Fit the machine with optional attachments for wet vacuuming.
- Disconnect the Recovery Hose (2) from the Recovery Tank Cover (4).
- Attach a 1-1/2" vacuum hose to the Recovery Tank Cover.
- Attach a two bend wand and squeegee tool to the hose.
- Turn the Master Key Switch (11) ON.
- Move the Squeegee Lever (5) to turn on the vacuum motor.
AFTER USE
- Raise the squeegee.
- Step DOWN on the Brush Raise/Lower Pedal (13) to raise the brush (or pad).
- To empty the Solution Tank, remove the Solution Drain Hose (12) from its hanger. Direct the hose to a floor drain or bucket and remove the plug. Draining the solution tank automatically cleans the in-line solution filter. Park the machine over a floor drain, then put clean water in the tank and hold the Solution Switch (10) in the Momentarily ON position. This will run water through the solution system and clean out the solution valve.
- Turn the Master Key Switch (11) OFF and remove the key. Unplug the Power Cord (21).
- To empty the Recovery Tank, remove the Recovery Drain Hose (18) from its hanger. Direct the hose to a floor drain or bucket and remove the plug. Rinse the tank with clean water. Inspect the recovery and vacuum hoses and replace if kinked or damaged.
- Remove the brush or pad holder. Rinse the brush or pad with warm water and hang it up to dry. Allow buffing pads to dry completely before using again.
- Remove the squeegee, rinse it with warm water and hang it up to dry.
- Check the maintenance schedule below and perform any required maintenance before storage.
MAINTENANCE SCHEDULE
| MAINTENANCE ITEM | DAILY | ONCE A MONTH | ONCE A YEAR |
|---|---|---|---|
| Clean and Inspect the Tanks and Hoses | • | ||
| Clean the Brushes/Pads | • | ||
| Clean the Squeegee | • | ||
| Lubrication | • | ||
| Vacuum Motor Carbon Brushes | • |
- Store the machine indoors in a clean, dry place.
MAINTENANCE
LUBRICATION
Once a month, pump grease into each grease fitting on the machine until grease seeps out around the bearings. Grease fittings locations are:
- (2) rear wheel bearing fittings
- (2) front caster wheel bearing fittings
Once a month, apply light machine oil to lubricate the following:
- Squeegee Lever pivot linkage
- Solution Flow Control Lever pivot points
VACUUM MOTOR BRUSHES
Have your Advance Dealer check the vacuum motor carbon brushes once a year.
MAINTENANCE
SQUEEGEE REPLACEMENT (after serial #0536424)
If the squeegee leaves narrow streaks of water, it is probably dirty or damaged. Remove the squeegee, rinse it under warm water and inspect the rear squeegee blade. Reverse or replace the squeegee blade if it is cut, torn, wavy or worn to a radius.
To Reverse or Replace the Squeegee Blade...
- Raise the squeegee.
- Remove the wing nuts, then unlock and remove the rear straps.
- Remove the rear squeegee blade from the tool.
- The rear squeegee blade has 4 working edges. Turn the blade so a sharp 90° edge points toward the front of the machine and against the floor. Replace the blade if all edges are nicked, torn or worn to a radius.
- Install the blade, the rear straps and the wing nuts.
Reverse or replace the front blade if cut, torn, wavy or worn to a radius.
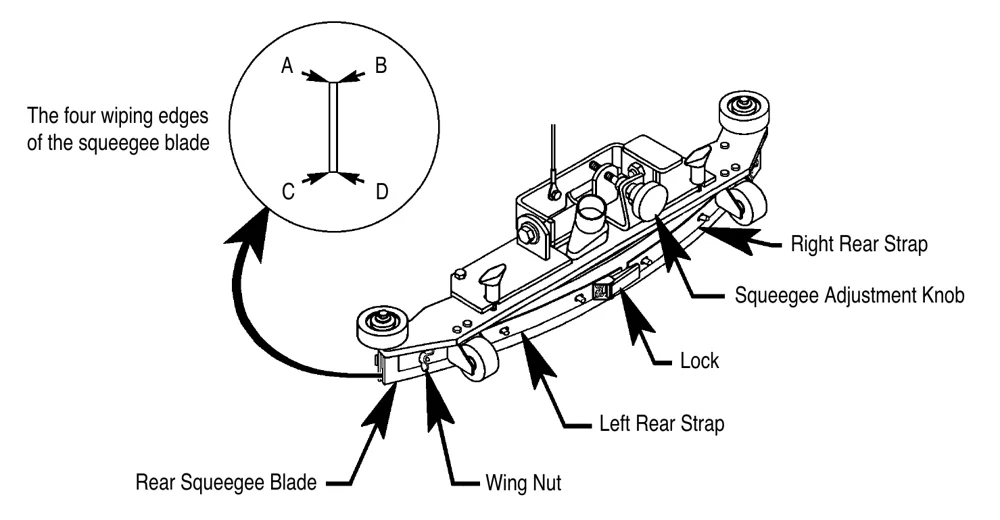
SQUEEGEE ANGLE ADJUSTMENT (after serial #0536424)
Adjust the squeegee angle whenever a blade is replaced, or if the squeegee is not wiping the floor dry.
To Adjust the Squeegee Angle...
- Park the machine on a flat, even surface.
- Lower the squeegee.
- Turn the Squeegee Adjustment Knob until the rear squeegee blade touches the floor evenly across its entire width.
MAINTENANCE
SQUEEGEE REPLACEMENT (before serial #0536425)
If the squeegee leaves narrow streaks of water, it is probably dirty or damaged. Remove the squeegee, rinse it under warm water and inspect the squeegee blade. Reverse or replace the squeegee blade if it is cut, torn, wavy or worn to a radius.
To Reverse or Replace the Squeegee Blade...
- Raise the squeegee.
- Remove the nuts and the rear strap, then remove the rear blade from the tool.
- The rear squeegee blade has 4 working edges. Turn the blade so a sharp 90° edge points toward the front of the machine and against the floor. Replace the blade if all edges are nicked, torn or worn to a radius.
- Install the blade, the rear strap and the nuts.
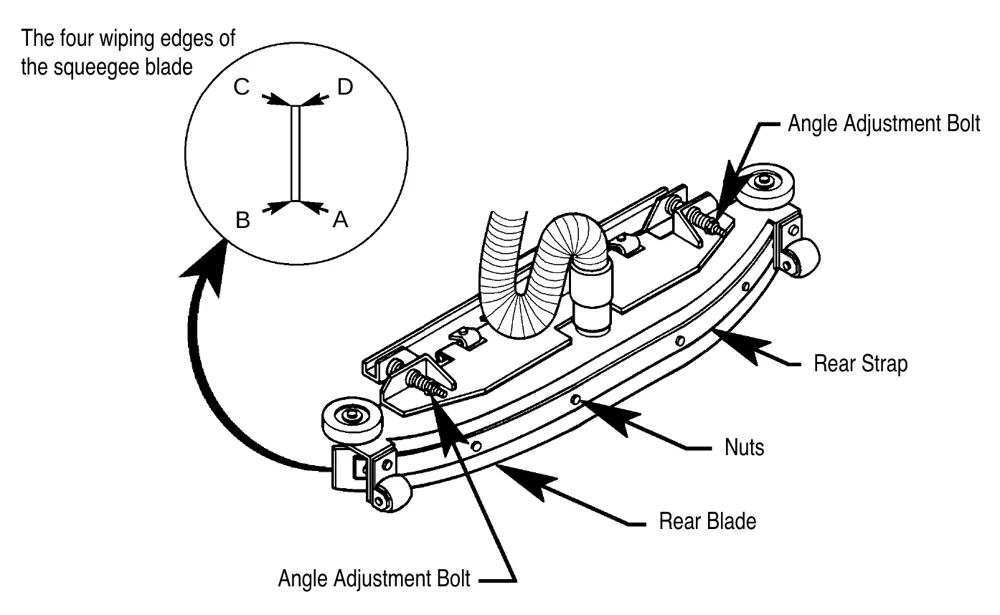
SQUEEGEE ANGLE ADJUSTMENT (before serial #0536425)
Adjust the squeegee angle whenever a blade is replaced, or if the squeegee is not wiping the floor dry.
To Adjust the Squeegee Angle...
- Park the machine on a flat, even surface.
- Lower the squeegee.
- Turn the Squeegee Adjustment Bolts until the rear squeegee blade touches the floor evenly across its entire width.
TROUBLESHOOTING
CIRCUIT BREAKERS TRIPPING
Circuit breakers protect electrical circuits and motors from damage due to overload conditions. If a circuit breaker trips, turn the Master Key Switch (11) OFF and unplug the machine. Then try to determine the cause. Once the problem has been corrected, reset the circuit breaker by pushing the button in. If the button does not stay in, wait 5 minutes and try again. If the circuit breaker trips repeatedly, call your local Advance Dealer for service.
Possible causes for the Brush Motor Circuit Breaker (19) tripping may be:
- Damaged brush motor (bearings, etc.)
- Incorrect brush or pad for the application
- Debris wrapped around brush (or pad) drive pulleys
Possible causes for the Vacuum Motor Circuit Breaker (20) tripping may be:
- Foam going into vacuum motor (using high-sudsing soap)
- Recovery Tank Float not closing (drawing water through the vacuum motor)
- Vacuum motor requires service (carbon brushes, bearings, etc.)
POOR WATER PICKUP
- Recovery tank full, shut-off float closed
- Cover not sealing against the top of the tank
- Plugged vacuum system (inspect squeegee and hoses)
- Cracked, damaged, or disconnected vacuum hoses
- Drain plug open
- Incorrectly adjusted squeegee
SQUEEGEE STREAKS
- Debris under the squeegee blade
- Worn, nicked or torn squeegee blade
- Incorrectly adjusted squeegee
SWIRL MARKS
- Running the machine with a dry brush or pad (no cleaning solution)
- Debris caught in brush or pad
Advance and Nilfisk are trademarks of Nilfisk A/S. Southeastern Equipment & Supply is an independent dealer.